background image

8

MV-410HS 

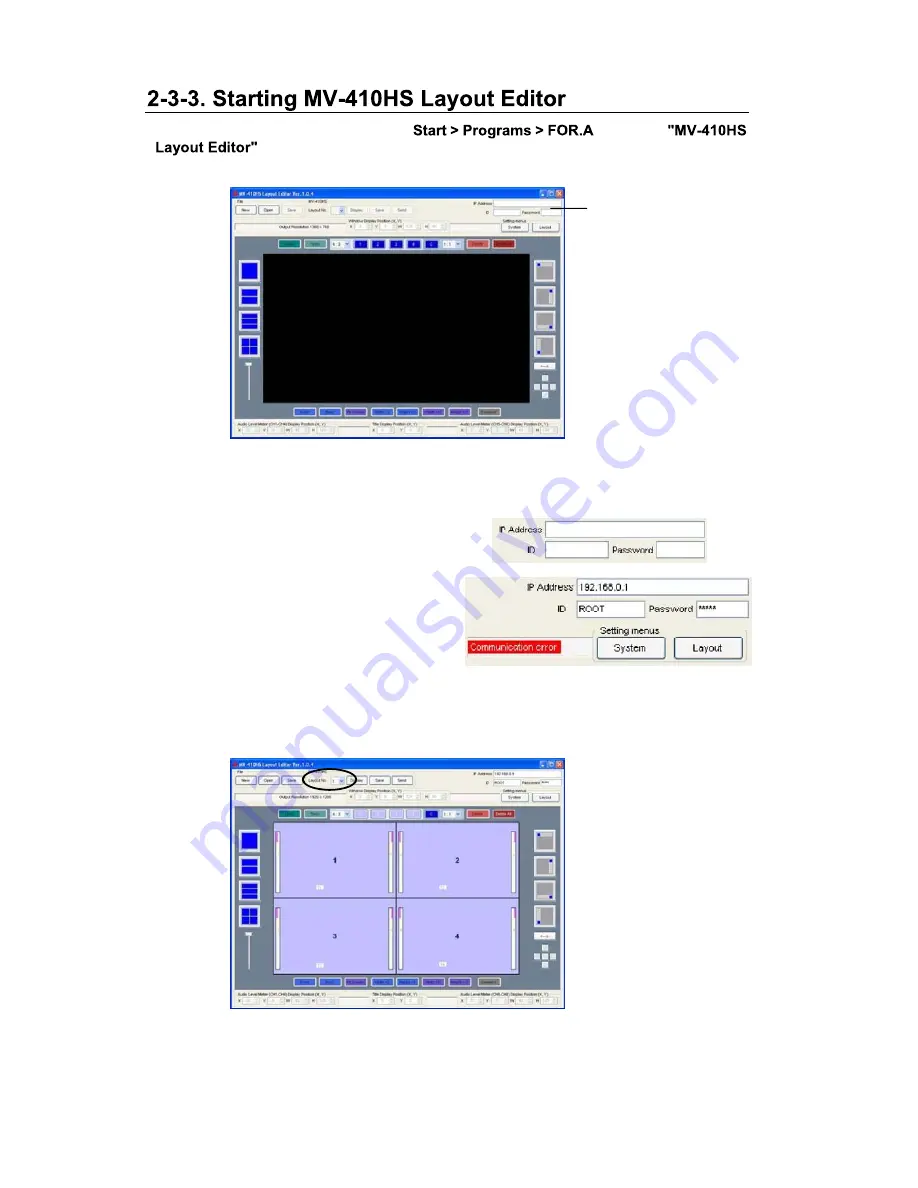
1)  To start MV-410HS Layout Editor, go to 

and select 

2)  After the application is started the screen shown below is displayed. 

3)  Enter the IP address, ID and password of the MV-410HS that you wish to connect in the 

MV-410HS ID boxes at the top-right of the main screen. (The factory default of the 
MV-410HS is as below.) 

IP address: 

192.168.0.1 

ID:  

ROOT 

Password: 00000 

If the entered IP address, ID, or password is 
not correct, the error message as shown to 
the right will be displayed.  
Correct the error. 

4)  Select the layout number as shown below. The selected layout is loaded and displayed in 

the layout editing area, and the connection is established. Clicking the Display button next 
to the Layout No. box will display the same layout on the monitor screen. You can edit the 
layout watching the display on the monitor screen. 

5) If you are going to edit the layout, see section 4-3. "Editing Layouts" in the MV-410HS 

Layout Editor Operation Manual for details. 

MV-410HS ID boxes 

USO 

RESTRITO

Содержание MV-410HS

Страница 1: ...MV 410HS Multi Viewer MV 410HS Command MV 410HS Layout Editor MV 410HS Live Viewer MV 410HS Web Browser Layout Editor Tutorial 4th Edition USO RESTRITO...

Страница 2: ...1 MV 410HS 37 pages 2 MV 410HS Command 29 pages 3 MV 410HS Layout Editor 37 pages 4 MV 410HS Live Viewer 14 pages 5 MV 410HS Web Browser 8 pages 6 Layout Editor Tutorial 15 pages USO RESTRITO...

Страница 3: ...lugged into AC outlet operate unit in hazardous or potentially explosive atmospheres Doing so could result in fire explosion or other dangerous results allow liquids metal pieces or other foreign mate...

Страница 4: ...power cord to avoid potentially hazardous conditions If problems similar to above occur contact authorized service representative attempting to again operate unit The consumables used in unit must be...

Страница 5: ...ckets 1 set EIA standard type Operation Manual 1 This manual Layout Editor Command Live Viewer and Web Browser Operation Manuals and Layout Editor Tutorial are included in the attached CD ROM Layout E...

Страница 6: ...the both ends of Retaining Clip 1 into the holes of Retaining Clip 2 The installation is now complete Font The font used in this product is the Ricoh Vector Font designed by Ricoh Company Limited USO...

Страница 7: ...nnection 11 4 1 System with DVI Output 11 4 2 System with Video Transmission 11 4 2 1 Network Mode 12 4 2 1 1 UNICAST Mode 12 4 2 1 2 MULTICAST Mode 12 5 Operations 13 5 1 Operation at Startup 13 5 2...

Страница 8: ...28 8 Output Size Test Mode 29 9 RS 232C 422 485 Interface 30 9 1 Changing RS 422 RS 485 or Termination 30 9 2 RS 232C 422 485 Connector 32 9 3 RS 232C Connection Example 33 10 Troubleshooting 34 11 S...

Страница 9: ...ded layout editor allows user to freely arrange the viewer screen layout The MV 410HS is most suitable for monitoring the system with mixed input of HD SDI SD SDI and analog composite signals Support...

Страница 10: ...nual thoroughly to ensure you understand the product After reading it is important to keep this manual in a safe place and available for reference The following conventions are used throughout this ma...

Страница 11: ...ow 3 Connect a DVI monitor or an analog RGB monitor You need an adaptor to connect an analog RGB monitor 4 Connect a PC which you are going to use to edit layout by installing the supplied Layout Edit...

Страница 12: ...used before the last powering off is employed The factory default is set to 1920x1200 60 The LEDs of 1 to 4 LOCK MENU FULL and SPLIT on the front panel indicate the currently employed format as shown...

Страница 13: ...utput frequencies The output frequency is changed in the order shown in the following Output Frequency table by every press on the ENTER button If the image is not properly displayed adjust the displa...

Страница 14: ...en and double click Right click icon to open window Double clicking under the tab opens the window Make the settings as shown in the example below Make a note of the settings before changing them in c...

Страница 15: ...he PC and open the CD ROM drive Run the file to start the setup wizard 2 If NET Framework 2 0 or Windows Installer 3 1 is not installed on your PC one of the screens shown below is displayed Click If...

Страница 16: ...ress ID or password is not correct the error message as shown to the right will be displayed Correct the error 4 Select the layout number as shown below The selected layout is loaded and displayed in...

Страница 17: ...n mode these buttons are used to select inputs to be displayed In the split screen mode these buttons are used to select the screen layout designed using the Layout Editor All four buttons are set to...

Страница 18: ...or arrange layouts from a PC over a LAN Ethernet interface Transmitting video to a PC is also possible 4 LTC Used to input time code to synchronize the analog or digital clock display Hour minute and...

Страница 19: ...on MV 410HS Video cameras etc HD SD SDI or and Analog composite MV 410 DVI SPLIT FAN ALARM POWER 1 POWER 2 ENTER MENU FULL POWER 1 POWER 2 MV 410HS LOCK 1 2 3 4 ON OFF MULTI VIEWER SPLIT FAN ALARM PO...

Страница 20: ...tocol used in MULTICAST mode the video output may not be updated at the packet loss which occurs under the unstable network condition Video cameras etc HD SD SDI or and Analog composite LAN Switching...

Страница 21: ...o display your desired channel in full screen press the FULL button and then press the VIDEO SELECT 1 to 4 buttons For instance to view channel 3 in full screen press the FULL button and then press th...

Страница 22: ...change the displayed split screen layout to another layout The image distortion occurs while switching layouts A black screen is shown for channels with no input signals SPLIT FAN ALARM POWER1 POWER2...

Страница 23: ...LLY Green INPUT4 TALLY border Green display 9 FULL 1 INPUT1 Full screen display 10 FULL 2 INPUT2 Full screen display 11 FULL 3 INPUT3 Full screen display 12 FULL 4 INPUT4 Full screen display 13 5V 5V...

Страница 24: ...Time adjustment made by the falling edge of the external pulse input pulse width 100ms or more is shown below 1 When second digit displays 1 to 29 Correct to 0 second 2 When second digit displays 30...

Страница 25: ...overlapping on the video image The aspect ratio of the input signal is retained The example below is displaying 4 3 material in 16 9 display mode Overlaps the title and audio level meters on the video...

Страница 26: ...aspect ratio of the input signal is not retained and the image is displayed to fill the selected display mode screen The split screen layout can be freely arranged using the supplied Layout Editor CHA...

Страница 27: ...er within or outside the windows 4 Border display Border display is available on each window frame Line width of border can be changed using Layout Editor See section 3 3 1 Border in the MV 410HS Layo...

Страница 28: ...by converting images to 4 3 or 16 9 can be reduced or eliminated and the images can be enlarged and displayed to best fit the output screen See section 3 2 6 Crop in the MV 410HS Layout Editor Operat...

Страница 29: ...he bar below the reference level is displayed in green 3 Peak Hold Shows the maximum level reached in the set length of the time If the higher peak is reached the display changes to indicate the highe...

Страница 30: ...TER Accesses the submenu of the selected item Item Setting details Reference 1 SYSTEM Input signal format settings Network mode settings ID and Password settings Date and time settings 2 LAN Network s...

Страница 31: ...ICAST PORT MULTICAST ADDRESS MASK LENGTH IP ADDRESS MAC ADDRESS VERSION LAN SERIAL SERIAL SELECT PARITY SERIAL ID BAUDRATE CH1 CH3 CH4 CH2 CH1 CH3 CH4 CH2 SYSTEM ADJUST INPUT FORMAT NETWORK MODE ID PA...

Страница 32: ...anually set signal formats only NETWORK MODE MULTICAST Sets to Multicast mode UNICAST Sets to Unicast mode ID 8 alphanumeric characters Used to set ID for the connection with PC over a LAN ID of 8 spa...

Страница 33: ...anual mode Changes the setting item value Reverse Only in manual mode Changes the setting item value Forward Only in manual mode MENU Returns to SYSTEM menu Item Setting range Setting details CH1 4 10...

Страница 34: ...ept 0 0 0 0 and 1 0 0 0 Used to set IP ADDRESS This setting is necessary for the communication over a LAN interface Please consult with your system administrator if using in your existing network MASK...

Страница 35: ...The SERIAL screen is displayed as shown below Button Action Moves the cursor up Moves the cursor down Changes the setting item value Reverse Changes the setting item value Forward MENU Returns to MAIN...

Страница 36: ...o VERSION and press the ENTER button The VERSION screen is displayed as shown below On the VERSION screen the version information of MV 410HS can be seen Button Action MENU Returns to MAIN menu SOFT 0...

Страница 37: ...r does not display the image in the format set on the MV 410HS verify the format actually output by the LEDs on the front panel See the table below for the verification If you need to change the forma...

Страница 38: ...ections with the unit powered ON Always power OFF all connected units disconnect power cords prior to accessing interior The repair or adjustment that requires to open the unit should only be done by...

Страница 39: ...CT Before performing the above operation to change interface selection disconnect the serial cable from the connector on the rear panel The operations as an example below may cause unit a malfunction...

Страница 40: ...ription 1 Unassigned 2 RX Input Receive data 3 TX Output Transmit data 4 Unassigned 5 GND Signal ground 6 Unassigned 7 RX Input Receive data 8 TX Output Transmit data 9 Unassigned RS 485 connector pin...

Страница 41: ...R and RTS CTS are looped back in the MV 410HS Use a RS 232C straight cable or 422 straight cable to connect another device such as a PC MV 410HS PC Pin no Signal Pin no Signal 1 Not used 1 Not used 2...

Страница 42: ...e all information display settings in the Parameter page set to ON Check the display settings by the Layout Editor Unable to operate front panel buttons Is the LOCK button flashing Front panel operati...

Страница 43: ...t When H PIXEL OFFSET is set to 0 768 Mode Hz kHz V Vertical Hz 720 Mode Hz kHz Hz 60Hz mode is most similar to the VESA standard Active loop through output for a monitor HD SDI 1 485Gbps or 1 485 1 0...

Страница 44: ...mpress and transmit DVI Analog RGB output and image JPEG compression Layout Editor Edit size and position of windows in split screen Data Backup Stores the setting data to the memory Rewrite capacity...

Страница 45: ...37 MV 410HS All dimensions in mm SP LI T EN TER LOC K MEN U F ULL POWER 1 POWER 2 2x2 6 4x12 40 20 40 350 430 462 480 MV 410HS MULTIVI EW ER ON OFF 1 2 3 4 USO RESTRITO...

Страница 46: ...38 MV 410HS Crop 20 USO RESTRITO...

Страница 47: ...39 MV 410HS USO RESTRITO...

Страница 48: ...USO RESTRITO...

Страница 49: ...ment is operated in a commercial environment This equipment generates uses and can radiate radio frequency energy and if not installed and used in accordance with the instruction manual may cause harm...

Страница 50: ...Fax 1 352 378 5320 346A Queen Street West Toronto Ontario M5V 2A2 Canada Phone 1 416 977 0343 Fax 1 416 977 0657 5200 Blue Lagoon Drive Suite 760 Miami FL 33126 USA Phone 1 305 931 1700 Fax 1 305 264...

Страница 51: ...USO RESTRITO...

Страница 52: ...MV ID USO RESTRITO...

Страница 53: ...Redo is USO RESTRITO...

Страница 54: ...Half USO RESTRITO...

Страница 55: ...s USO RESTRITO...

Страница 56: ...Setti USO RESTRITO...

Страница 57: ...LARGE USO RESTRITO...

Страница 58: ...Change Change USO RESTRITO...

Страница 59: ...page the tally detection On or Off to the TALLY IN REMOTE connector on the rear USO RESTRITO...

Страница 60: ...USO RESTRITO...

Страница 61: ...ick OK USO RESTRITO...

Страница 62: ...MV at the top right of the main USO RESTRITO...

Страница 63: ...MV USO RESTRITO...

Страница 64: ...at the top right of the main USO RESTRITO...

Страница 65: ...USO RESTRITO...

Страница 66: ...USO RESTRITO...

Отзывы: