background image

FontanaShowers

©

FontanaShowers

©

FontanaShowers

FontanaShowers

Customer Service: 800-684-4489

fontanashowers.com

5

Mixer Installations Instructions 

Step 2

Step 1

Step 3 ( Connection)

Hot water

Cold water

Rough-in Body

Anchor

Positioning

Bar

Tapping Screw 1

Tapping Screw 2

Plate

Cover

Button

Screw 1 

Diverter

Handle

Temp.

Handle

On/Off

Handle

Hex Wrench

Hot Water In

Cold Water In

Function 1

Function 2

Function 3

Содержание FS1320D

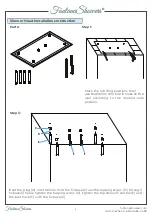
Страница 1: ...ode FS1320D 1 Please read installation instructions below All plumbing should be installed in accordance with applicable building codes and regulations Unpack and inspect the items for any shipping damages If you find damages do not install All products must be installed by a professional and certified plumber otherwise warranty may be voided PRIOR TO INSTALLATION FontanaShowers FontanaShowers Fon...

Страница 2: ... Parts Step 3 Step 1 D C E F F Mark the 4 drilling positions then use the Ø6mm drill to drill holes on the wall according to the marked hole position Inset the plug D into the hole hold the fix base C use the tapping screw D through fix base C holes tighten the tapping screw D tighten the top shower fixed bar E and the inlet hose F with the fix base C ...

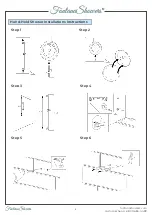
Страница 3: ... big shower heads so the water disperses equally throughout the showerhead The installation is completed Note The LED lights are powered by water flow and will be activated once the water is turned on E F Step 5 Step 6 FontanaShowers FontanaShowers FontanaShowers FontanaShowers Customer Service 800 684 4489 fontanashowers com 3 ...

Страница 4: ... water proofing must be applied Position the arm vertically and push trim ring into place Use wrenching flats to tighten DO NOT USE ARM TO LEVER Remove the protective cap from the showerhead ball joint and screw the unit onto the overhead arm ensuring the filter washer is in place Shower Head Installations Instruction Step 1 Step 2 Step 3 Step 4 FontanaShowers FontanaShowers FontanaShowers Fontana...

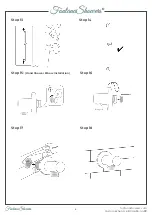
Страница 5: ...rs com 5 Mixer Installations Instructions Step 2 Step 1 Step 3 Connection Hot water Cold water Rough in Body Anchor Positioning Bar Tapping Screw 1 Tapping Screw 2 Plate Cover Button Screw 1 Diverter Handle Temp Handle On Off Handle Hex Wrench Hot Water In Cold Water In Function 1 Function 2 Function 3 ...

Страница 6: ...FontanaShowers FontanaShowers FontanaShowers FontanaShowers Customer Service 800 684 4489 fontanashowers com 6 Step 1 Step 2 Step 3 Hand Held Shower Installations Instructions Step 5 Step 6 Step 4 ...

Страница 7: ...FontanaShowers FontanaShowers FontanaShowers FontanaShowers Customer Service 800 684 4489 fontanashowers com 7 Step 7 Step 8 Step 9 Step 11 Step 12 Step 10 ...

Страница 8: ...8 FontanaShowers FontanaShowers FontanaShowers FontanaShowers Customer Service 800 684 4489 fontanashowers com Step 13 Step 14 Step 15 Hand Shower Elbow Installation Step 17 Step 18 Step 16 ...

Страница 9: ... Out The Screws Drill Two Holes Size 0 2 6mm On The Wall According To The Hole Position Of The Shower Holder Use A Hammer To Break 2 Plastic Wall Plug Into Two Holes Tighten The Screws With The Plastic Wall Plug And Locking With The Shower Holder Then Install The Closed Cover Connect The Shower Hose With The Water Outlet Connection Part And Hand Shower Plug The Hand Shower In The Shower Holder ...

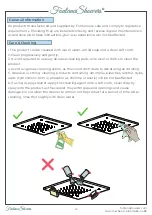
Страница 10: ...eaning products containing ammonia bleaches alcohol dyes acids hydrochloric formic phosphorus chlorine or acetic will be not be affected All products manufactured and supplied by Fontana are safe and comply to legislative requirements Providing they are installed correctly and receive regular maintenance in accordance with these instructions your user experience will not be affected 6 If using a s...

Отзывы: