background image

EN

USER GUIDE

22

ITDECT200

2

INSTALLATION

Plug the main power lead into the bottom of the base unit. 
Plug the main adapter into mains socket with the switch on the socket set to off. 
Switch on main power at the socket. 
Fit the batteries in the handset
Powering up the handset, press and hold key 


*  The power adapter is the disconnect device for this equipment, the socket-outlet shall 
be near the equipment and easily accessible.
* Batteries must be charged through the base at first time at least 12 hours non-stop in 
order to increase their lifetime and obtain an optimal performance.
* All passwords are set by default “0000”.

3

MENU SETTINGS

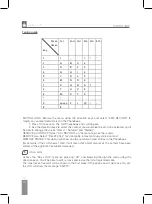
During idle state, press the OK key to enter the menu setting, press UP or DOWN key to 
select the above items and then press OK key to enter. Press 

 to quit the setting state, 

or press 

  to back to the previous menu. Details of each item are shown in next parts. 

Note:

 The system will time out if you leave more than 30 seconds between key presses.

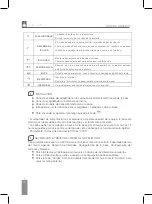
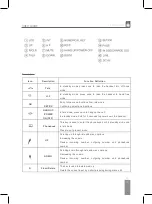
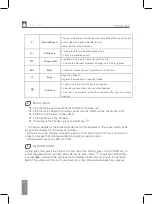
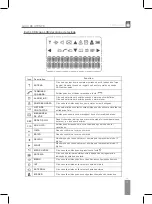
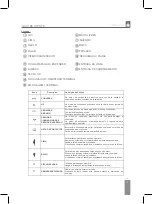
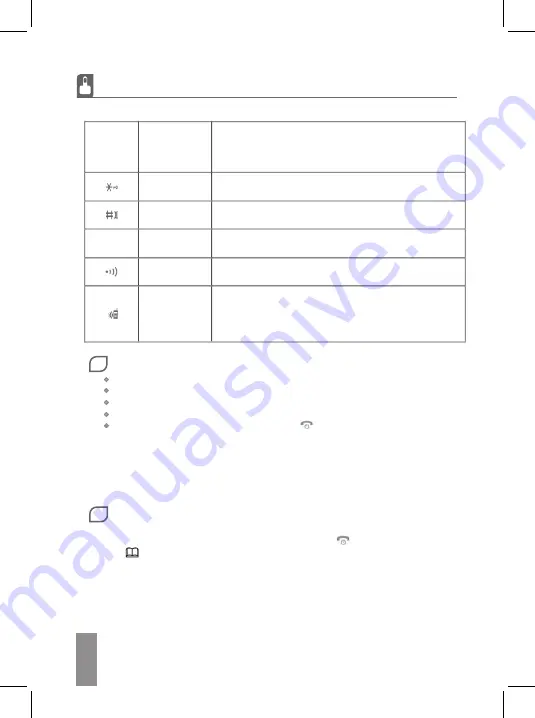
Icon 

Description 

Function Definition 


Talk 

In standby mode press once to take the handset into off hook 
mode. 


H.F 

In standby mode press once to take the handset to hand free 
mode. 

OK 


SET/OK 

Entry to the menu functions from idle mode;  
Confirming selections & actions.  


HANG UP 

/POWER 

ON(OFF) 

In talk mode, press once to hang up the call;  
In standby mode, hold for 3 seconds to power down the handset. 


Phonebook 

This key is used to enter the phonebook both in standby mode and 
in talk mode. 
Press to exit present menu 


UP 

Scrolling up through lists and menu options;  
Increasing the volume;  
Review  incoming  number,  outgoing number and phonebook 
number. 


DOWN 

Scrolling down through lists and menu options;  
Decreasing the volume.  
Review incoming number,  outgoing number and phonebook 
number.  

Flash/Delete 

The key is used to delete memory;  
Delete the current input by a short pressing during menu edit. 

Redial/Pause 

The key will perform PAUSE function if pressed after any digit input 
both in talk mode and in standby mode;  
Redial the last dialed number. 


Star/Lock 

A Long press (2s) to activate keypad lock;  
To set up a conference call. 


Ring on/off 

In addition to its use for text and number entry;   
To switch the handset external call ringer on/off by long press. 

MU


Mute 

In talk mode press the key to perform mute function.  


Page 

Page the handset; 
Register the handset to a specified base. 


Intercom 

To set up an internal call to another handset;  
To transfer an incoming call to another handset;  
To set up a conference call with an external line and an internal 
handset. 


Содержание ideus ITDECT200

Страница 1: ...ES 1 MANUAL DE USUARIO USER GUIDE GUIA DE UTENTE GUIDE D UTILISATION ITDECT200 TELÉFONO DIGITAL INALÁMBRICO DIGITAL WIRELESS TELEPHONE ...

Страница 2: ......

Страница 3: ...ción de fábrica 12 CONFIGURACIONES DEL TELEFONO 12 Alarma 12 Configuración del timbre 12 Configuración del tono 12 Establecer el idioma de la interfaz 12 Nombre del terminal 13 Respuesta automática 13 Restricción de llamadas 13 Fecha y hora 13 Contraste de la pantalla 13 Seleccionar base 13 Devolver el terminal a su configuración de fábrica 13 REGISTRO DEL TELÉFONO 13 OPERACIONES Y ACCIONES USUALE...

Страница 4: ... de sus componentes con ningún tipo de líquido Intente evitar mover o desconectar el teléfono durante una tormenta intensa ya que aunque remoto puede existir riesgo de atraer rayos y truenos Los intentos por reparar un mal funcionamiento del teléfono o la tentativa de explorar su circuitería e interiores además de acabar con su garantía de compra pueden resultar de riesgo Para una exploración o re...

Страница 5: ...a registrado un nuevo mensaje de voz REP CID REPETIDO Se muestra al recibir más de una llamada perdida del mismo número CID NUEVA CID Se muestra con cada nueva llamada perdida sin revisar ARRIBA Se muestra al moverse hacia arriba durante la navegación en menu ABAJO Se muestra al moverse hacia abajo durante la navegación en menu IZQUIERDA Se muestra al visualizar un número que no cabe en pantalla d...

Страница 6: ...ES GUÍA DE USUARIO 6 ITDECT200 Diagrama del teléfono y la base ...

Страница 7: ...BLAR INTERCOMUNICADOR MANOS LIBRES MUTE ABAJO TECLADO RD P COLGAR APAGAR ENCENDER AGENDA TECLA OK LOCALIZADOR REGISTRAR TERMINAL INDICADOR LED CARGA EN USO ENTRADA DE LINEA ENTRADA DE ALIMENTACIÓN OK GUÍA DE USUARIO ES 7 ITDECT200 ...

Страница 8: ... Colgar para salir completamente del menú o la tecla Agenda para volver al menú anterior APAGAR en modo espera para apagar el terminal AGENDA ATRÁS Puede acceder a la Agenda durante el modo espera o en conversación puls con esta tecla Tiene la función atras durante la navegación en el menu ARRIBA Para moverse a través el menu arriba Para subir el volumen Revisar llamadas entrantes salientes y núme...

Страница 9: ...o mostrará a través de un mensaje en la pantalla 2 Si la escritura está disponible el cursor parpadeará para que comience a introducir los datos 3 Para corregir un caracter pulse R 4 Navegue a través del menú para seleccionar la melodía personalizada para ese contacto 5 Tras completar los campos requeridos para crear un contacto pulse la tecla OK para confirmar el nuevo registro 4 OPERACIONES DE L...

Страница 10: ...de llamada asignada BORRAR UNA ENTRADA Seleccione Borrar registro en el menú para eliminar una entrada BORRAR TODOS Seleccione Borrar Todos en el menú para eliminar por completo todos los registros de la agenda ESTADO DE MEMORIA Esta opción le muestra el número total de contactos memorizados en la agenda en relación con el número total de memorias disponibles Por ejemplo si ha guardado 5 contactos...

Страница 11: ...eclas de dirección Puede establecer los siguientes valores o realizar las siguientes acciones dentro de este apartado Eliminar teléfono Si lo selecciona eliminará el registro del terminal con la base es decir romperá el enlace entre el terminal y la base con lo que no podrá realizar ninguna operación telefónica de manera temporal y hasta que vuelva a registrar de nuevo el terminal a la base Para c...

Страница 12: ...car cualquier tecla excepto la tecla volviendo a sonar la alarma al cabo de 6 minutos 4 Para desactivar la alarma mantenga pulsada la tecla Configuración del timbre Puede seleccionar entre 10 melodías disponibles y configurar los valores de llamada interna y externa el volumen del tono la melodía asignada Acceda a CONFIFURACIÓN DEL TIMBRE al apartado TIMBRE EXT TIMBRE INT para establecer los valor...

Страница 13: ...lse OK para validar la selección Contraste de la pantalla Puede seleccionar el nivel de contraste de la pantalla LCD de entre 8 valores de intensidad Seleccionar base Accediendo a esta opción el terminal inalámbrico le permitirá ser conectado hasta a 4 bases guardadas en memoria También puede establecer que el enlace con la base sea automático Devolver el terminal a su configuración de fábrica Acc...

Страница 14: ... las teclas de dirección Arriba Abajo Pasar a modo privado Puede silenciar la entrada de audio a través del micrófono del terminal durante una llamada en curso para evitar que al otro lado de la línea puedan escuchar una conversación paralela Para pasar a este modo privado no tendrá más que pulsar la tecla MU y hacer lo mismo para volver a la normalidad Identificación de llamadas La función de ide...

Страница 15: ...ono emitirá un pitido y en la pantalla se visualizará el mensaje Teclado bloqueado y a partir de ese momento ninguna tecla estará activa Para desbloquear el teclado de nuevo vuelva a realizar la misma acción 10 SOLUCIÓN DE PROBLEMAS LA PANTALLA LCD NO ES LEGIBLE Aumente el contraste de la pantalla LCD a través del menú Si aún encuentra que la pantalla sigue teniendo un bajo contraste pruebe a camb...

Страница 16: ... 05 CE Puede descargar una copia de la declaración completa en http www fonexion com doc El ITDECT200 está garantizado por un periodo de 2 años a partir de la fecha que figure en su recibo de compra Guarde su recibo de compra es su garantía Sin embargo esta garantía no cubre ningún fallo provocado por accidente uso incorrecto desgaste negligencias rayos modificaciones realizadas en el equipo o tod...

Страница 17: ...USER GUIDE ENGLISH ITDECT200 ...

Страница 18: ... not overload wall outlets and extension cords as this can result in fire or electric shock Never push foreign objects of any kind into this product through cabinet slots as they may affect dangerous voltage points or short circuit parts that could result in fire or electric shock Never spill liquid of any kind on the product Avoid moving or disconnecting this unit during a heavy storm as there ma...

Страница 19: ...wing the phonebook entries VOICE MESSAGE Displayed when a new voice message is received from the network REP REPEAT CID Repeat call indicate that the same calls received which un reviewed and the icon will be displayed CID NEW CID The icon will be displayed when a new call comes SEQUENCE When you scroll and review the numbers SEQUENCE When you scroll and review the numbers LEFT Display when you re...

Страница 20: ...EN USER GUIDE 20 ITDECT200 Telephone charger pod diagram ...

Страница 21: ...nt menu UP Scrolling up through lists and menu options Increasing the volume Review incoming number outgoing number and phonebook number DOWN Scrolling down through lists and menu options Decreasing the volume Review incoming number outgoing number and phonebook number R Flash Delete The key is used to delete memory Delete the current input by a short pressing during menu edit P Redial Pause The k...

Страница 22: ...ext parts Note The system will time out if you leave more than 30 seconds between key presses UP Increasing the volume Review incoming number outgoing number and phonebook number DOWN Scrolling down through lists and menu options Decreasing the volume Review incoming number outgoing number and phonebook number R Flash Delete The key is used to delete memory Delete the current input by a short pres...

Страница 23: ...firm LIST The function allows the user to review the phone book record lists by using the direction keys and edit answer delete or save one of the registered phone numbers on the list NEW ENTRY Press direction keys to select a NEW ENTRY This function allows the user to add an entry to the phone book 1 Press OK key to enter If the phonebook is full the message MEM IS FULL will be presented to the u...

Страница 24: ... of every stored contact MEMORY STATUS This option will show you the number of used entries in the Phonebook for example if the LCD shows 10 50 it will mean that a total amount of 10 contacts have been stored of the original 50 available memories 5 CALL LOG Access the CALL LOG menu by pressing OK and browsing thorugh the menu using the direction keys You ll be able to edit remove and revise the li...

Страница 25: ...plete the deleting process you will be forced to enter the 4 digit security code or PIN The default PIN number is 0000 Dial mode You can select Pulse or Tone By default the value Tone is set Flash Time You can select 100 300 600 or 1000 ms Modify the PIN number Select MODIFY PIN using the direction keys on the menu The LCD will be showing PIN Prior to customize your own PIN you must enter the old ...

Страница 26: ...battery status 2 The handset goes out of range of the base unit 3 The user press a key Interface Language You can choose between english german french italian spanish portuguese russian turkish greek ukrainian polish hungarian swedish dutch danish and norwegian Each language will display in its own native translation Hanset name Customize your HS NAME choosing this option on the menu Use the R key...

Страница 27: ... PIN code and press OK 4 Wait for the message searching to appear on the screen 5 Go to the base where you registered the handset in and press and hold the key until you hear a confirmation tone That will mean that the registration process has been completed Notes If the phone is unable to register to any base it will return to idle mode The key on the base of the charging pod can be used to locat...

Страница 28: ...you want to use the hands free feature Review remove or answering outgoing calls Access to the outgoing calls log by pressing the DOWN key in idle mode Browse the list with the direction keys To delete an entry press R If you want to answer to the call press to launch a normal call or if you want to use the hands free feature Edit Phonebook You can save up to 50 contact numbers in the Phonebook Ea...

Страница 29: ...t2 the or key to accept call Press HS1 the key then you can talk all together Press to quit the party conference and other parties can also continue to communication Locking the keypad Press and hold the key for about 2 seconds You will hear a beep tone the unit will go back to idle mode Repeat the operation to unlock 10 TROUBLESHOOTING The ringtone is too low Check if the ringing volume is proper...

Страница 30: ...a complete copy of this declaration on the website http www fonexion com doc The ITDECT200 is guaranteed for 12 months from the date of purchase on your sales receipt but does not cover any faults or defects caused by accidents misuse fair wear and tear neglect lightning tampering with the equipment or any attempt at adjustment or repair other than through approved agents Please keep your sales re...

Страница 31: ...GUÍA DE UTENTE PORTUGUÊS ITDECT200 ...

Страница 32: ...stranhos de qualquer tipo dentro do produto através das ranhuras do compartimento uma vez que podem afectar pontos de voltagem perigosos ou partes de curto circuito que podem resultar em incêndio ou choque eléctrico Nunca deite líquido de qualquer tipo no produto Evite mover ou desconectar esta unidade durante tempestades uma vez que pode existir um pequeno risco de choque eléctrico devido aos tro...

Страница 33: ...R CID Repetir chamada indica que a mesma chamada foi recebida mais que uma vez e o ícone será exibido CID NOVO CID Exibido quando recebe uma nova chamada e que ainda não foi visualizada CIMA Quando você rola e rever os números BAIXO Quando você rola e rever os números DEIXOU Mostrar quando você analisar um número que representa mais de 12 dígitos RIGHT Mostrar quando você analisar um número que re...

Страница 34: ...PT GUÍA DE UTENTE 34 ITDECT200 Diagrama del teléfono y la base ...

Страница 35: ... para baixo através das listas e opções de menu Diminui o volume da coluna microfone durante uma chamada Acede à lista de números efectuados Visualiza os números recebidos efectuados e números de telefone R CLR PISCAR APAGAR Utilizada para apagar memória Apaga a introdução actual durante a edição de menu RD P REMARCAÇÃO PAUSA Remarca o ultimo número marcado Pressionado para inserir uma pausa duran...

Страница 36: ...e à lista de números efectuados Visualiza os números recebidos efectuados e números de telefone R CLR PISCAR APAGAR Utilizada para apagar memória Apaga a introdução actual durante a edição de menu RD P REMARCAÇÃO PAUSA Remarca o ultimo número marcado Pressionado para inserir uma pausa durante a marcação de números ASTERISCO BLOQUEIO Toque longo para activar o bloqueio de teclado Inicia chamada de ...

Страница 37: ...Além disso pode também realizar uma chamada da lista de contactos NOVA ENTRADA Pressione as teclas de direção para seleccionar o item NOVA ENTRADA Esta função permite adicionar uma entrada na lista de contactos Se a lista de contactos estiver cheia aparecerá uma mensagem avisando do mesmo MEMÓRIA CHEIA Se uma entrada de lista de contactos estiver disponível o cursor para o nome irá piscar Escreva ...

Страница 38: ...DAS Quando o LCD exibir REGISTO DE CHAMADAS Pressione a tecla OK para entrar nas listas de chamadas perdidas chamadas recebidas e chamadas marcadas O LCD irá exibir o ultimo registo Se não existirem entradas na lista será exibido VAZIO Pressione as teclas de direção para visualizar outro registo Quando o registo é mostrado pressione a tecla OK utilize as teclas de direção para escolher entre ADICI...

Страница 39: ... a tecla OK para confirmar a selecção Modificar PIN Esta função permite o utilizador alterar o número PIN da base activa actual Pressione a tecla OK para confirmar Utilize as teclas de direção para seleccionar o item MODIFICAR PIN Pressione a tecla OK para confirmar e o ecrã mostrará PIN Será pedido primeiro o código PIN actual para a base Utilize as teclas numéricas e pressione a tecla OK para co...

Страница 40: ... ou desactivar a função de adiar do alarme Pressione a tecla OK para confirmar a sua selecção O ícone de alarme será mostrado no LCD Iniciar alarme No estado de suspensão o alarme irá tocar na hora que tiver definido Repetição de alarme Durante o alarme pressione qualquer tecla excepto e será pausado s Quando receber uma chamada o alarme também será pausado Desligar alarme Pressione a tecla para d...

Страница 41: ...eclasde direçãopara seleccionar ON ou OFF para activar desactivar o som de bip respectivamente Pressione a tecla OK para confirmar a sua selecção Nota após estas definições Um bip para o tom de teclas irá soar quando uma tecla for pressionada no aparelho Um bip de bateria fraca irá soar quando a bateria estiver fraca Um bip para alcance de alarme irá soar quando o aparelho estiver a sair do alcanc...

Страница 42: ...que deseja barrar Pressione a tecla OK para confirmar Repita os passos acima para definir os outros 3 Após definir todos os números a serem barrados assim que marcar um número que comece com qualquer um deles o LCD irá exibir CHAMADAS BARRADAS e o número não poderá ser marcado Nota Chamadas internas para intercomunicador ou conferência estarão disponíveis Data e Hora O utilizador pode definir a da...

Страница 43: ...ados à mesma unidade de base através dos seguintes passos e um máximo de 4 bases podem ser ligadas ao mesmo aparelho através dos seguintes passos Em modo de suspensão pressione a tecla OK e utilize as teclasde direçãopara escolher o item de REGISTO Pressione a tecla OK para entrar e utilize as teclasde direção para escolher BASE de BASE1 BASE2 BASE3 ou BASE4 Pressione a tecla OK para confirmar O L...

Страница 44: ...emporizador O temporizador irá iniciar automaticamente da linha de telefone ter sifo accionada Re chamada Quando o número marcado e a linha estão ocupados pressione a tecla R e pressione a tecla P para marcar novamente Pausar Pressione a tecla P para inserir um tempo de atraso de 3 6 numa sequência de marcação Pré marcação A unidade tem função de pré marcação A mesma serve para entrar e editar o n...

Страница 45: ...e bip quando o teclado bloquear o ícone irá aparecer no topo do ecrã HS BLOQUEADO aparcerá no LCD Qualquer tecla que pressionar será inválida Para desbloquear o teclado Pressione e mantenha a tecla do aparelho durante 2 segundos novamente Irá ouvir um tom de bip quando o teclado bloquear o ícone irá aparecer no topo do ecrã e regressará ao modo de suspensão 10 RESOLUÇÃO DE PROBLEMAS LCD está escur...

Страница 46: ...n com doc O ITDECT200 está garantido por um período de 2 anos a partir da data que figure em sua recebo de compra Guarde o seu recebo de compra é a sua garantia No entanto esta garantia não cobre nenhuma falha provocada por acidente uso incorreto desgaste negligencias raios modificações realizadas na equipa ou todo a tentativa de ajuste ou reparacion caseira ou através de agentes não aprovados Ou ...

Страница 47: ...GUIDE DE L UTILISATEUR FRANÇAIS ITDECT200 ...

Страница 48: ... et poser un risque d incendie ou d électrocution Ne jamais verser un liquide de quelque nature que ce soit sur l appareil Éviter de déplacer ou de débrancher cet appareil durant une tempête violente car il pourrait y avoir un risque faible d électrocution à cause de la foudre et du tonnerre Une personne non qualifiée ne peut ouvrir le téléphone ou le dépanner veuillez l envoyer à un centre de ser...

Страница 49: ... du réseau REP RÉPÉTER CID S affiche lorsque vous recevez les mêmes appels en absence plus d une fois CID NOUVEAU CID S affiche lorsqu un appel manqué n a pas encore été vu SÉQUENCE S affiche lorsque vous faites défiler la liste et parcourez les numéros SÉQUENCE S affiche lorsque vous faites défiler la liste et parcourez les numéros GAUCHE S affiche lorsque vous lisez un numéro qui contient plus d...

Страница 50: ...FR GUIDE DE L UTILISATEUR 50 ITDECT200 ...

Страница 51: ...du téléphone BAS Permet de défiler vers le bas dans les listes et les options du menu Permet de réduire le volume Permet de revoir les numéros entrants sortant set les numéros du téléphone R C Flash Supprimer Cette touche est utilisée pour supprimer la mémoire Permet de supprimer l entrée actuelle en appuyant brièvement sur la touche Éditer du menu RC P Recomposer Pause En mode conversation appuye...

Страница 52: ...ifiez pas vous même le mot de passé tous les mots de passé par défaut de ce manuel sont 0000 3 MENU En veille appuyez sur la touche OK pour accéder aux réglages du menu il s agit de 5 menus secondaires du menu du téléphone REPERTOIRE JOURNAL DES APPELS REGLAGES BS REGLAGES HS et ENREGISTREMENT Appuyez sur la touche des flèches pour sélectionner les éléments précédents et appuyez ensuite sur la tou...

Страница 53: ...10 Appuyez sur la touche OK Utilisez la touche des flèches pour sélectionner REPERTOIRE Appuyez ensuite sur la touche OK pour confirmer LISTE s affiche sur l écran Cette fonction permet à l utilisateur de parcourir les listes d enregistrement du répertoire à l aide de la touche ou de la touche Vous pouvez également lancer un appel à partir ru répertoire NOUVELLE ENTREE Appuyez sur la touche des fl...

Страница 54: ...difier le nom numéro et changer de mélodie Effacer entree Appuyez sur la touche des flèches pour sélectionner EFFACER ENTREE Cette fonction permet à l utilisateur d effacer une entrée du répertoire Tout effacer Appuyez sur la touche des flèches pour sélectionner TOUT EFFACER Cette fonction permet à l utilisateur d effacer toutes les entrées du répertoire permet à l utilisateur d ajouter une entrée...

Страница 55: ...d ajouter une entrée au répertoire à partir de la liste des appels Effacer cette fonction permet à l utilisateur d effacer l entrée actuelle de la liste des appels Tout effacer cette fonction permet à l utilisateur d effacer tous les numéros 6 REGLAGES BS L utilisateur peut modifier les réglages de base dans cette rubrique Appuyez sur la touche OK et utilisez la touche des flèches pour la sélectio...

Страница 56: ... touche des flèches pour sélectionner MODIFIER PIN Appuyez sur la touche OK pour confirmer et PIN S affiche à l écran L utilisateur devra d abord saisir le code PIN actuel de la base à l aide des touches numériques puis appuyer sur la touche OK pour confirmer Lorsque l ancien code est validé l utilisateur devra entre le nouveau code PIN 4 chiffres et appuyer sur OK pour confirmer Une fois qu un no...

Страница 57: ...arreter L alarme sera également intermittente lors de la réception d un appel Arrêt de l alarme Appuyer sur la touche pour arrêter l alarme ou pour entrer dans les paramètres de l alarme sélectionner OFF Arrêt Configuration de la sonnerie L utilisateur peur changer la sonnerie du combiné pour les appels internes et externes Il est possible de configurer 10 mélodies de sonnerie et 5 niveaux différe...

Страница 58: ...nera lorsque la batterie sera faible Un bip sonnera pour la portée de l alarme sonnera lorsque le combiné sera Langue Le combiné prend en charge 16 langues prédéfinies Appuyer sur la touche OK et utiliser la touche des flèches pour sélectionner l élément LANGAUGE LANGUE Appuyer sur la touche OK pour confirmer Appuyer sur la touche des flèches pour sélectionner la langue à partir de anglais alleman...

Страница 59: ...nfirmer Reprendre les étapes ci dessus pour configurer les 3 groupes restants Après la configuration des numéros de blocage une fois que vous composez un numéro qui commence par l un d eux l écran affichera CALLS BARRED APPELS BLOQUES et l appel ne passera pas Remarque Les appels internes vers intercom ou de conférence seront toujours disponibles Date heure L utilisateur peut configurer la date et...

Страница 60: ...s suivantes Il est possible de lier jusqu à 4 bases au même combiné des manières suivantes En veille appuyer sur la touche OK et utiliser la touche des flèches pour sélectionner l élément REGISTRATION ENREGISTREMENT Appuyer sur la touche OK pour entrer Appuyer sur la touche des flèches pour sélectionner BASE à partir de BASE1 BASE2 BASE3 ou BASE4 Appuyer sur OK pour confirmer le LED affiche PIN en...

Страница 61: ...a touche R puis sur la touche P pour le composer à nouveau Pause Appuyez sur la touche P pour insérer une temporisation de 3 6 secondes dans une séquence d appel Pré numérotation L unité possède une fonction de pré numérotation grâce à laquelle vous pouvez saisir et modifier le numéro avant de l appeler La procedure suivante décrit son utilisation en mode veille saisir le numéro que vous voulez co...

Страница 62: ...uyez sur la touche HS2 the ou pour accepter l appel Appuyez sur HS1 puis sur la touché et vous pourrez communiquer Appuyez sur la touche pour quitter la conférence et les autres personnes peuvent poursuivre la communication Verrouiller et déverouiller le clavier Pour verrouiller le clavier Appuyez et maintenez la touche pendant environ 2 secondes Vous entendrez un bip lorsque le clavier est verrou...

Страница 63: ...d autres dispositions pertinentes de la directive 1999 5 CE Vous pouvez télécharger une copie de la déclaration complète au http www fonexion com doc L ITDECT200 est garanti pendant 2 ans à compter de la date sur votre ticket d achat Conservez votre reçu d achat est votre garantie Toutefois cette garantie ne couvre pas les pannes causées par un accident l usure la négligence la foudre les modifica...

Страница 64: ......

Отзывы: