


EN - 37
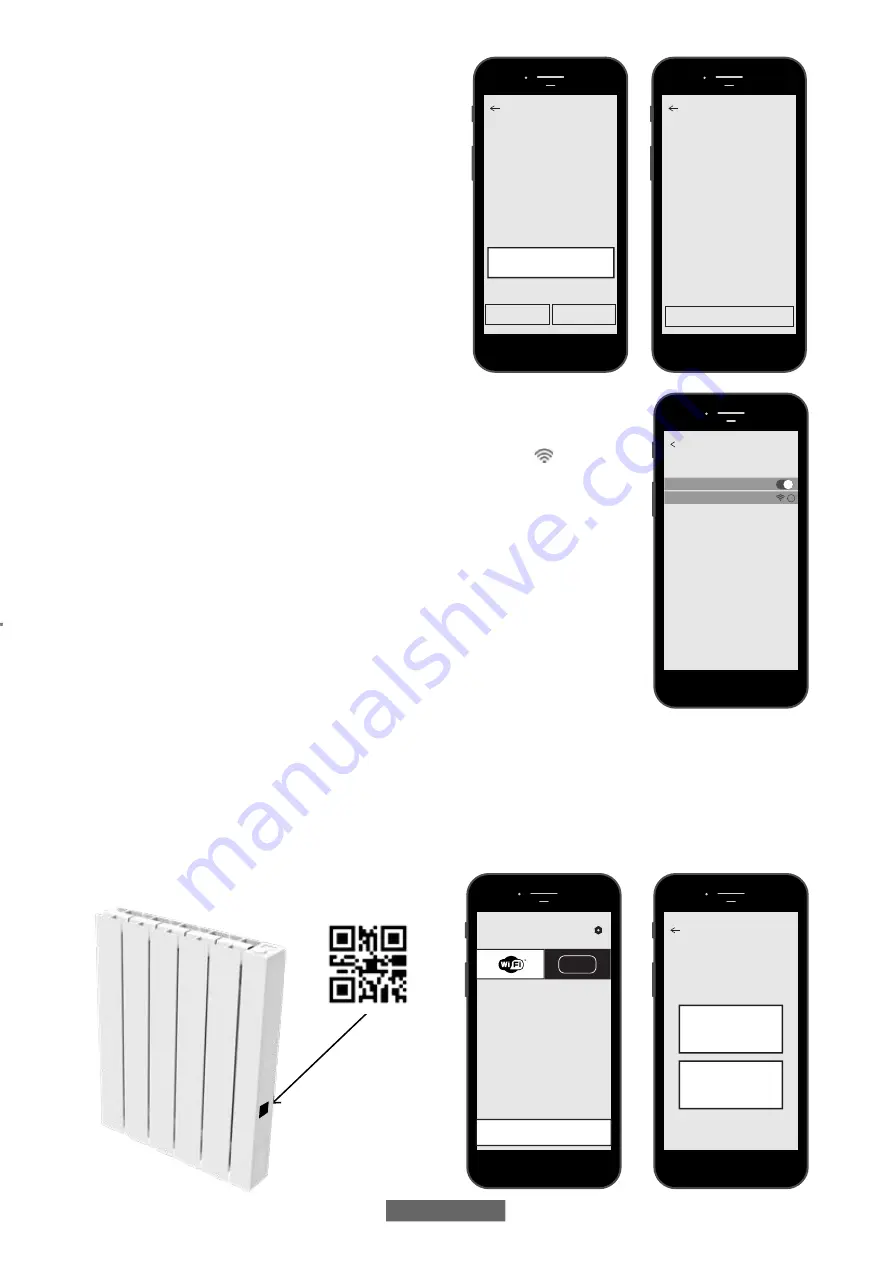
be displayed (figure 04):
Enter the network password if required. Press, “CONFIGURE”, the
screen shown in figure 05 will be displayed.
Press “GO TO WI-FI SETTINGS”, the Wi-Fi setting page of the
operating system will be displayed (figure 06).
The Wi-Fi network “DOMUS WI-FI...” of the radiator will be
displayed.
Note:
if the DOMUS network does not appear, check in the
phone’s Wi-Fi settings that the “automatic reconnection” option is
not selected for your home network. In case remove this setting.
In your phone, select the Domus Wi-Fi network.
Wait for the successful connection to the Wi-Fi network. and then
return to the APP.
Wait until successful connection message is displayed on your
phone and, if requested, confirm. Depending on the phone this
may take up to 2 minutes.
A Wi-Fi connection message appears on the radiator and, once connected, the symbol on the
display is steady ON.
Now your radiator is connected to your home Wi-Fi network, and you can add it to the list of
radiators to be managed via your phone or to other phones with DOMUS ONE APP, as described
in the following paragraph.
4.11.1.3 Adding the new radiator to the list of devices that can be managed via your phone:
Log in to the APP.
The following screen is displayed on the radiator (figure 07):
Press “+ ADD NEW THERMOSTAT”, the screen shown in figure 08 is displayed.
Press “YES”, you will be prompted to frame the QR code on the right side of the radiator.
Frame the QR code, a message will appear on your phone, press “CONNECT”.
You will be prompted to give a name to the radiator and pair it to a group, for example you can give the name eBlitz 1000 W and
pair it to the group “Living room”, or create a new group, e.g. “Bedroom”.
The Group and the radiator registered in this way will be displayed on the main page of the APP and you can start managing it
from your phone.
Repeat the procedure described above for each new radiator.
To remove a radiator from your account, press and hold the name of the radiator for several seconds and then select “DELETE”.
Select the Wi-Fi network you want this thermostat to
connect to
You can change the Wi-Fi network from settings
menu.
The current Wi-Fi network is:
Home Network
Please type your password and press CONFIGURE
CONFIGURE
GO TO SETTINGS
Switch Wi-Fi network
password
04
Wi-Fi
Domus WiFi H - 8xxxxxxxxxx
Settings Wi-Fi
i
06
Go to settings and select the Wi-Fi network of the
thermostat. Wait for the connection procedure to
complete. ONLY THEN come back here.
Make sure that the thermostat is ON and
that Wi-Fi in ON too.
Make sure that Location Service in turned on
Wait for the Wi-Fi icon to replace the cellular data icon
(it may take several seconds)
GO TO WI-FI SETTINGS
Configure Wi-Fi
05
HOME
+ ADD NEW THERMOSTAT
BLE
07
CREATE NEW
YES
Point the camera at the QR
code
NO
Connect to the thermostat you
want to add
is the thermostat you want to add already
connect to a Wi-Fi network?
08