background image


Operating Instructions


28 


8.  OPERATION 

 CEPHALOMETRY (P11 to P13 PROGRAMS) 

8.1.  PREPARING EQUIPMENT FOR EXPOSURE 


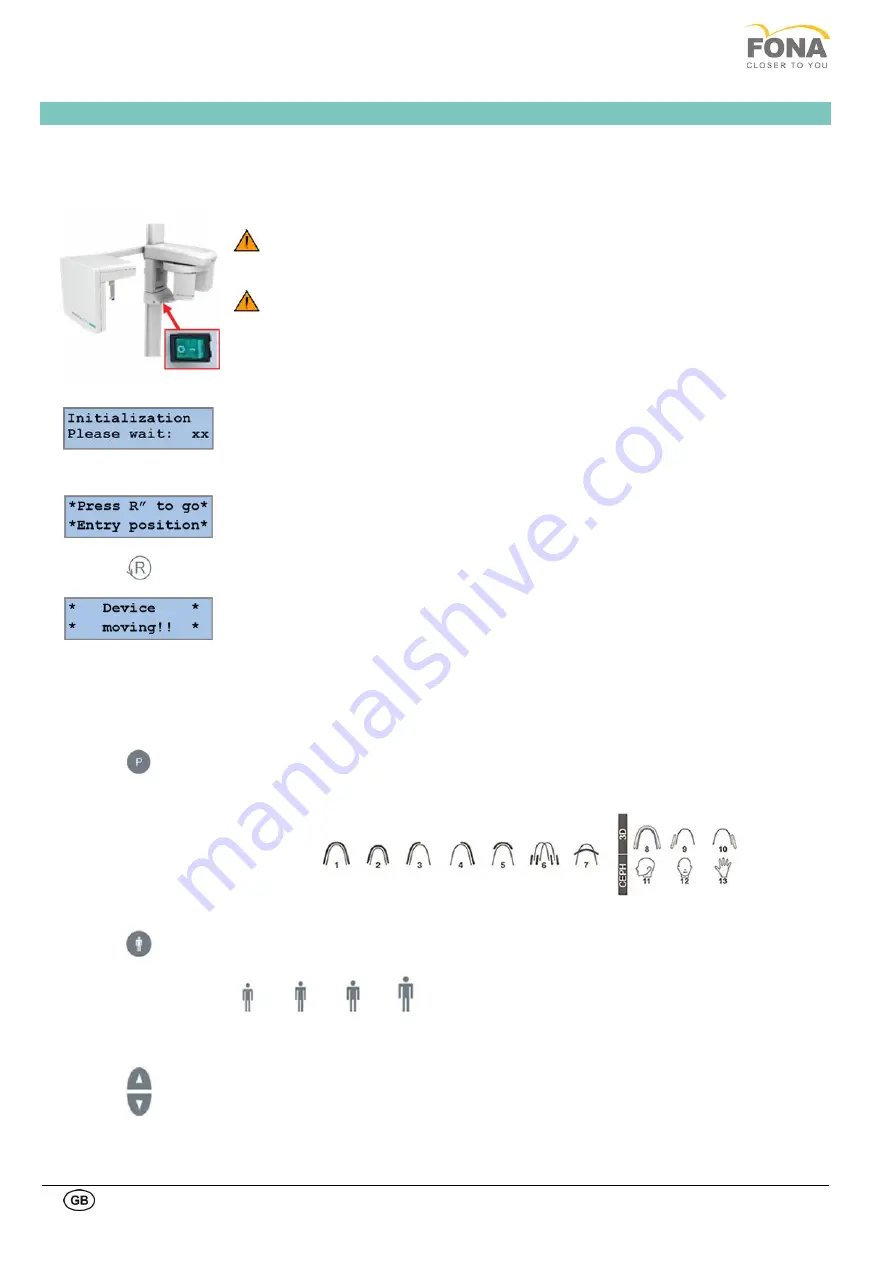
A. Switching ON the Unit 


By  pressing the mains switch in the lower part of the  vertical carriage under the  mirror, 
the unit is supplied as indicated by the green light of the mains switch. 

 ATTENTION: 

Following  extreme  temperature  fluctuations,  condensate  formation  may  occur;  therefore 
please do not switch on the device until normal room temperature has been reached. 

 ATTENTION: 

When switching on the unit there must NOT be a patient positioned in the unit. 
If a fault occurs which requires switching the unit off and then back on again, the patient 
must be taken out of the unit at the latest before switching it on again! 


x

  The display on the control panel turns on  

x

  System initialization is started 


B. Reset Function 


In  order  to  use  the  equipment,  it  is  necessary  to  press  the  Return  button  in  order  to 
initialize the device, as indicated on side figure.  
 
By  pressing  the  RETURN  Arm  Movement  key  the  rotation  arm  locates  the  reference 
points and moves to the PATIENT ENTRY position. 
 
When the unit is movi

ng,  the message “Device moving!!” appears on the display


C. Running Image Acquisition Software on the PC 


Set the OrisWin DG Suite program following the indication of §5, Application Software). 


D. Selection of Exam 


Press the key for PROGRAM selection, to sequentially change the program from 1 to 13 
and  back  again.  All  exposure  programs  are  described  in  section  6.  Select  one  of  the 
cephalometric  programs  (P11:  Latero-lateral  program;  P12  Antero-posterior  program; 
P13 carpus program). 


E. Selection of Patient Size 


Press the key for PATIENT build selection,  
Small, Medium, Large, Extra Large. 


The  pre-programmed  technique  factors  (kV  and  mA)  are  automatically  selected  and 
appear on the display 


Manual correction of tube voltage and of tube current can be done using the INCREASE 
or DECREASE keys at display sides. 
The same correction can be done through Image Acquisition module on PC side. 


Содержание XPan 3D Plus

Страница 1: ...OPERATING INSTRUCTIONS FONA XPan 3D Plus_ English...

Страница 2: ...left 3D volume 18 6 10 P10 PROGRAM TMJ right 3D volume 18 6 11 P11 PROGRAM Latero lateral cephalometric image 19 6 12 P12 PROGRAM Antero posterior cephalometric image 19 6 13 P13 PROGRAM Carpus image...

Страница 3: ...1 WARNING MESSAGES 37 11 2 ERROR MESSAGES 37 12 INSPECTION AND MAINTENANCE 38 13 TECHNICAL DESCRIPTION 39 14 ELECTROMAGNETIC COMPATIBILITY 42 14 1 ELECTROMAGNETIC EMISSION 42 14 2 ELECTROMAGNETIC IMM...

Страница 4: ...ure x Operating Instructions x Installation manual x Service manual x Maintenance manual x Warranty conditions Keep this literature for easy and quick reference Read the Operating Instructions to beco...

Страница 5: ...stem following the instructions and recommendations contained in this user manual x Keep the machine in perfect working condition following the maintenance instructions given by the manufacturer Failu...

Страница 6: ...prior to X ray exposure Laser light localizers used This product incorporates Class 1 lasers as light localizers for the positioning of the patient They must not be used for other purposes A minimum...

Страница 7: ...of electrical and electronic devices Your product is marked with the adjacent symbol Disposal of your product with domestic refuse is not compatible with the objectives of environmentally sound recycl...

Страница 8: ...me and secures your investment Innovative sensor technology acquires the cephalometric image in less than 1 second thus preventing patient movement and increasing image quality Setting of exposure was...

Страница 9: ...nables visual contact with the patient An optional kit is available for remote mounting of the hand switch Order code 93 190 00155 1 X Ray button 2 Patient positioning mirror 3 3D Panoramic Image Mirr...

Страница 10: ...ray Radiation Orange Light ON PROGRAM Selection INCREASE kV left side mA right side DECREASE kV left side mA right side PATIENT build Small Medium Large Extra Large LIGHT for alignment ON for 60 s RE...

Страница 11: ...n the unit reaches the START position the green light of the READY indicator on the control panel is turned ON x PATIENT EXIT position Control panel and X ray source on the left of the patient and the...

Страница 12: ...for TMJ and sinus exams 2 Chin rest with support for edentulous 6 Nasal support for TMJ and sinus exams 3 Bite block 7 Chin rest with support for 3D TMJ exams left and right Optional 4 Nasal support f...

Страница 13: ...reatment planning The software OrisWin DG Suite allows the acquisition of panoramic and cephalometric X ray images and X Ray images for 3D reconstruction managing also the associated patient data reco...

Страница 14: ...to acquire o Green system ready to acquire o Blue system acquiring X Ray ON x Click on P button 2 to select the program and on Size button 3 to select proper patient size x If needed it is possible to...

Страница 15: ...standard panoramic image x Program duration time approx 16 s x Program exposure time 14 2 s x Positioning tool 1 2 3 4 see 4 Positioning tools 6 2 P2 PROGRAM Children panoramic image x Program duratio...

Страница 16: ...rogram duration time approx 16 s x Program exposure time 7 3 s x Positioning tool 1 2 3 4 see 4 Positioning tools 6 5 P5 PROGRAM Anterior teeth panoramic image x Program duration time approx 16 s x Pr...

Страница 17: ...n the unit A second set of two exposures can be taken immediately TMJ closed mouth x Program duration time approx 16 s x Program exposure time 4 4 s 2 x 2 2 s x Positioning tool 5 6 see 4 Positioning...

Страница 18: ...s x Program exposure time 12 3 s x Positioning tool 1 2 3 4 see 4 Positioning tools 6 9 P9 PROGRAM TMJ left 3D volume x Program exposure time 12 3 s x Positioning tool 7 available on request 6 10 P10...

Страница 19: ...djustable 6 12 P12 PROGRAM Antero posterior cephalometric image x Positioning tool 8 without nasion see 4 Positioning tools x Program duration time 1 6 s adjustable Program exposure time 1 6 s adjusta...

Страница 20: ...to press the Return button in order to initialize the device as indicated on side figure By pressing the RETURN Arm Movement key the rotation arm locates the reference points and moves to the PATIENT...

Страница 21: ...e current can be set from 4 to 10 mA 4 0 5 0 6 3 8 0 10 F TEST Mode without Radiation optional READY GREEN LIGHT ON Press RETURN Arm Movement to move the arm from PATIENT ENTRY position to START posit...

Страница 22: ...OTE The height adjustment motor starts slowly and then increases its speed Press the height adjustment key until the unit has reached the desired height 7 3 POSITIONING THE PATIENT 7 3 1 Panoramic and...

Страница 23: ...ion holding firmly the handles With bite block x Have the patient bite into the indentation in the tip of the bite block Mouth is closed but teeth are not superimposed With nasal support x Instruct th...

Страница 24: ...een the upper edge of the external auditory meatus and the lower edge of the infra orbital rim x The height of the FH horizontal beam can be adjusted with a dedicated knob 7 on the right side of the t...

Страница 25: ...move the carriage with the FORWARD BACKWARD buttons until the lateral light beam is on the canine to have the roots of the incisors within the layer in focus the movement in mm is shown on the contro...

Страница 26: ...sition in the following Run the acquisition program on PC to receive the radiographic image being created as described in section 5 Application Software on page 11 Go to the area designated for the op...

Страница 27: ...ue of the dose by area product DAP in mGy cm2 is indicated on display after a panoramic exposure Do acknowledge the DAP value with RETURN or EXPOSURE key to proceed DAP computations can be enabled or...

Страница 28: ...rn button in order to initialize the device as indicated on side figure By pressing the RETURN Arm Movement key the rotation arm locates the reference points and moves to the PATIENT ENTRY position Wh...

Страница 29: ...l The mAs level can be selected from 2 to 40 2 0 4 0 8 0 16 32 2 5 5 10 20 40 3 2 6 3 12 25 Press the Return button to bring the carriage from Patient Entry Position to Cefalometric Exams position The...

Страница 30: ...neously outwards as far as they will go Insert the protective caps for ear plug Bring the unit the proper height using UP or DOWN keys NOTE The height adjustment motor starts slowly and then increases...

Страница 31: ...outwards as far as they will go Insert the protective caps for ear plug Bring the unit the proper height using UP or DOWN keys NOTE The height adjustment motor starts slowly and then increases its spe...

Страница 32: ...ot to lose the washer Grasp the holders at the very top with both hands Push the holders simultaneously outwards as far as they will go Guide the patient sideways into the unit Instruct the patient to...

Страница 33: ...patient has been partially exposed Part of the radiograph is being available Examination may have to be repeated 8 5 AFTER THE EXPOSURE At the end of the X Ray exposure grasp the holders at the very t...

Страница 34: ...OTE Keep pressed the TEST key to reset all values to default factory conditions Select the exposure program by pressing the program key Select the patient build by pressing the PATIENT key Small Mediu...

Страница 35: ...values kV mAs Program P1 P3 P4 P5 P6 P7 61 6 3 67 6 3 73 6 3 79 6 3 P2 61 5 0 67 5 0 73 5 0 79 5 0 P8 P9 P10 61 6 3 67 6 3 73 6 3 79 6 3 Factory programmed values kV mAs Freely programmed values kV m...

Страница 36: ...being careful not to let liquid substances penetrate the machine The plastic covers can be cleaned with a soft cloth and a mild detergent Disinfecting The parts that come into contact with the patient...

Страница 37: ...failure Switch the unit off Report to technical service 10 Tube head temperature exceeding limit Wait for tube cool down 11 Exposure aborted during irradiation Restart if termination was requested by...

Страница 38: ...our system by performing maintenance on it at regular intervals at least once annually or having this work performed by your dental dealership In addition to the scheduled annual inspection by the use...

Страница 39: ...oducts Diagnostic X ray Systems and their major Components US FDA 21CFR1020 31 Performance Standards for Ionizing Radiation Emitting Products Radiographic Equipment US FDA 21CFR1040 10 Performance Sta...

Страница 40: ...at receptor s plane is approximately 27 higher than real size vertical magnification on adult standard profile 1 27 1 approximately Cephalometric images at receptor s plane is approximately 10 higher...

Страница 41: ...ve Tube housing assembly Reference axis Used Icons OFF disconnected from mains supply Inherent Filtration ON connected to mains supply Fragile Handle With Care Fuse Fear of Humidity Alternate Current...

Страница 42: ...601 1 2 test level Compliance level Electromagnetic environment Electrostatic discharge ESD IEC 61000 4 2 6 kV contact 8 kV air IEC 60601 1 2 Test level Floors should be wood concrete or ceramic tile...

Страница 43: ...arked with the following symbol 14 4 RECOMMENDED SAFETY DISTANCES FOR SYSTEMS THAT ARE NOT LIFE SUPPORTING The FONA XPan 3D Plus system is intended for use in an electromagnetic environment in which r...

Страница 44: ...6968380110 11 2016...

Отзывы: