6
Caring for your Lawnmower
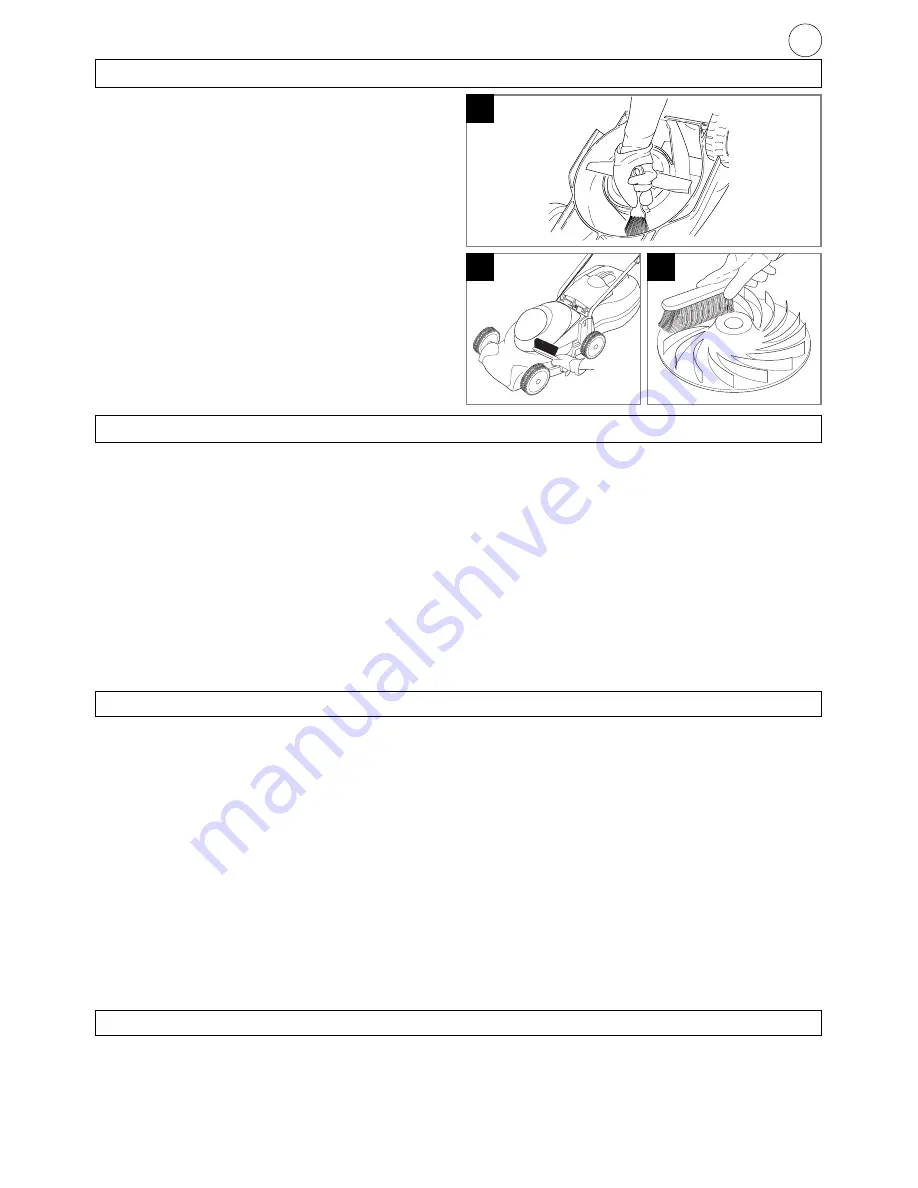
Cleaning (W, Y, Z)
• USE GLOVES
1. Remove grass from under the deck with a brush.
(W)
2. Using a soft brush
(X)
remove grass clippings from all
air intakes, the discharge chute and the grass box.
3. Remove the blade to gain access to the fan and
clean with a soft brush.
(Y)
4. Wipe over the surface of your lawnmower with a dry cloth.
• IMPORTANT
Never use water for cleaning your lawnmower. Do
not clean with chemicals, including petrol, or solvents
- some can destroy critical plastic parts.
At the End of the Mowing Season
1. Replace blade, bolts, nuts or screws, if necessary.
2. Clean your lawnmower thoroughly.
3. Ask your local Service Centre to clean the air filter thor-
oughly and carry out any service or repairs required.
4. Make sure that the electric cable is coiled properly.
Storing your Lawnmower
Store in a dry place where your lawnmower is protect-
ed from damage.
W
X
Y
Fault Finding Hints
Fails to Operate
1. Is the correct Starting procedure being followed?
See ‘To Start your Lawnmower’.
2. Is the Power Turned On?
3. Check the fuse in the plug, if blown replace.
4. Fuse continues to blow?
Immediately disconnect from the mains electricity
supply and consult your local approved Electrolux
Outdoor Products Service Centre.
Poor Grass Collection
1. Disconnect from the mains electricity supply.
2. Clean the outside of the air intakes, the discharge
chute and the underside of the deck
.
3. Clean the outside of the Air Filters.
(Ask your local service centre to clean your air filter
thoroughly).
4. Clean Fan Blades.
5.
If poor collection persists.
Immediately disconnect from the mains electricity
supply and consult your local approved Electrolux
Outdoor Products Service Centre.
Excessive Vibration
1. Disconnect from the mains electricity supply.
2. Check that the blade is fitted correctly?
3. If the blade is damaged or worn, replace it with a new one.
4. If vibration persists, turn the blade through 180
o
by
first loosening the blade bolt, turning the blade and
re-tightening the blade bolt.
5. If vibration persists?
Immediately disconnect from the mains electricity
supply and consult your local approved Electrolux
Outdoor Products Service Centre.
Environmental Information
Electrolux Outdoor Products are manufactured under an Environmental Management System (ISO 14001) using, where
practical, components manufactured in the most environmentally responsible manner, according to company procedures,
and with the potential for recycling at the end of the products’ life.
•
Packaging is recyclable and plastic components have been labelled (where practical) for categorised recycling.
•
Awareness of the environment must be considered when disposing of ‘end-of-life’ product.
•
If necessary, contact your local authority for disposal information.
If any part is found to be defective due to faulty manufacture
within two years of original purchase, Electrolux Outdoor
Products, through its Authorised Service Repairers will effect the
repair or replacement to the customer free of charge providing:
(a) The fault is reported directly to the Authorised Repairer.
(b) Proof of purchase is provided.
(c) The fault is not caused by misuse, neglect or faulty
adjustment by the user.
(d) The failure has not occurred through fair wear and tear.
(e) The machine has not been serviced or repaired, taken
apart or tampered with by any person not authorised by
Electrolux Outdoor Products.
(f) The machine has not been used for hire.
(g) The machine is owned by the original purchaser.
(h) The machine has not been used outside of the country
for which it was specified.
(i)
The machine has not been used commercially.
*
This guarantee is additional to, and in no way diminish-
es the customers statutory rights.
Failures due to the following are not covered, therefore it is important
that you read the instructions contained in this Operator's Manual
and understand how to operate and maintain your machine:
Failures not covered by guarantee
*
Replacing worn or damaged blades
*
Failures as a result of not reporting an initial fault.
*
Failures as a result of sudden impact.
*
Failures as a result of not using the product in accor-
dance with the instructions and recommendations con-
tained in this Operator's Manual.
*
Machines used for hire are not covered by this guarantee.
*
The following items listed are considered as wearing
parts and their life is dependent on regular maintenance
and are, therefore not normally subject to a valid warran-
ty claim: Blades, Electric Mains cable.
*
Caution!
Electrolux Outdoor Products does not accept liability under the
warranty for defects caused in whole or part, directly or indirectly
by the fitting of replacement parts or additional parts that are not
either manufactured or approved by Electrolux Outdoor
Products, or by the machine having been modified in any way
Guarantee & Guarantee Policy


