background image

4

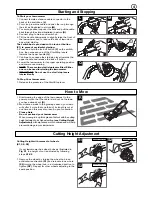
Starting and Stopping

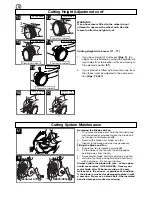
Cutting Height with removal of wheels 
(S1, S2, S3)

If your lawnmower has wheel hubs as illustrated in

Fig S1

, the height of cut is adjusted by following

steps 

S1-S3

.

1. Remove the wheel by turning the wheel hub in an

anticlockwise direction 

(S1)

and relocate in new hole

(S2)

turning the wheel hub in a clockwise direction to

tighten 

(S3)

.  Repeat for other wheels adjusting to the

same position.

To Start your Lawnmower

1. Connect female extension cable connector to the

back of the switchbox.

(L)

2.  Form loop in mains cable and push the loop through

the slot as illustrated in picture 

(M)

3.  To secure, position loop over the hook and pull the cable

back through the slot as illustrated in picture 

(N)

.

4. Connect plug to mains and switch on.
5. Tilt the handle downwards to slightly raise the front of

the lawnmower and to reduce the risk of lawn dam-
age whilst starting.

The switchbox is provided with a lock-off button
(P1) to prevent accidental starting.

6. Press and hold the lock-off button 

(P)

on the switch-

box, then squeeze one of the Start/Stop levers
towards the upper handle 

(Q)

.

7. Continue to squeeze the start/stop lever towards the

upper handle and release the lock-off button.

8. Lower the lawnmower to its proper operating position

and commence mowing.

• NOTE There are two start/stop levers fitted. Either

one can be used for starting the lawnmower.

• IMPORTANT Do not use the start/stop levers

intermittently

To Stop Your Lawnmower.

1. Release the pressure of the Start/Stop lever

How to Mow

1. Start mowing the edge of the lawn nearest to the

power point so that the cable is laid out on the lawn
you have already cut 

(R)

.

2. Mow twice a week in the growing season, your lawn

will suffer if more that one third of its length is cut at
one time and this may also result in poor collection.

• Please Note

Do not overload your Lawnmower

When mowing in long thick grass a first cut with the cutting
height adjusted to its highest setting, 

(see Cutting Height

Adjustment)

, will help reduce motor overload and will help

prevent damage to your lawnmower.

R

S1

S2

S3

Wheel removal

Wheel removal

Wheel removal

Cutting Height Adjustment

M

P

Q

N

1

L

Содержание VENTURER 370

Страница 1: ...IMPORTANT INFORMATION Read before use retain for future reference For all customer enquiries or for replacement parts contact 01325 300303 www flymo com eop customer services electrolux co uk ...

Страница 2: ... signs of damage or ageing 3 Do not use the lawnmower if the electric cables are damaged or worn 4 Immediately disconnect from the mains electricity supply if the cable is cut or the insulation is damaged Do not touch the electric cable until the electrical supply has been disconnected Do not repair a cut or damaged cable Replace it with a new one 5 Your extension cable must be uncoiled coiled cab...

Страница 3: ...ese connectors be used for earthed products All Flymo connectors and cables are of splashproof con struction They are not waterproof and must not be left outside permanently nor should they be submerged or immersed in water Do not let cable lay or trail through pools of water or splashed with water from hose pipes MAINS PLUG REPLACEMENT IMPORTANT If the plug supplied is cut off it should be destro...

Страница 4: ... over and insert screw into hole as illustrated in fig F and tighten fully 3 Locate grassbox upper into grassbox lower G Align clips ensure all clips are correctly located 4 Clip the two halves together 5 Ensure all clips are securely connected Grassbox Assembly RE420 RE420c 1 Insert the grassbox handle into the top of one of the grassbox halves Press firmly down and forward until the handle click...

Страница 5: ... and hold the lock off button P on the switch box then squeeze one of the Start Stop levers towards the upper handle Q 7 Continue to squeeze the start stop lever towards the upper handle and release the lock off button 8 Lower the lawnmower to its proper operating position and commence mowing NOTE There are two start stop levers fitted Either one can be used for starting the lawnmower IMPORTANT Do...

Страница 6: ...gs T2 T7 Cutting System Maintenance Removing the Blade and Fan 1 To remove the blade bolt hold the fan firmly and with the spanner provided loosen the blade bolt by turning it anti clockwise U 2 Remove the blade bolt blade and fan 3 Inspect for damage and clean as necessary Fitting the Blade and Fan 1 Ensure the fan is located correctly V 2 Fit the blade to the fan with the sharp edges pointing aw...

Страница 7: ...actical components manufactured in the most environmentally responsible manner according to company procedures and with the potential for recycling at the end of the products life Packaging is recyclable and plastic components have been labelled where practical for categorised recycling Awareness of the environment must be considered when disposing of end of life product If necessary contact your ...

Страница 8: ...SO 5349 as a guide The maximum weighted root mean square value of vibration recorded at opera tor s hand position was Type of Cutting Device Rotary Blade Identification of Series See Product Rating Label Conformity Assesment Procedure ANNEX VI Notified Body I T S Cleeve Road Leatherhead Surrey KT22 7SB England Other Directives 98 37 EEC 89 336 EEC 73 23 EEC applicable standards EN60555 2 1987 EN60...

Отзывы: