background image

Safety Precautions

10. Switch off before pushing the mower over

surfaces other than grass.

11. Never operate the lawnmower with damaged

guards or without guards in place.

12. Keep hands and feet away from the cutting means at

all times and especailly when switching on the motor. 

13. Do not tilt lawnmower when the motor is running,

except when starting and stopping.  In this case, do
not  tilt more than absolutely necessary and lift only
the part which is away from the operator.  Always
ensure that both hands are in the operating position
before returning the appliance to the ground.

14. Never pick up or carry a mower when it is

operating or still connected to the mains supply.

15. Remove the plug from the mains:
-

before leaving the mower unattended for any period;

-

before clearing a blockage;

-

before checking, cleaning or working on the appliance;

-

if you hit an object.  Do not use your lawnmower
until you are sure that the entire lawnmower is in
a safe operating condition.;

-

if the lawnmower starts to vibrate abnormally.  Check
immediately.  Excessive vibration can cause injury.

Maintenance and storage

1. Keep all nuts, bolts and screws tight to be sure

the lawnmower is in safe working condition.

2. Check the grassbox frequently for wear or deterioration.
3. Replace worn or damaged parts for safety.
4. Only use  the replacement blade, blade bolt,

spacer and impeller specified for this product.

5. Be careful during adjustment of the lawnmower

to prevent entrapment of the fingers between
moving blades and fixed parts of the machine.

Assembly Instructions

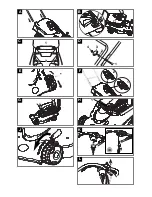
C1 - Grassbox lid,  C2 - Lower handle fixing pins
Assembly of Lower Handles to Deck

1. Insert lower handle into holes in the deck 

(A)

2. Release the grassbox catch and lift the grassbox lid 

(B).

3. Rest the grassbox lid against the lower handle

and remove the grassbox.

4. Push the lower handle into place ensuring that

the holes in the lower handle are correctly located
behind the holes in the deck.

5. Secure the lower handles to the inside of the

deck with the lower handle fixing pins. 

(C).

6. Ensure the fixing pins are securely located.
7. Should a problem occur when securing lower

handle to deck, carefully lever fixing pins out of

location and repeat steps 4 to 6 above.

8. Replace the grassbox and close the grassbox lid.

D1 - Bolt,  D2 - Washer,  D3 - Handle knob,
D4 - Nut 
Fitting Upper Handles to Lower Handles (D) 

1. Ensure the upper handle is located correctly with

the lock-off button on the switchbox uppermost.

2. Insert the nut into the handle knob.
3. Ensure the upper handle and the lower handle

are aligned correctly.

4. Fit the bolts, washers and handle knobs.
5. Fit the cable to the handles with the clips

provided.  Make sure the cable is not trapped
between the upper and lower handles.

Cutting Height Adjustment

1. Lift the lever out of location and rotate to the

desired position. 

(E)

Heights of cut
1 & 2

low

3 medium
4 & 5 

high

Removing, Emptying and Refitting the Grassbox

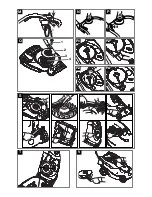
F1 - Grassbox full,  
F2 - Grassbox empty
Grassbox Full 

As the grassbox fills up, grass will be visible
through the window in the lid 

(F1)

.

When the window is full it is time to empty the
grassbox.

Emptying the Grassbox

Stop the lawnmower, as described in ‘To Stop
your Lawnmower’ and wait until the blade has
stopped rotating, BEFORE lifting the grassbox lid.

1. Release grassbox catch and lift grassbox lid 

(B).

See Assembly Instructions.

2. Rest grassbox lid against lower handle and

remove grassbox  

(G).

3. Empty grassbox.
4. Replace grassbox and close grassbox lid.

Cut Out Device

H1 - Cut out

The Roller Compact is fitted with a cut-out
device (H) which will prevent the lawnmower
from being started until the grassbox lid is
firmly close and clicked into place.

Do not attempt to use your lawnmower without
the grassbox in place or with the lid open.

ENGLISH - 2

When received from the
Manufacturer, the front
wheels are in a raised
position.

Do not switch on this
product before removing
from the raised position into
a desired height of cut. (J)

IMPORTANT INFORMATION

Содержание ROLLER COMPACT 400

Страница 1: ... ennen käyttöä ja säilytä myöhempää tarvetta varten SK Záruka na tento produkt nebude uznaná v prípade porúch spôsobených nesprávnou obsluhou alebo používaním výrobku na iný účel alebo iným spôsobom ako je uvedené Pred začatím práce si prosím dôkladne prečítajte návod na obsluhu a tento si aj pre prípad potreby uschovajte SI Garancija ne velja ob nepravilni uporabi proizvoda in ali ob uporabi za d...

Страница 2: ...C D 1 2 3 2 1 K CH 4 L A B E F 1 2 G H 1 J ...

Страница 3: ...P N M Q 4 2 3 1 R1 R2 R3 R4 T V S ...

Страница 4: ...2 stk 6 Mutter 2 stj 7 Nedre håndtak 8 Klippedeksel 9 Festebolt for nedre håndtak 2 stk 10 Lokk for gressoppsamler 11 Regulering for klippehøyden 12 Bryterboks 13 Bruksanvisning 14 Skrunøkkel skrape 15 Easi Reel kabelvikler kun Roller Compact 4000 16 Advarselsetikett 17 Produktmerking 18 Elektrisk nettkabel kun Roller Compact 4000 FI SISÄLTÖ 1 Ylempi kahva 2 Johdon pidike x 2 3 Pultti x 2 4 Tiivis...

Страница 5: ...3 Śruba 4 Podkładka 5 Gałka mocująca 6 Nakrętka x 2 7 Dolny uchwyt 8 Obudowa 9 Śruba mocująca dolnego uchwytu 10 Pokrywa pojemnika na trawę 11 Dźwigienka regulująca wysokość 12 Puszka przyłączeniowa 13 Instrukcja obsługi 14 Klucz skrobak 15 Zwijarka kabla Easi Reel wyłącznie dla modelu Roller Compact 4000 16 Znaki bezpieczeństwa 17 Tabliczka znamionowa 18 Kabel Zasilania Elektrycznego wyłącznie dl...

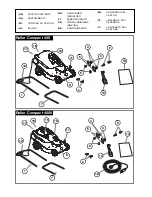
Страница 6: ...ONGEN INNHOLDER FI PAKETIN SISÄLTÖ SE FÖRPACKNINGENS INNEHÅLL DK KARTONINDHOLD ES CONTENIDO DEL CARTON PT LEGENDAS DOS DESENHOS IT CONTENUTO DEL CARTONE Roller Compact 400 1 2 3 4 5 7 8 9 10 11 12 13 Roller Compact 4000 1 2 3 4 5 7 8 9 10 12 13 14 17 16 17 16 6 6 14 11 15 18 ...

Страница 7: ... Do not pull cable around sharp objects 8 Always switch off at the mains before disconnecting any plug cable connector or extension cable 9 Switch off remove plug from mains and examine electric supply cable for damage or ageing before winding cable for storage Do not repair a damaged cable replace it with a new one Use only Flymo replacement cable 10 Always wind cable carefully avoiding kinking 1...

Страница 8: ...lower handle are correctly located behind the holes in the deck 5 Secure the lower handles to the inside of the deck with the lower handle fixing pins C 6 Ensure the fixing pins are securely located 7 Should a problem occur when securing lower handle to deck carefully lever fixing pins out of location and repeat steps 4 to 6 above 8 Replace the grassbox and close the grassbox lid D1 Bolt D2 Washer...

Страница 9: ... is cracked or damaged replace it with a new one Fitting the Blade and Fan 1 Ensure the fan is located correctly 2 Fit the blade to the fan 3 Re assemble blade bolt through blade and fan 4 Hold the fan firmly and tighten blade bolt firmly with the spanner provided Do not over tighten ENGLISH 3 Storing your cable in the Easi Reel cable winder Roller Compact 4000 only 1 Insert the connector into the...

Страница 10: ...ecommend that your product is serviced at least every twelve months more often in a professional application Fault Finding Hints Fails to Operate 1 Is the correct Starting procedure being followed See To Start your Lawnmower 2 Is the grassbox lid firmly closed 3 Is the Power Turned On 4 Check the fuse in the plug if blown replace 5 Fuse continues to blow Immediately disconnect from the mains elect...

Страница 11: ... Industrial Park NEWTON AYCLIFFE Co Durham DL5 6UP Grande Bretagne certifie qu un échantillon du produit ci dessus a été essayé selon les indications de la norme ISO 5349 La moyenne quadratique pondérée des vibrations enregistrées à la position de la main de l opérateur était de Type d outil de coupe Lame rotative Identification de la serie Voir la Plaquette D identification Procédure d évaluation...

Страница 12: ...r herved at en prøve af ovenstående produkt er blevet testet idet ISO 5349 er blevet benyttet som vejledning Den maksimale vægtede effektivværdi for vibration som er blevet registreret ved brugerens håndposition var Type klippeenhed Rotorklinge Identifikation af serie Se Produktmærkat Fremgangsmåde til vurdering af overensstemmelse ANNEX VI Underrettet organ I T S Cleeve Road Leatherhead Surrey KT...

Страница 13: ...nt D Mért hangerőszint E Szint F Érték G Súly H Ja niżej podpisany M Bowden of Electrolux Outdoor Products Aycliffe Industrial Park NEWTON AYCLIFFE Co Durham DL5 6UP Zaświadczam że Kosiarka do strzyżenia trawników Kategoria Elektryczna kosiarka obrotowa na kółkach Wykonanie Electrolux Outdoor Products Odpowiada wymaganiom technicznym Dyrektywy Europejskiej Wspólnoty Gospodarczej EWG nr 2000 14 EEC...

Страница 14: ... C Garantovaný stupeň sily zvuku D Nameraný stupeň sily zvuku E Úroveň F Hodnota G Hmotnos H Spodaj podpisani M Bowden of Electrolux Outdoor Products Aycliffe Industrial Park NEWTON AYCLIFFE Co Durham DL5 6UP potrjujem da je kosilnica kategorija Električni aparat z gibljivimi kolesi blagovna znamka Electrolux Outdoor Products v skladu z določbami Direktive 2000 14 EEC Spodaj podpisani M Bowden Ele...

Страница 15: ...oftegaardsvej 93A DK 2800 Kgs Lyngby Tel 45 87 75 77 Fax 45 93 33 08 www flymo partner dk DEUTSCHLAND Flymo Deutschland Tel 097 21 7640 Fax 097 21 764202 ESTONIA Electrolux Estonia Ltd Electrolux Eesti AS Tel 372 6650010 FRANCE Flymo France SNC Tel 01 46 67 8141 Fax 01 43 34 2491 FINLAND SUOMI Electrolux Outdoor Products Finland Tel 00 358 9 39611 Fax 00 358 9 3961 2644 ITALIA McCulloch Italiana s...

Отзывы: