


14
15
Once a FLOW UNIT is connected, the device automatically detects
it and the "Operation window" will display an additional zone
including the flow rate measurement.
The measured flow rate (Qmeas) is only monitoring purposes. To
directly control the flow rate, see next page (Flow rate control)
For connection of FLOW UNIT to Flow EZ
TM
simply connect the USB
cable from the FLOW UNIT to the Flow EZ
TM
.
SETTING UP
For more information about how to connect and use the Flow EZ
TM
check our webpage and Flow EZ
TM
user manual:
https://www.fluigent.com/research/instruments/pressure-flow-
controllers/lineup-series/flow-ez/
Once connected to the Flow EZ
TM
and to the fluidic system (reservoir
and chip) flow rate can be measured either directly on the Flow EZ
TM
in local mode or by using OxyGEN.
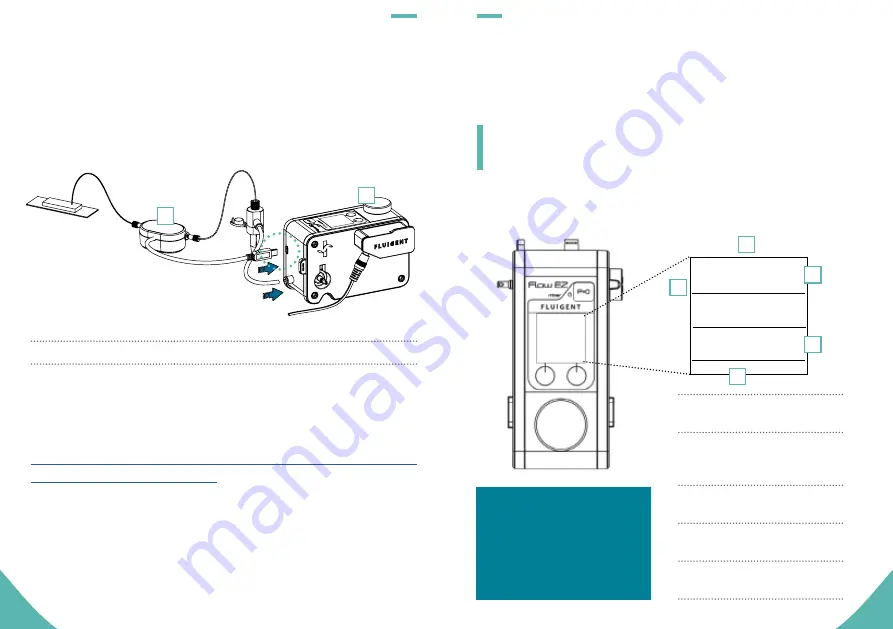
SETTING UP
Local mode:
measure and control the flow-rate
Connection to Flow EZ
TM
1
FLOW UNIT
(sensor)
2
FLOW EZ
TM
(Pressure-based flow controller)
1
2
Flow-rate measure
Qmeas
H20
M
µL/min
87.00
Set Q Ctrl
Menu
Pmeas
Pcmd
mbar
mbar
432.0
432.0
1
Liquid type H2O or
Isopropanol
2
Range of the FLOW UNIT
depending on the target flow rate
(XS, S, M+, L+)
3
Switch to flow rate control
mode
see next page
4
Measured flow rate units
can be changed using the menu
5
Pressure command
to be
set by the user
In this configuration you will
have access to the measure
of the flow rate in real time.
You can then adjust the
pressure to reach the flow
rate you want to target.
1
2
+
3
4
4


