background image

6

G B

I E

CY

N I

Intended purpose

The electric chainsaw is constructed for 

sawing wood only. The saw is not de-

signed for any other types of application 

(e.g. cutting of brickwork, plastic or food). 

The chainsaw is designed for employment 

in the do-it-yourselfer sector. It was not 

designed for continuous employment in the 

commercial sector.

The device is designed for use by adults. 

Young people over 16 years old may use 

the chainsaw under supervision only.

The manufacturer is not liable for dam-

ages, which were caused through use in 

applications for which it was not designed, 

or incorrect operation. 

This electric chainsaw is to be used only 

by one person and only for sawing wood. 

The chainsaw must be held with the right 

hand on the rear handle and the left hand 

on the front handle. Before use, the user 

must have read and understood all of the 

information and directions in the operating 

instructions. The user must wear appropri-

ate personal protective equipment (PPE). 

The chainsaw is to be used only for sawing 

wood. Materials such as plastic, stone, 

metal or wood containing foreign objects 

(e.g. nails or screws) must not be cut with 

the chain saw!

General description

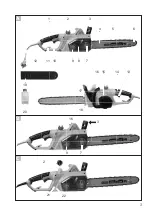
  The illustration of the principal 

functionin g parts can be found 

on the front and back foldout 

pages.

Extent of the delivery

Carefully unpack the appliance and check 

that it is complete:

Chainsaw

-  Chain bar (guide rail) (already mounted)

-  Saw chain (already mounted)

-  Saw bar 

protection sheath

8

-  Instruction Manual

Dispose of the packaging material 

correctly.

Overview

A

  1  Rear handle

2


3  Chain brake handle, front hand 

guard


4  Chain bar


5  Saw chain


6  Nose sprocket


7  Fastening bolt for sprocket chain 

wheel covering


8  Sprocket chain wheel covering


9  Screw for the chain quick- 

tensioning system


10  Rear hand guard


12  Mains cable


13  On/off switch


14  Safety lock


15  Electric motor


16  Front handle


17  Bumper


18  Chain catcher (not visible)


19  Saw bar protection sheath


20  Oil bottle

C

 21  Oil level indicator


22  Minimum mark “MIN”  

on the oil level indicator

Содержание FKS 2200 G4

Страница 1: ...RIC CHAINSAW FKS 2200 G4 IAN 291822 ELEKTRO KETTENS GE Originalbetriebsanleitung ELECTRIC CHAINSAW Translation of the original instructions 291822_Elektro Kettensaege_cover_GB_IE_NI_CY indd 2 27 10 17...

Страница 2: ...ing unfold the page containing the illustrations and familiarise yourself with all functions of the device Klappen Sie vor dem Lesen die Seite mit den Abbildungen aus und machen Sie sich anschlie end...

Страница 3: ...3 C 1 2 3 5 6 17 A 14 13 15 16 7 9 7 9 11 12 19 B 2 4 10 8 3 16 20 21 22 18...

Страница 4: ...4 R N S Q P O M L K 1 2 1 2 3...

Страница 5: ...ing on 17 Checking the chain brake 17 Checking the chain 18 lubrication 18 Changing the saw bar 18 Sawing techniques 18 General 18 Felling trees 18 Limbing 20 Bucking 20 Maintenance and cleaning 21 Cl...

Страница 6: ...he user must wear appropri ate personal protective equipment PPE The chainsaw is to be used only for sawing wood Materials such as plastic stone metal or wood containing foreign objects e g nails or s...

Страница 7: ...gth of the chain bar 460 mm Sawing length 395 mm Acoustic pressure level LpA 94 pA 3 dB Sound power level LWA measured 4 8 WA 2 49 dB guaranteed 107 dB A Vibration ah 3 22 m s2 5 2 Noise and vibration...

Страница 8: ...on the oil tank cap Saw chain lubrication Notes on safety This section deals with the basic safety regulations while working with the electric chainsaw An electric chainsaw is a dangerous device whic...

Страница 9: ...s Practise using the saw sawing logs on a sawhorse and get an experienced user or a specialist to explain to you the func tion of the saw the way of working the techniques of sawing and the personal p...

Страница 10: ...njury Wear personal protective equip ment and always wear safety glasses Wearing personal protective equipment such as nonslip safety boots in the presence of flammable Iiquids gases or dust Power too...

Страница 11: ...ed Do not use the power tool if the switch does not turn it on and off Any power tool that cannot be controlled with the switch is dangerous and must be repaired Disconnect the plug from the power sou...

Страница 12: ...s the risk of personal in jury and should never be done Hold the power tool only on the insulated handle surfaces as the saw chain may come into contact with concealed power cables Contact between the...

Страница 13: ...w chain along the top of the guide bar may push the guide bar rapidly back towards the operator Either of these reactions may cause you to lose control of the saw which could result in serious persona...

Страница 14: ...d representative e g authorised workshop customer service etc Lay the extension cable in such a way that it will not be caught by branches or similar during sawing Use a surge protector with a release...

Страница 15: ...be low the bar bolt 23 sits in the round recess on the blade the blade is placed correctly It is nor mal for the saw chain 5 to sag It is normal that the saw chain 5 is slack 6 Pre tension the saw cha...

Страница 16: ...3 is pulled up against the front grip 16 2 Unscrew the fastening bolt 7 3 To tension the saw chain turn the screw 9 for the chain quick tensioning system in clockwise direction To loosen the tension t...

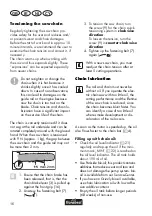
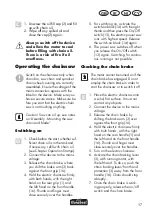
Страница 17: ...se securely over the handles 5 For switching on activate the switch on block 14 with the right thumb and then press the On Off switch 13 the electric power saw runs with highest speed Release the swit...

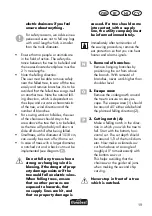
Страница 18: ...the chain tension and to remove the sprocket chain wheel cover 8 4 Remove the saw bar 4 and saw chain 5 To remove the guide bar 4 raise it to an angle of ap prox 45 degrees This will make it easier t...

Страница 19: ...l any trees when a strong or changing wind is blowing if the danger of prop erty damage exists or if the tree could fall on electric wires When felling trees ensure that no other persons are exposed t...

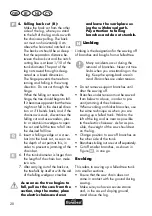
Страница 20: ...and above the log 4 Felling back cut B Make the back cut from the other side of the log where you stand to the left of the log and saw with the chainsaw pulling The back cut must run horizontally 5 cm...

Страница 21: ...d you on the right 1 Hold your left arm as straight as you can 2 Watch out for the falling trunk Position your self to prevent any danger from the separated trunk Watch your feet The trunk may cause i...

Страница 22: ...around Oil automatic system check and where appropriate Oiling the saw chain Clean and oil the chain regularly In this way you keep the chain sharp and get optimum machine performance In case of damag...

Страница 23: ...pecial tools are necessary for sharpening the chain which guarantee that the cutting edges are sharpened at the correct angle and to the correct depth For the inexperi enced user of chainsaws we recom...

Страница 24: ...utomatic oiling of the saw chain during operation 5 Mount chain bar 4 chainsaw 5 and sprocket chain wheel covering 8 and tighten the chainsaw With the oil nozzles in good condi tion and the oil regula...

Страница 25: ...lps to reduce both the con sumption of raw materials and the environ mental impact Information about disposal and the location of the nearest recycling centre may be obtained for example from your loc...

Страница 26: ...e Worn carbon brushes Repair by customer service Defective motor Repair by customer service Chain does not rotate Chain brake blocks saw chain A 5 Check chain brake Possibly release chain brake Inferi...

Страница 27: ...quipment has been carefully pro duced in accordance with strict quality guidelines and conscientiously checked prior to delivery The guarantee applies for all material and manufacturing defects This g...

Страница 28: ...send your equipment to our service branch in clean condition and with an indication of the defect Equipment sent carriage forward or by bulky goods express or other special freight will not be accepte...

Страница 29: ...2 9 CY G R 52 52 52 53 5 3 53 54 55 5 6 5 7 S e r v i c e Ce n t e r 5 7 5 7 2 9 30 30 30 30 31 31 32 32 33 33 34 38 39 40 40 4 1 41 42 43 43 44 44 45 45 4 5 45 46 48 48 49 49 50 50 51 51 CE 8 7 o 8 9...

Страница 30: ...3 0 G R CY 16 180 ml A 1 2 3 4 5 6 O 17 16 15 13 14 18 9 7 8 10 12 19 20...

Страница 31: ...G4 U 230 240 V 50 Hz P 2200 Watt II o IPX0 v0 15 3 m s 4 9 kg 5 6 kg 190 ml Oregon 91P057X Oregon 16 DOUBLE GUARD 160SDEA041 112364 10 mm 1 3 mm 6 460 mm 395 mm LpA 94 1 dB A KpA 3 dB LWA 104 8 dB A K...

Страница 32: ...3 2 G R CY 7 1 Lwa dB II...

Страница 33: ...3 3 CY G R 460 mm...

Страница 34: ...3 4 G R CY A...

Страница 35: ...3 5 CY G R 30 mA H05RN F 75 2 5 mm2...

Страница 36: ...3 6 G R CY N...

Страница 37: ...3 7 CY G R...

Страница 38: ...3 8 G R CY 1 E 1 B...

Страница 39: ...3 9 CY G R 1 A A O B...

Страница 40: ...4 0 G R CY FI 30 mA A 1 10 3 5 17 15 13...

Страница 41: ...4 1 CY G R 11 18 1 2 7 8 3 5 4 5 4 45 5 24 5 4 5 23 23 5 6 5 9 7 8 25 8 7...

Страница 42: ...4 2 G R CY 10 9 N 1 kg 2 10 min B 1 16 2 7 3 9 9 4 7 5...

Страница 43: ...4 3 CY G R A 4 C 21 C 22 190 ml Parkside Grizzly 6 8 C 1 2 2...

Страница 44: ...4 4 G R CY D 1 2 3 3 16 4 1 16 5 14 13 14 6 13 E 1 2 3 3 16 4 1 16 5 6 3 3 16 7...

Страница 45: ...4 5 CY G R 26 F 1 2 3 7 9 8 4 4 5 4 45 5 24 5...

Страница 46: ...4 6 G R CY 2 15 18 cm...

Страница 47: ...4 7 CY G R 1 2 1 45 2 3 A 1 3 45 4 B 5 cm 1 10...

Страница 48: ...4 8 G R CY 5 6 7...

Страница 49: ...4 9 CY G R 1 2 3 2 1 3 3 1 3 4 1 2 3...

Страница 50: ...5 0 G R CY A 8 A 4 26 10 24 A 5 A 5 A 4 A 4...

Страница 51: ...5 1 CY G R 10 G 30 85 0 65 mm...

Страница 52: ...5 2 G R CY H 1 2 3 4 0 mm 4 5 6 4 mm 7 8 0 65 mm 5 10 F 1 12 2 8 5 4 3 A 4...

Страница 53: ...5 3 CY G R 4 26 5 4 5 8 F 4 10 1 A 12 2 8 5 4 3 5 8...

Страница 54: ...5 4 G R CY w w w g r i zzl y s e r v i c e e u Internet Service Center 57 7511 8246 Oregon 91P057X 3009 1598 3010 0420 Bio 1 3023 0001 Bio 5 3023 0002 Oregon Oregon...

Страница 55: ...5 5 CY G R A 13 ser vice ser vice ser vice A 5 A 5 A 5 service...

Страница 56: ...5 6 G R CY 3 291822...

Страница 57: ...Ce n t e r G R Tel 801 5000 019 0 03 EUR Min E Mail grizzly lidl gr I AN 2 9 1 8 2 2 CY Tel 8009 4409 E Mail grizzly lidl com cy I AN 2 9 1 8 2 2 Grizzly Tools GmbH Co KG Stockst dter Stra e 20 63762...

Страница 58: ...1 71 Bedienung 72 Einschalten 72 73 73 Schwert wechseln 73 S getechniken 74 Allgemeines 74 B ume f llen 74 Entasten 76 Abl ngen 76 Wartung und Reinigung 77 Reinigung 77 S gekette len 78 Wartungsinterv...

Страница 59: ...den Vor Gebrauch der Elektrokettens ge muss der Benutzer alle Hinweise und Anweisungen in der Betriebsanleitung gelesen und verstanden haben Der Benutzer muss angemessene pers nliche Schutzausr stung...

Страница 60: ...chutzklasse II Schutzart IPX0 0 15 3 m s Gewicht ohne Schwert und S gekette 4 9 kg mit Schwert und S gekette 5 6 kg Tankinhalt ca 190 ml S gekette Oregon 91P057X verchromter Schneidzahn r ckschlagarm...

Страница 61: ...das bei falscher oder nachl ssiger Benutzung ernst hafte oder sogar t dliche Verletzun gen verursachen kann Beachten Sie daher zu Ihrer Sicherheit und der Sicherheit anderer stets nach folgende Siche...

Страница 62: ...en Bildzeichen auf dem Schwert Laufrichtung der S gekette Bildzeichen auf der ltankkappe S gekette len Bildzeichen auf der Befestigungsschraube f r die Kettenradabdeckung AUF ZU Bildzeichen am Kettenb...

Страница 63: ...were Verletzungen verursachen Bewahren Sie alle Sicherheitshin weise und Anweisungen f r die Zukunft auf Der in den Sicherheitshinweisen verwende te Begriff Elektrowerkzeug bezieht sich auf netzbetrie...

Страница 64: ...Schraubenschl ssel bevor Sie die Elektrokettens ge ein Vermeiden Sie K rperkontakt mit geerdeten Oberfl chen wie von Rohren Heizungen Herden und K hlschr nken Es besteht ein erh htes Risiko durch elek...

Страница 65: ...ient wird Verwendung und Behandlung der Elektrokettens ge berlasten Sie das Ger t nicht Verwenden Sie f r Ihre Arbeit das daf r bestimmte Elektro werkzeug Mit dem passenden Elektro werkzeug arbeiten S...

Страница 66: ...amit wird sichergestellt dass die Sicherheit des Elektrowerkzeuges erhalten bleibt Befolgen Sie sorgf ltig die Wartungs ser Betriebsanleitung Besch digte Schutzvorrichtungen und Teile m ssen sachgem d...

Страница 67: ...hlagen wird s Bild 1 Abb a Arbeiten Sie mit der Kettens ge nicht auf einem Baum Bei Betrieb steht Verletzungsgefahr Achten Sie immer auf festen Stand und benutzen Sie die Kettens ge nur wenn Sie auf f...

Страница 68: ...warteten Situationen erm glicht Verwenden Sie stets vom Her steller vorgeschriebene Ersatz schienen und S geketten Falsche Ersatzschienen und S geketten k nnen R ckschlag f hren Halten Sie sich an die...

Страница 69: ...schaltsperre Zum Einschalten des Ger tes muss die Einschaltsperre entrie gelt werden 18 Kettenfangbolzen vermindert die Gefahr von Verletzungen wenn die S gekette rei t oder abspringt Weiterf hrende S...

Страница 70: ...3 in der unteren runden Aussparung am Schwert sitzt sitzt das Schwert richtig Es ist normal wenn die S gekette 5 durch h ngt 6 Spannen Sie die S gekette 5 vor indem Sie die Schraube f r 9 im Uhrzeiger...

Страница 71: ...er behandschuhten Hand ganz herumziehen l sst Beim Zie 9 Zugkraft d rfen S gekette und Schwert 2 10 min B 1 Vergewissern Sie sich dass die vorderen Griff 16 gedr ckt ist 2 L sen Sie die Befestigungs s...

Страница 72: ...tand Vergewissern Sie sich vor dem Starten dass die Elektroketten s ge keine Gegenst nde ber hrt Achtung Die Elektrokettens ge tage S gekette und Schwert mon tieren Einschalten D 1 berpr fen Sie vor d...

Страница 73: ...efahr durch die nach laufende S gekette Lassen Sie die Elektroketten s ge von unserem Kunden dienst reparieren Kettenschmierung pr fen Pr fen Sie vor Arbeitsbeginn den lstand Schalten Sie die Elektrok...

Страница 74: ...ist viel Erfahrung erforder lich um B ume zu f llen F l len Sie nur B ume wenn Sie sicher mit der Elektroketten s ge umgehen k nnen Be nutzen Sie die Elektroketten s ge auf keinen Fall wenn Sie sich u...

Страница 75: ...lanten F llrichtung 2 liegen 3 Fallkerbe schneiden A Setzen Sie eine Fallkerbe in die Richtung in die der Baum fal len soll Beginnen Sie mit dem unteren horizontalen Schnitt Die Schnitttiefe soll etwa...

Страница 76: ...ernen Sie St tzzweige erst nach dem Abl ngen Unter Spannung stehende ste m ssen von unten nach oben ges gt werden um ein Festklemmen der Elektrokettens ge zu verhindern Beim Abs gen von dickeren sten...

Страница 77: ...gen verursachen Halten Sie das Gleichgewicht 3 Wartung und Reinigung F hren Sie Wartungs und Reinigungsarbeiten grund s tzlich bei ausgeschaltetem Motor und gezogenem Netz stecker durch Verletzungs ge...

Страница 78: ...einmal pro Woche je nachdem was zuerst eintrifft Vor dem len muss das Schwert ins besondere die Zahnung des Schwertes gr ndlich gereinigt werden Benutzen Sie hierzu einen Handfeger und einen trockenen...

Страница 79: ...f hren Erh hte Unfallgefahr Zum Sch rfen der S gekette sind Spezial werkzeuge erforderlich die gew hrleisten dass die Messer im richtigen Winkel und in der richtigen Tiefe gesch rft sind F r s gen em...

Страница 80: ...nem ab genutzten Kettenritzel oder auf einem besch digten oder abgenutzten Schwert Die S gekette k nnte abspringen oder rei en Schwere Ver letzungen k nnen die Folge sein F Schwert warten Benutzen Sie...

Страница 81: ...erecht siehe Entsorgung Umweltschutz Bringen Sie die Schwertschutzh lle an Bewahren Sie das Ger t an einem trockenen und staubgesch tzten Ort auf au erhalb der Reichweite von Entsorgung Umweltschutz E...

Страница 82: ...cherung pr fen Ein Ausschalter A 13 defekt Motor defekt S gekette l uft nicht S gekette A 5 Schlechte Schneid leistung S gekette A 5 falsch montiert S gekette richtig montieren S gekette A 5 stumpf Sc...

Страница 83: ...ice Center Seite 85 Halten Sie die unten genannten Bestellnummern bereit ltankkappe 75118246 S gekette Oregon 91PX057X 30091598 16 Oregon Ersatzschwert 30100420 Bio S geketten l 1 l 30230001 Bio S gek...

Страница 84: ...umfang Das Ger t wurde nach strengen Qualit ts richtlinien sorgf ltig produziert und vor Anlieferung gewissenhaft gepr ft Die Garantieleistung gilt f r Material oder Fabrikationsfehler Diese Garantie...

Страница 85: ...unserer Service Niederlassung durchf hren tenvoranschlag Wir k nnen nur Ger te bearbeiten die ausreichend verpackt und frankiert einge sandt wurden Achtung Bitte senden Sie Ihr Ger t ge reinigt und m...

Страница 86: ...2011 EN 55014 2 2015 EN 61000 3 2 2014 EN 61000 3 3 2013 EN 62321 1 2013 2 4 guideline Sound power level guaranteed 107 dB A measured 104 8 dB A Compliance evaluation process carried out in accordance...

Страница 87: ...2010 EN 60745 2 13 2009 A1 2010 EN 55014 1 2006 A2 2011 EN 55014 2 2015 EN 61000 3 2 2014 EN 61000 3 3 2013 EN 62321 1 2013 2000 14EC 107 dB A v 104 8 dB A V 2000 14EC T V S d NB 0123 M6A 17 10 38356...

Страница 88: ...006 A2 2011 EN 55014 2 2015 EN 61000 3 2 2014 EN 61000 3 3 2013 EN 62321 1 2013 Zus tzlich wird entsprechend der Ger uschemissionsrichtlinie 2000 14 EG best tigt Schallleistungspegel garantiert 107 dB...

Страница 89: ...2017 11 23_rev02_sh informativ informative Explosionszeichnung Exploded Drawing o 22 4 8 9...

Страница 90: ...3 G F E D 14 13 24 9 23 3 3 16 16 1 16 24 9 23 F 4 5 25 8 24 7 4 5 0 45 I H 26...

Страница 91: ......

Страница 92: ...G Stockst dter Stra e 20 DE 63762 Gro ostheim GERMANY Last Information Update Stand der Informationen 10 2017 Ident No 75018206102017 GB IE NI CY IAN 291822 291822_Elektro Kettensaege_cover_GB_IE_NI_C...

Отзывы: