33
GB
Always change both tine
pairs at the same time to
avoid damage to the tool
from imbalance.
Switch the tool off, unplug it and
wait for the tines to stop turning.
D
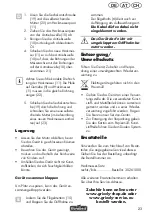
1. Unscrew the hex bolt (19) and
the self-locking nut (20) on the
tine-wheel pair (11).
2. Slide the tine-wheel pair off the
shaft (10).
3. Clean the driveshaft
with biological oil.
4. Slide the new tines onto
the driveshaft with the
holes on the axles
aligned to the holes on
the driveshaft (21).
Make sure that the tines are set to
their proper turning direction. The
arrows on the gearbox and tines
should point the same way
(
D
No. 22).
5. Slide the hex bolt through the
hole and tighten on the self-lock-
ing nut (supplied with each new
tine wheel pair 23).
Storage
• Leave the motor to cool down before
you put the tool into a closed space.
• Keep the tool clean, dry and out of the
reach of children.
• Do not cover the tool in plastic bags as
moisture may form.
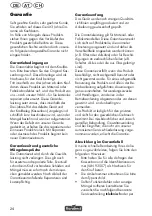
E
Unscrew the wing nuts
and fold the fork grips down to re-
duce the space taken by the tool.
Make sure that the cable
does not become jammed.
• The frame tubing also serves as a hook
to hang up the tool at the place of stor-
age.
Do not use the tool with the
handle folded closed.
Replacement parts
Use the service address or fax number sup
-
plied to order replacement parts. Make sure
you include the order number in your order.
Set of tines
Right/left.................Order No. 30261000
Please contact our service address for all
other replacement part numbers.
Disposal, environmental
protection
Be environmentally friendly. Return the tool,
accessories and packaging to a recycling
centre when you have finished with them.
Do not dispose of electrical appli-
ances in household waste.
Return the tool to a recycling centre. The
plastic and metal parts used can be separat
-
ed and sorted for recycling. Ask our service
centre for details.

