


- 35 -
Digital Video Security Systems
Troubleshooting
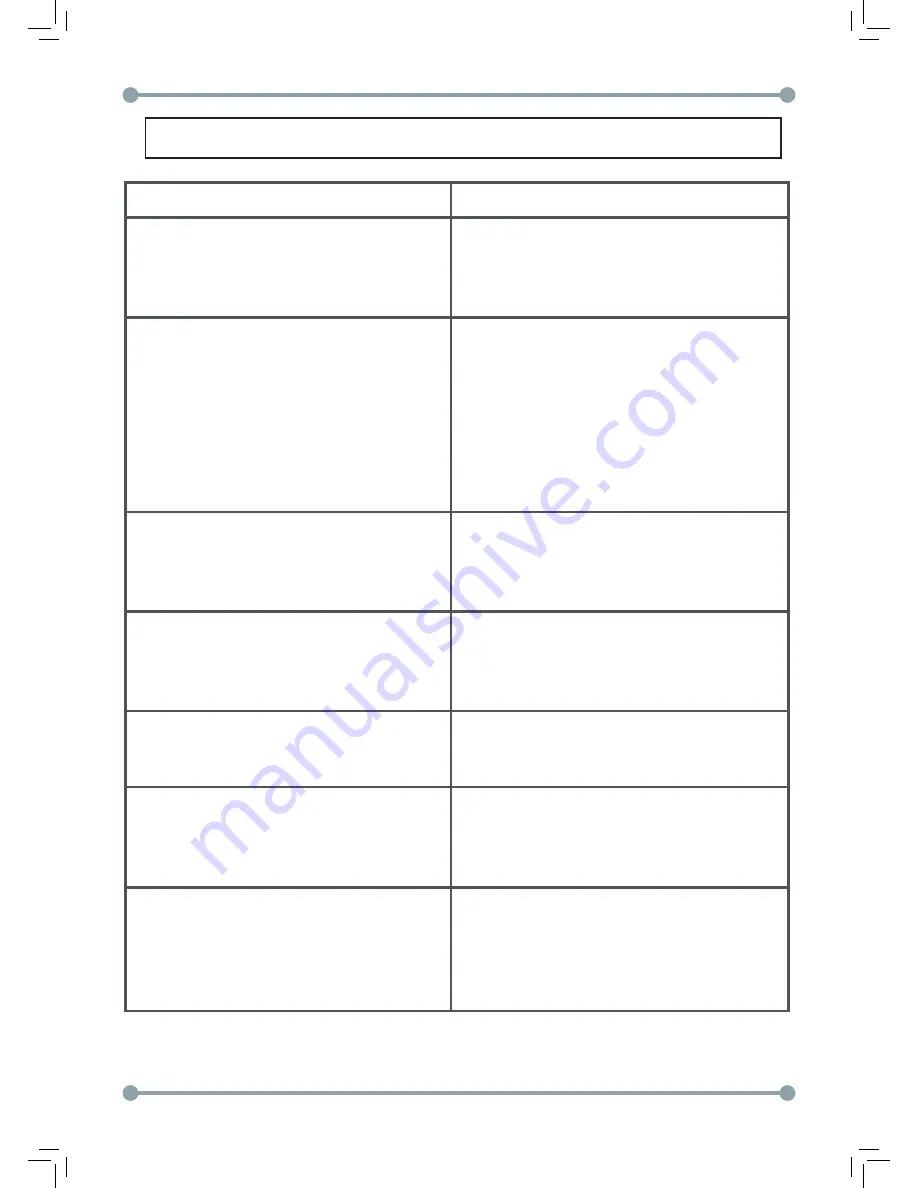
PROBLEM
POSSIBLE CAUSE
Nothing appears on the screen.
•
Check the power and video
connection to the camera.
•
Ensure sufficient power is being
supplied to the camera.
The image on the screen is unclear.
•
Adjust the lens zoom and focus.
•
The lens cover is dirty. Clean the lens
/ glass with a soft clean cloth.
•
Reset the camera to default settings.
•
If the camera is facing a very strong
light, move the camera to a different
position.
•
Ensure DZOOM is not enabled.
The image on the screen is dark.
•
Adjust the brightness and contrast
controls on the monitor/DVR.
•
If there is an intermediate device,
ensure it is set to 75
Ω
/Hi z.
The image is overexposed at night.
•
Turn the LED Level screw to the left
to reduce the power output to the IR
LEDs. It is recommended to fine tune
the LED Level to find the best setting.
The camera is not working properly and
the surface of the camera is hot.
•
Check the camera is correctly
connected to an appropriate
regulated power source.
The color of the picture is not correct.
•
Make sure that the camera isn’t
facing direct sunlight or fluorescent
lighting. If necessary, change the
camera position.
The SENSE-UP does not work.
•
Check that the AGC setting in the
EXPOSURE menu isn’t set to OFF.
•
Check the EXPOSURE menu and
make sure SHUTTER is set to AUTO or
1/60.
Содержание DPV74TLUX
Страница 2: ...2 Digital Video Security Systems...
Страница 3: ...3 Digital Video Security Systems...
Страница 15: ...14 Digital Video Security Systems Menu Tree...
Страница 16: ...15 Digital Video Security Systems Menu Tree Continued...
Страница 17: ...16 Digital Video Security Systems Menu Tree...


