background image

1. Equipment Introduction

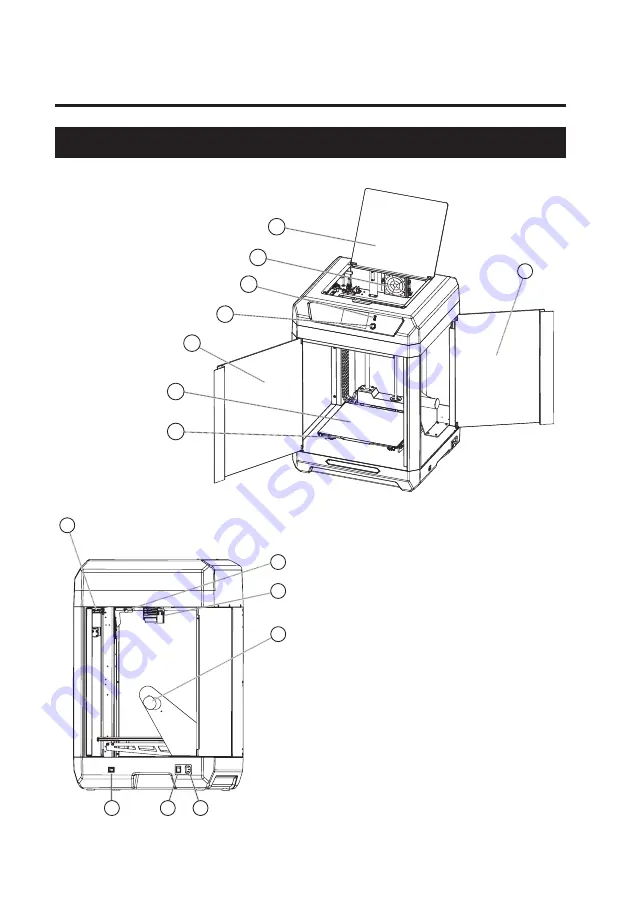
Guider 3 Introduction

1. Upper Cover     2. Air Filter

3. USB Port     4. Screen Switch

5. Front Door     6. Flexible Steel Plate

7. Platform Plate     8. Filament Chamber Door

9. Chamber Light     10. Camera     11. Extruder

12. Filament Spool Holder 

13. Network Cable Port     14. Power Switch

15. Power Port

05

6

1

7

2

3

4

5

11

12

13

14

15

9

8

10

Содержание Guider 3

Страница 1: ...This guide is only applicable to FLASHFORGE Guider 3 3D printer 3 P26 USER GUIDE EN CN A02 Guider 3 3...

Страница 2: ......

Страница 3: ...ra Connection 4 5 Model Removal After Finishing Printing 5 1 Printing Screen 5 2 Filament Screen 5 3 Preheating Screen 5 4 Tools Screen 5 5 Settings Screen 6 1 Maintenance Screen 6 2 Extruder Maintena...

Страница 4: ...lug will inevitably increase the risk of electric leakage Do not expose the equipment to damp or hot sun environment Humidity will increase the risk of electric leakage Exposure to sunlight will accel...

Страница 5: ...ide and rear side of the equipment and a distance of at least 45cm must be reserved at the right side and front side of the equipment The storage temperature should be between 0 and 40 When using the...

Страница 6: ...late Net Weight Equipment Dimensions Required Space for Installation Guider 3 1 0 15mm or 0 002 mm mm The larger values shall prevail X Y axis 0 011mm Z axis 0 0025mm 0 05 0 4mm 300x250x340mm Default...

Страница 7: ...Filter 3 USB Port 4 Screen Switch 5 Front Door 6 Flexible Steel Plate 7 Platform Plate 8 Filament Chamber Door 9 Chamber Light 10 Camera 11 Extruder 12 Filament Spool Holder 13 Network Cable Port 14...

Страница 8: ...g Brush Diagonal Pliers Scraper Nipper Pliers Power Cord Lubricating Grease x 2 Elbow Tweezers Allen Wrench Set Straight Screwdriver Unclogging Pin Tool USB Flash Drive Leveling Card 3D Printing Filam...

Страница 9: ...efore Printing 2 1 Power Connection 1 Connect the power cord to the socket and equipment and press the switch to start the machine Power Switch Screen Switch 2 Turn on the screen switch and the screen...

Страница 10: ...nd pass the filament clockwise through the corresponding filament sensor at the upper left of the chamber inside until the filament is visible from the other end of the filament guide tube 2 Press the...

Страница 11: ...d on the screen select the corresponding filament for the extruder start filament feeding and operate following the prompts on the screen Load Custom Heating extruder please insert the lament to spool...

Страница 12: ...leveling plane may be damaged due to the vibration generated during transportation It is recommended to perform a Z axis calibration and a sensor calibration before first use 10 Sensor Calibration Ca...

Страница 13: ...Wi Fi No connect Wi Fi Network 1 Click the Network on the touch screen select the wireless network and turn on the wireless network switch 2 Click to connect to the corresponding wireless network and...

Страница 14: ...FlashPrint for slicing select the printer type as Guider 3 to connect to it or by entering the IP address or by automatic scanning while the IP address can be viewed in the About of the equipment Aft...

Страница 15: ...right corner click Settings and click the PIN Code in the menu to query the PIN code After connecting Guider 3 to the network turn on the Polar Cloud switch and enter the account and PIN code 2 Click...

Страница 16: ...exible steel plate against the positioning blocks on the left and right edges of the platform note that it is inserted into the inside of the positioning blocks 2 The platform will be automatically ad...

Страница 17: ...the screen As the firmware will be upgraded from time to time please refer to the actual display screens The following is only a brief introduction of functions ATTENTION 15 Queue 256M 135M 8G 798M 1...

Страница 18: ...leads to nozzle clogging or there is no filament extrusion due to different melting temperatures of different filaments When switching from a filament of high printing temperature to a filament of lo...

Страница 19: ...the equipment return to the zero position Here you can manually move the X Y Z axis of the equipment Here you can connect to the wireless network wired network and hot spot Here you can connect to th...

Страница 20: ...er finishing printing Please pay attention to the high temperature and preventing burns and scalds When the Led is turned on the brightness of the light inside the chamber can be adjusted When the Det...

Страница 21: ...be viewed by clicking the How to change the extruder on the maintenance screen Please operate following the instructions on the screen 6 2 1 Nozzle Replacement 6 2 Extruder Maintenance Maintain Screw...

Страница 22: ...be viewed by clicking the How to Install a Glass Platform on the maintenance screen Please operate following the instructions on the screen 6 3 1 Glass Platform Replacement Note After the glass platfo...

Страница 23: ...atform Replacement How to Install a Glass Platform 2 3 Maintain 1 Remove the steel plate and lift the handle directly How to replace the exible steel plate platform How to replace the exible steel pla...

Страница 24: ...on is required to adjust the platform flatness Please operate following the prompts on the screen 1 Please perform sensor calibration when using flexible steel plate platform 2 Before sensor calibrati...

Страница 25: ...f not please click the Load button again until the filament is extruded from the extruder 2 Check whether the nozzle is clogged If so please check the Q1 for the solution Q4 Click to start printing th...

Страница 26: ...l The format of the USB flash drive is incorrect The equipment supports FAT32 file system Please format the USB flash drive into FAT32 format Q12 After inserting the USB flash drive the print file can...

Страница 27: ...blems In case you contact us during off duty time your inquiry will be answered the following business day immediately We are sorry for any inconvenience caused Due to the replacement of different fil...

Страница 28: ...ncy energy and if not installed and used in accordance with the instructions may cause harmful interference to radio communications However there is no guarantee that interference will not occur in a...

Страница 29: ...2 3 2 4 2 4 1 2 4 2 4 1 Wi Fi 4 2 U 4 3 4 4 4 5 5 1 5 2 5 3 5 4 5 5 6 1 6 2 6 2 1 6 2 2 6 3 6 3 1 6 3 2 6 4 Q A 31 33 49 51 31 32 33 34 36 37 37 37 38 38 41 45 38 38 39 40 40 41 42 43 43 44 45 45 45 4...

Страница 30: ...3D 50mm 28...

Страница 31: ...30cm 45cm 0 40 2022 8 Copyright 2022 15 30 20 70 29...

Страница 32: ...4mm 0 6 0 8mm 10 250mm s 320 110 PLA PETG ASA ABS PC PA PLA CF PETG CF PETG GF PA CF PA GF AC100 240V DC 24V 20 8A 500W FlashPrint 3MF STL OBJ FPP BMP PNG JPG JPEG GX G gcode U Wi Fi 15 30 Windows XP...

Страница 33: ...1 1 1 2 3 USB 4 5 6 7 8 9 10 11 12 13 14 15 31 6 1 7 2 3 4 5 11 12 13 14 15 9 8 10...

Страница 34: ...1 2 3D x 2 3D x 2 U 32 x 2...

Страница 35: ...2 1 1 2 33...

Страница 36: ...2 2 1 2 34...

Страница 37: ...3 PLA 1 2 ABS PETG PC PA66 PA12 100 200 35...

Страница 38: ...2 3 1 2 Z 3 Z 4 5 Z Z Z 150 mm 140 150 20 50 Z Z mm 0 1 0 3 0 05 0 5 Z Z Z Z 36 1 2 1 2 4 3 1 2 4 3 0 05 mm 0 03 mm...

Страница 39: ...2 4 2 4 1 1 2 1 2 2 4 2 Wi Fi SSID 10 33 23 222 IP 10 03 03 111 IPV4 IP DNS 10 33 23 222 255 255 255 0 10 33 23 1 202 101 172 35 IPV4 37 1 2 IP DNS 10 33 23 222 255 255 255 0 10 33 23 1 202 101 172 35...

Страница 40: ...4 1 Wi Fi U FlashPrint www sz3dp com FlashPrint 3 IP IP 4 2 U U U U 3D 38...

Страница 41: ...1 https cloud sz3dp com 1 Polar Polar https Polar 3d com 2 Settings PIN Code PIN 3 Polar PIN 2 4 3 Polar 39...

Страница 42: ...1 2 3 FlashPrint FlashPrint 1 2 1 2 4 4 50 4 5 40...

Страница 43: ...5 1 UI 256M 135M 8G 798M 16G U 220 220 220 PLA 79 Testmodel 1h 18m 1185 1500 100 70 20m 0 05mm 2h 35m PLA 0 18mm 20 45 60 15m 300g 1500 2021 11 09 45 45 ashforge jpeg 800 60 Flashforge 41...

Страница 44: ...PC PLA PC PC PC 5 2 200 42 PLA 1 2 ABS PETG PC PA66 PA12...

Страница 45: ...5 3 220 45 45 220 45 Z XYZ Polar 5 4 43 1 2...

Страница 46: ...Guider 3 5 min 85 5 5 HEPA 44...

Страница 47: ...6 1 6 2 1 6 2 UI 1 2 45 2 2 1 2 2 2...

Страница 48: ...6 2 2 6 3 1 6 3 46 1 3...

Страница 49: ...6 3 2 47 2 3 1 1 3 2 2 3 2...

Страница 50: ...6 4 48 Z 1 2...

Страница 51: ...49 Q A Q1 Q2 Q3 Q6 220V 240V 100 120VAC 110VAC 110VAC Q7 AC Q8 ABS HEPA PLA Q9 ABS 1 2 Q1 Q4 Z Q5...

Страница 52: ...50 1 2 3 4 5 Q10 Q11 U FAT32 U FAT32 Q12 U 1 Wi Fi 2 Q13 Wi Fi Q14 Q15 Q16 Q17...

Страница 53: ...51 www sz3dp com 8 00 5 00 400 886 6023 support flflashforge com 518 S N FFAD...

Страница 54: ......

Страница 55: ......

Страница 56: ......

Отзывы: