background image

CAUTION

Use the charger in dry locations only.

Battery Charging

E

WARNING

• The battery must be handled by adults

only. The battery is heavy and contains
sulfuric acid (electrolyte). Dropping the
battery could result in serious injury.

• Never allow children to charge the battery.

Battery charging must be done by adults
only. A child could be injured by the
electricity involved in charging the battery.

• Use of the wrong type battery or charger

could cause a fire or explosion, resulting
in serious injury.

• Use of Power Wheels

®

components in

products other than Power Wheels

®

vehicles could cause overheating, fire 
or explosion.

• Read the cautions on the back panel of

the battery.

• Examine the battery, charger and their

connectors for excessive wear or damage
each time you charge the battery. If
damage or excessive wear is detected, do
not use the charger or the vehicle 
until you have replaced the worn or
damaged part.

• Never alter this vehicle or its electrical

system in any way. Alterations could
cause a fire resulting in injury and could
also ruin the electrical system.

7

About Thermal  Fuses

Your Power Wheels

®

12 volt battery is equipped with a

built-in thermal fuse. The thermal fuse is a self-resetting
safety device which automatically “trips” and shuts down
operation of the vehicle if the vehicle is overloaded or the
driving conditions too severe. Once a fuse has “tripped”, it
will automatically reset itself after approximately 25
seconds and allow the vehicle to resume normal
operations. To avoid repeated automatic shutdowns, do
not overload the vehicle by exceeding the 65 lb. maximum
weight capacity or by towing anything behind the vehicle.
Avoid severe driving conditions, such as driving up very
steep slopes or running into fixed objects, which can
cause the wheels to stop spinning while power is still
being supplied to the motors. Make sure your child stops
the vehicle before switching speeds or direction.

If a thermal fuse in a battery continually trips under
normal driving conditions, please contact your local 
Power Wheels

®

Authorized Service Center. For the

location of the Authorized Service Center nearest to you,
see page 25.

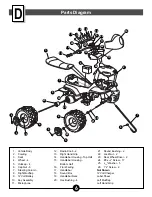
Содержание Power Wheels TrailBeast 74527

Страница 1: ...or Model 74527 Tools needed for assembly Phillips Screwdriver Hammer and Pliers not included Cap Nut Assembly Tool included Use only with a Power Wheels 12 Volt Lead acid Rechargeable Battery with Built in Thermal Fuse and Power Wheels 12 Volt Charger both included Product features may vary from the picture above ...

Страница 2: ...do not tow anything behind the vehicle or overload it Do not exceed the maximum weight capacity of 65 lb 30 kg For safety reasons your vehicle has been pre set so that it will operate at low speed You must disconnect the high speed lock out to allow operation of the vehicle at high speed Please see page 21 for detailed instructions If you have any questions about your Power Wheels vehicle please c...

Страница 3: ...y way Alterations could cause a fire resulting in injury and could also ruin the electrical system Use of the wrong type battery or charger could cause a fire or explosion resulting in serious injury Use of Power Wheels components in products other than Power Wheels vehicles could cause overheating fire or explosion The battery must be handled by adults only The battery is heavy and contains sulfu...

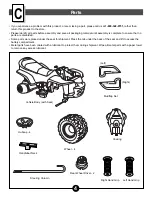
Страница 4: ...ensure that no parts are discarded Some parts were placed under the seat for shipment Press the tab under the back of the seat and lift to access the battery compartment Metal parts have been coated with a lubricant to protect them during shipment Wipe all metal parts with a paper towel to remove any excess lubricant Left Right Mudflap Set Rear Wheel Driver 2 TM Cowling Handlebar Neck Right Hand G...

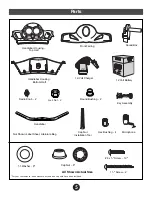
Страница 5: ...ttery Hex Bushing 4 Cap Nut Installation Tool Round Bushing 2 8 x 3 4 Screw 19 Microphone 12 VOLT CHARGER 12 Volt Charger Key Assembly Pb Lock Nut 2 For your convenience extra washers screws and cap nuts have been included 5 Parts Handlebar Housing Top Half Front Fairing Handlebar Housing Bottom Half Handlebar Sound Box ...

Страница 6: ...ndlebar Housing Top Half 15 Handlebar Housing Bottom Half 16 Front Fairing 17 Handlebar 18 Sound Box 19 Handlebar Neck 20 Hex Bushing 4 21 Round Bushing 2 22 Lock Nut 2 23 Rear Wheel Driver 2 24 8 x 3 4 Screw 17 25 7 16 Washer 5 26 11 2 Screw 2 Not Shown 12 Volt Charger Label Sheet Left Mudflap Left Hand Grip TM 1 8 3 13 18 17 26 16 15 11 10 12 14 4 4 23 5 20 20 6 7 25 21 2 24 24 24 22 19 9 5 6 6 ...

Страница 7: ...ay Alterations could cause a fire resulting in injury and could also ruin the electrical system 7 About Thermal Fuses Your Power Wheels 12 volt battery is equipped with a built in thermal fuse The thermal fuse is a self resetting safety device which automatically trips and shuts down operation of the vehicle if the vehicle is overloaded or the driving conditions too severe Once a fuse has tripped ...

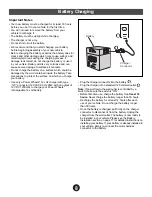
Страница 8: ...er Connector 8 Important Notes Your new battery must be charged for at least 18 hours before you use it in your vehicle for the first time You do not need to remove the battery from your vehicle to recharge it The battery must be upright while charging The charger is not a toy Do not short circuit the battery We recommend that you start charging your battery before beginning assembly of your new v...

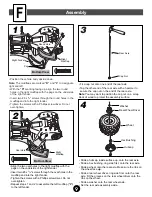
Страница 9: ...Phillips screwdriver Do not over tighten Repeat steps 1 and 2 to assemble the left mudflap L to the left fender Fit a cap nut onto one end of the rear axle Tap the other end of the rear axle with a hammer to secure the cap nut on the end of the rear axle Note You may want to position the cap nut on a scrap block of wood to protect the assembly surface Slide a hubcap inside surface up onto the rear...

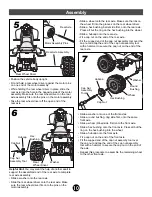
Страница 10: ...side of the motor assembly Make sure the rear wheel driver on the rear axle assembly fits onto the pins on the motor assembly Take the rear wheel driver off the open end of the rear axle Slide a wheel onto the rear axle Make sure the ribs on the wheel fit into the grooves on the rear wheel driver Slide a hex bushing barrel side first onto the rear axle Press all but the ring on the hex bushing int...

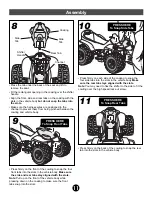
Страница 11: ...firmly on the front of the cowling to snap the four front tabs into the slots in the vehicle body Make sure the side and rear tabs stay aligned with the slots Note Pull up on the front of the vehicle body while pressing down on the cowling to make sure the front tabs snap into the slots Press firmly on the back of the cowling to snap the rear tab into the slots in the vehicle body TM 10 11 PRESS H...

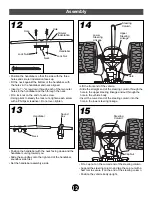
Страница 12: ... upright 12 Assembly Handlebar Sound Box Neck Position the handlebar with the neck facing down and the handlebar curving toward you Slide the soundbox onto the right end of the handlebar soundbox side first Set the handlebar assembly aside 13 Position the handlebar so that the side with the three holes and circular indentation faces up Fit the neck against the bottom of the handlebar with the hole...

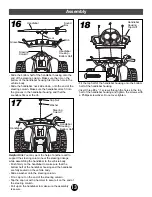
Страница 13: ...er adult to support the steering column near the steering linkage while assembling the handlebar to the vehicle body Push firmly on the handlebar to make sure that the bottom half of the handlebar housing and the handlebar are fully seated on the vehicle body Slide a washer onto the steering column Fit a cap nut on the end of the steering column Tap the cap nut with a hammer to secure it on the en...

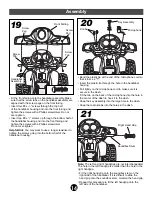
Страница 14: ... Screw Tab Screw Peg 20 Bend the plastic tip at the end of the microphone cord so that it forms a T Insert the plastic tip through the hole in the handlebar housing Pull lightly on the microphone cord to make sure it is secure in the dash Fit the tab on the back of the microphone into the hole in the center of the dash to hook it to the dash Snap the key assembly into the large hole in the dash Sn...

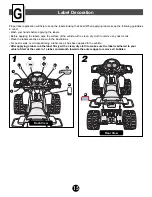
Страница 15: ...an dry cloth to remove any dust or oils Place the labels exactly as shown in the illustrations For best results avoid repositioning a label once it has been applied to the vehicle After applying a label rub the label firmly with a clean dry cloth to make sure the label is adhered to your vehicle Start at the center of a label and smooth towards the outer edges to remove air bubbles Rear View 1 2 L...

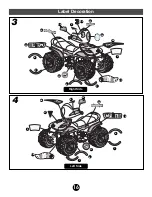
Страница 16: ... 4 x TM VOLT RECHARGEABLE BATTERY POWERED 3 T M 4 4 x 4 4 x VOLT RECHARGEABLE BATTERY POWERED 4 16 Right Side Left Side Label Decoration 19 16 9 25 27 7 6 7 6 13 7 28 12 10 26 8 21 17 9 6 13 7 6 11 23 10 5 22 ...

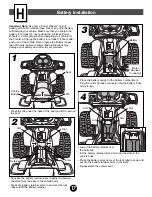
Страница 17: ... of the seat and lift to remove the seat Squeeze the battery retainer arms together to release the arms from the slots in the vehicle body Press the battery retainer arms in and over the lock tabs and lift the battery retainer Lower the battery retainer over the batteries Fit the battery retainer arms down into the slots in the vehicle body Press the battery arms out over the lock tabs to snap and...

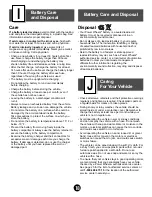
Страница 18: ... a sealed lead acid battery It must be recycled or disposed of in an environmentally sound manner Do not dispose of a lead acid battery in your regular household trash The incineration landfilling or mixing of sealed lead acid batteries with household trash is prohibited by law in most areas Return the battery to a federal or state approved lead acid battery recycler such as a Power Wheels authori...

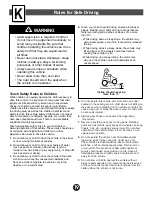
Страница 19: ... recognize or anticipate hazards even when they have been taught about them There is no acceptable substitute for adult supervision Teach appropriate safety rules to your child before allowing operation of this vehicle These rules should also be reviewed with neighborhood children or other playmates who want to drive this vehicle 1 Do not allow any child to drive the vehicle in the street or near ...

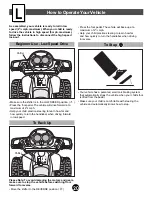
Страница 20: ...Note To avoid damaging the motors and gears make sure to stop the vehicle before switching from forward to reverse Move the shifter to the REVERSE position REMOVE LOCK OUT SCREW ON SIDE OF SHIFTER FOR HIGH SPEED OPERATION REMOVE LOCK OUT SCREW ON SIDE OF SHIFTER FOR HIGH SPEED OPERATION Shifter Shifter How to Operate Your Vehicle L As assembled your vehicle is ready to roll in low speed 21 2 mph m...

Страница 21: ...anty applies only to the 12 volt battery included by Power Wheels with the original purchase of the vehicle This warranty covers normal use and does not cover the Power Wheels vehicle or battery if it has been damaged by unreasonable use neglect accident abuse misuse improper service or other causes not arising out of defects in materials or workmanship Evidence of any attempt at consumer repair w...

Страница 22: ...lt battery has a built in thermal fuse A thermal fuse may trip and shut down operation of the vehicle if the vehicle is overloaded or the driving conditions too severe The fuse will automatically reset itself after approximately 25 seconds allowing the vehicle to resume normal operation To avoid repeated automatic shutdowns do not overload the vehicle by exceeding the 65 lb maximum weight capacity...

Страница 23: ...urs Check all wires and connectors Make sure the charger connector is plugged into the battery and that the charger is plugged into the wall Make sure power flow to the wall outlet is ON Overcharged battery Do not charge the battery longer than 30 hours If you suspect that your battery is damaged as a result of overcharging contact your local Power Wheels authorized service center They can test yo...

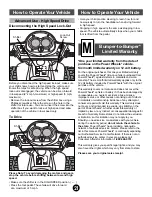
Страница 24: ...ntle inclines or slopes of 10 or less Vehicle runs in low speed but High speed lock out not disconnected The vehicle was pre set to run only in low speed does not run in high speed To allow the vehicle to run in low and high speed you must disconnect the High Speed Lock Out Follow the Please Note The vehicle is instructions on page 21 to remove the High designed to operate in low Speed Lock Out sc...

Страница 25: ...h Davis Road 93907 408 424 4044 SAN CARLOS California Electric Service Center 990 Industrial Road Suite 102 94070 415 593 6696 SAN DIEGO California Electric Service Center 3430 El Cajon Blvd 92104 619 283 6488 SAN FRANCISCO California Electric Service Center 1090 Bryant Street 94103 415 431 8494 SAN JOSE California Electric Service Center 481 So Bascom 95126 408 295 1723 SANTA ANA California Elect...

Страница 26: ...ennes Street 47150 812 944 4523 SOUTH BEND Ray s TV and Appliance 60717 US 31 South 46614 219 291 1630 SOUTH BEND OSCEOLA AAA Appliance Service Co 11868 Lincoln Way West 46561 219 679 4981 TERRE HAUTE Corey Electronics 1101 S 8th Street 47802 812 232 8786 888 232 8786 IOWA BETTENDORF K K True Value Hardware 1818 Grant Street 52722 319 359 4473 CEDAR RAPIDS Stalker Electric Inc 110 3rd Ave SW 52404...

Страница 27: ... 216 S Center St 28677 704 878 9683 WILMINGTON American Tool Tractor 102 Eastwood Road Ste D 9 28403 910 392 5784 WINSTON SALEM Authorized Appliance Servicenter 904 South Marshall Street 27117 910 725 5396 NORTH DAKOTA FARGO General Parts Supply Co 10 S 18th Street 58103 701 235 4161 800 279 9987 OHIO AKRON Advanced Appliance Service Company 73 W Exchange Street 44308 330 762 8968 CANTON Appliance...

Страница 28: ...NA Appliance Fix It 8455 Tyco Road 22182 703 893 1234 WINCHESTER Battery Mart of Winchester Inc 1 Battery Dr 22601 703 655 0065 WOODBRIDGE Baker s Appliance 13314 Occoquan Road 22191 703 490 5605 WASHINGTON SEATTLE Ajax Electric 2911 First Avenue South 98134 206 622 9945 SEATTLE BELLEVUE Action Small Appliance Service 1500 145th Place SE 98007 206 643 9806 SPOKANE SPARCO West 45 2nd Avenue 99204 5...

Отзывы: