background image

4

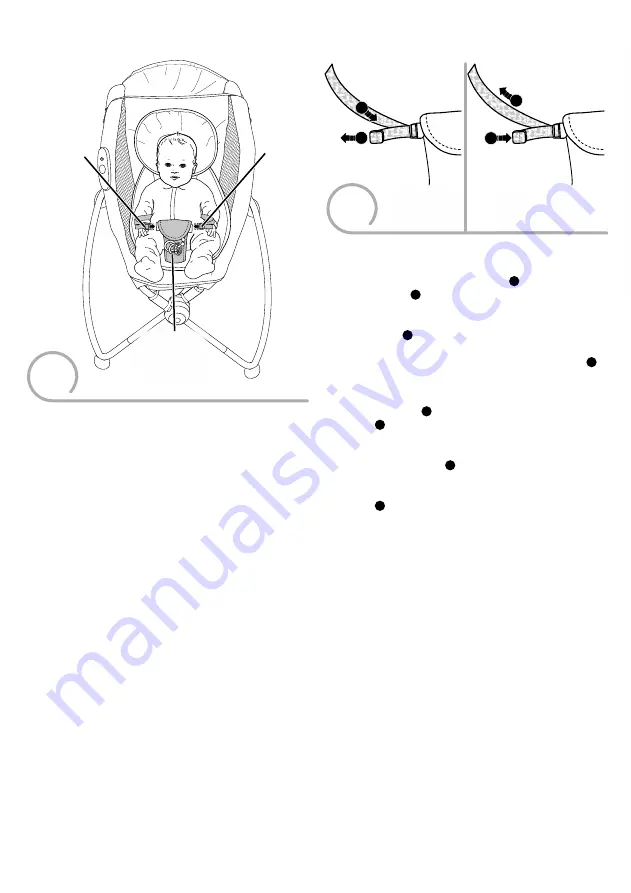
Waist Belt
Cinturón

Waist Belt
Cinturón

Restraint Pad
Almohadilla 
de sujeción

Securing Your Child    Sistema de sujeción

2

1

LOOSEN

LOOSEN

AFLOJAR

AFLOJAR

TIGHTEN

TIGHTEN

APRETAR

APRETAR

A

B

B

A

• Place your child in the seat.
• Position the restraint pad between your child’s legs.
• Fasten both waist belts to the restraint pad. Make sure 

you hear a “

click

” on both sides.

• Tighten each waist belt so that the restraint system is 

snug against your child. Please refer to the next section 
for instructions to tighten the waist belts.

• Check to be sure the restraint system is securely 

attached by pulling it away from your child. The restraint 
system should remain attached.

• Sentar al niño en el asiento.
• Colocar la almohadilla de sujeción entre las piernas 

del niño.

• Ajustar ambos cinturones de la cintura en la almohadilla 

de sujeción. Asegurarse de oír un clic en ambos lados.

• Apretar cada cinturón de modo que el sistema de 

sujeción quede bien ajustado al niño/a. Consultar la 
siguiente sección para mayores detalles sobre cómo 
apretar los cinturones.

• Asegurarse de que el sistema de sujeción esté bien 

asegurado, jalándolo en dirección opuesta al niño. El 
sistema de sujeción debe permanecer conectado.

To tighten the waist belts:

• Feed the anchored end of the waist belt 

up through the buckle to form a loop 

A

. Pull the free end 

of the waist belt 

B

.

To loosen the waist belts:

• Feed the free end of the waist belt up through the buckle 

to form a loop 

A

. Enlarge the loop by pulling on the end 

of the loop toward the buckle. Pull the anchored end of 
the waist belt to shorten the free end of the waist belt 

B

.

Para apretar los cinturones:

• Introducir el extremo fijo del cinturón en la hebilla para 

formar un espacio 

A

. Jalar el extremo libre del 

cinturón 

B

.

Para aflojar los cinturones:

• Introducir el extremo libre del cinturón en la hebilla 

para formar un espacio 

A

. Agrandar el espacio jalando 

el extremo libre del cinturón hacia la hebilla. Jalar el 
extremo fijo del cinturón para acortar el extremo libre del 
cinturón 

B

.

Содержание CHX77

Страница 1: ...eer estas instrucciones antes de ensamblar y usar este producto Requiere montaje por un adulto Requiere montaje por un adulto Ver el dorso de esta Ver el dorso de esta hoja para las instrucciones de m...

Страница 2: ...Clientes Mattel com 2014 Mattel All Rights Reserved PRINTED IN CHINA CHX77_1100386226_2LC Soothing Unit Unidad relajante Make sure your child is properly secured in the seat Slide the power switch to...

Страница 3: ...ttended ADVERTENCIA El incumplimiento de estas advertencias e instrucciones puede resultar en lesiones graves o la muerte SIEMPRE usar el sistema de sujeci n SIEMPRE usar la almohadilla proporcionada...

Страница 4: ...l sistema de sujeci n quede bien ajustado al ni o a Consultar la siguiente secci n para mayores detalles sobre c mo apretar los cinturones Asegurarse de que el sistema de sujeci n est bien asegurado j...

Страница 5: ...mily physician National Institute of Health NIH Eunice Kennedy Shriver National Institute of Child Health and Human Development Tanto pediatras como organizaciones de salud de ni os est n de acuerdo e...

Страница 6: ...Lean against a wall for storage Presionar el bot n de la conexi n que se cierra y unir los tubos del forro empuj ndolos Apoyar el producto contra una pared para guardarlo Unbuckle the restraint system...

Страница 7: ...usar el producto si falta o est rota alguna pieza P ngase en contacto con la oficina Mattel m s pr xima a su localidad para obtener piezas de repuesto e instrucciones en caso de ser necesarias Visite...

Страница 8: ...s tubos de la conexi n Atenci n cada conexi n est dise ada para ajustarse en la base de una sola manera Si no se ajustan voltear la base e intentar de nuevo Liner Forro Fit the liner tubes onto the hu...

Страница 9: ...ia la etiqueta de advertencia en el forro Poner la almohadilla sobre el forro Poner el coj n de soporte infantil sobre la almohadilla 7 8 Fold the top of the pad down and insert the waist belts throug...

Страница 10: ...unit through the large opening the pad Ajustar los orificios de bot n de la almohadilla alrededor de las abrazaderas del forro Ajustar los bordes de la unidad relajante en el orificio grande de la al...

Страница 11: ...e product before charging If removeable rechargeable batteries are used they are only to be charged under adult supervision Unidad relajante Destornillar el tornillo de la tapa del compartimento de la...

Страница 12: ...porte infantil y forro pueden humedecerse Quitar peri dicamente la almohadilla y soporte infantil del forro para orear el producto y evitar la acumulaci n de humedad Recomendamos lavar a m quina la al...

Отзывы: