background image

5

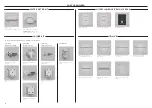
PARTS REQUIRED

INSTALLATION KIT (INTERNAL BOX)

Screw ST 8X5/8 CSK PH 

AB ZP

Depth gauge non hinge 

Blocker air bypass 

kickstrip

Bolt limiting hinge K08

Screw MC M5X12 MSH 

PH ZP

Screw hinge spacer

Install kit H - UI Trim kit

Anti-tip bracket

Screw WS #10X35 T17 

WFR PH ZP

Plug masonry 

SP630#10X30MM

Install kit A -  

Bracket anti tip assy

Miscellaneous parts

Install kit D - Kit flow divider

Trim UI RS60 non Hinge 

RH 

Trim UI RS60 Hinge LH

Trim UI RS60 non hinge 

LH

Trim UI RS60 Hinge RH

Assy hinge spacer A

Cover hinge spacer A

Install kit B - Kit hinge spacer & depth gauges

Assy hinge spacer B 

Cover hinge spacer B

Screw SD #7X13 PAN 

PH ZP

Cap divider flow door

Ball hex key M4

Door seal flow divider

Spanner door

L key combi PH2 T25

Install kit C -  

Kit door screw

Slider bracket skin DR 

60cm

Bracket trim side door 

60cm

Install kit F -  

Kit panel attach

Spacer bracket side DR 

60cm

Install kit G - Kit screw 

panel attachment

Twinthread screw 8GX19

Install kit E - Kit screw 

alcove attachment

Содержание RS6019BRU

Страница 1: ...INTEGRATED RS6019BRU Models INTEGRATED REFRIGERATION INSTALLATION GUIDE NZ AU UK IE SG HK...

Страница 2: ......

Страница 3: ...be installed by a professional installer according to the installation steps in this guide SAFETY AND WARNINGS WARNING 420 630 lb 190 285 kg Weight Hazard Failure to follow this advice may result in...

Страница 4: ...sible z Ensure an isolation valve is available if water connection is not accessible z Contact an electrical and or a plumbing professional if you are uncertain the electrical and or plumbing conditio...

Страница 5: ...UI RS60 non Hinge RH Trim UI RS60 Hinge LH Trim UI RS60 non hinge LH Trim UI RS60 Hinge RH Assy hinge spacer A Cover hinge spacer A Install kit B Kit hinge spacer depth gauges Assy hinge spacer B Cove...

Страница 6: ...el Door B 60cm To be ordered seperately for multiple installation Water filter comes fitted to product Bracket dual connection top Screw M5X12 CSKPH NP Bracket duel plinth FNT 1X Screw M5X12 PH MT STL...

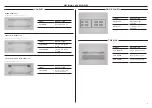
Страница 7: ...ine handle set Professional round flush handle set MODEL DESCRIPTION AHD5RDB19 Square fine handle kit SS AHD5RDB19B Square fine handle kit BLK MODEL DESCRIPTION AHP3RDB19 Professional round flush hand...

Страница 8: ...T25 Spanner Supplied tools Required tools Not supplied and must be provided by the installer M4 Ball allen key Cross head screwdriver Socket 8mm Flathead screwdriver Hacksaw Hand truck Measuring tape...

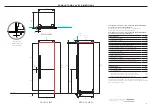
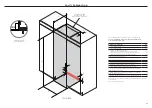
Страница 9: ...of top door panel 1001 I Height of bottom door panel 771 J Depth of door panels 19 K Gap between door panels 3 L Height from floor to bottom of bottom door panel 102 M Depth of toe kick excl front do...

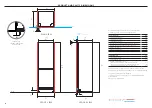
Страница 10: ...inetry clearance from top of door panel 3 F Depth of door panels 16 19 G Height of toe kick panel 100 H Depth of toe kick excl front door and toe kick panels 50 100 Cavity Dimensions mm I Overall heig...

Страница 11: ...ctrical Plumbing Supply Dimensions mm d Overall height of supply routing area at rear of cavity 37 Overall width of supply routing area at rear of cavity 600 E Overall depth of supply routing area at...

Страница 12: ...cabinet Hose and Cord Lengths mm Electrical a Power cord length from the left edge of the product 1800 B Power cord length from the right edge of the product 2000 C Power cord length from the top of t...

Страница 13: ...76 H Height from floor to top of bottom door panel 873 I Height from floor to bottom of bottom door panel 15 150 J Height of toe kick panel 100 K Width of toe kick panel 597 Maximum weight of top door...

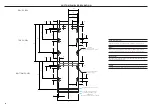
Страница 14: ...files of the panel preparation can be downloaded from Trade Resources www fisherpaykel com Template A template for marking and drilling the holes is provided with the product REAR VIEW Do not place h...

Страница 15: ...l 90 reduced internal access 80 C Minimum door clearance to adjacent wall 115 full internal access 273 D Minimum cabinetry clearance from side of door panel to adjacent wall non hinge side 4 E Minimum...

Страница 16: ...o be installed alongside the anti tip bracket Refer to page 18 for details Ensure a finished return has been created 1 2 3 4 Ensure services are accessible and correctly installed Refer to Services fo...

Страница 17: ...ensure there is no shipping damage If any damage is detected contact the dealer or retailer you bought the product from to report the damage z Fisher Paykel is not responsible for shipping damage Til...

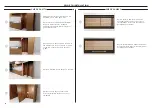
Страница 18: ...ward when the door is opened Check for wall stud 1 For solid wall installs Using the bracket as a guide pre drill four holes into the wall or spacer Secure bracket using crosshead screws 5 Install kit...

Страница 19: ...e clips are on its marks and the side hooking clip on place Locate trim by hooking clip then applying pressure to each centre clip position until clipping sound is heard Push on the edge of the outsid...

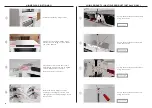
Страница 20: ...sing four screws 2 Refit both centre hinge covers by aligning to the hinge as shown and sliding across to clip back hinge covers into position Joiner kit A 3 4 1 Slot the door back onto the screws and...

Страница 21: ...top and bottom of the product based on your installation as shown INSERT HINGE LIMITING PIN OPTIONAL To limit the door opening to 90 place the hinge limiting pin into the lower hinges on both doors 1...

Страница 22: ...hose and power cord Ensure the gauges touch the alcove end the hose doesn t kink and the power cord remains free and untangled 4 OUTSIDE ALCOVE SERVICE CONNECTIONS Route the hose from rear of product...

Страница 23: ...ONS 5 Connect to outlet and turn power on Route the hose from rear of product through to front corner 1 3 Connect to tap and turn on If water is running check for leaks Push product into alcove Push i...

Страница 24: ...bracket touches the alcove 1 Profile view alcove alignment Front adjustment Front view Rear adjustment Open the door and secure following the sequence shown The longer screws should be used where sho...

Страница 25: ...arked Refer to page 14 for details Alternately the supplied door panel template can be used to mark bracket locations 1 Align the side brackets to panel 5 Install kit F Remove both washers and nuts an...

Страница 26: ...Remove all blue tape from the panel Align the side brackets to the pre drilled holes on the panel 5 Remove both washers and nuts and set aside Lift the panel brackets outwards to remove 3 7 Secure th...

Страница 27: ...For 90 door opening installs the supplied crosshead key should be used on the hinge side Tighten all side screws and the top M8 washer and nut to secure Install kit D Ensure top mounting screws have b...

Страница 28: ...ower bracket screw Adjust the bracket until it rests against the door panel Re tighten the screw and fit an additional screw to secure to panel 5 Fit the top cover using two screws Ensure flat side fa...

Страница 29: ...the top right screw Fit the remaining five screws on the grille to secure Fit the top UI trim taking into account the hinge location 5 6 7 Install kit H Ensure top of trim touches alcove before securi...

Страница 30: ...ANEL PREP Install kit E Slide both depth adjustment brackets all the way forward and slightly tighten the screws Loosen the screws on both toe kick depth adjustment brackets Attach the toe kick to the...

Страница 31: ...z You will be given step by step guidance on both your appliance and mobile device z It may take up to 10 minutes to connect your appliance 1 2 3 4 Press Fridge 3 0 C Fridge 3 0 C Fridge 5 0 C to dis...

Страница 32: ...When dispensing for long durations a time out period may occur where an alarm will sound Please wait 2 minutes before dispensing again Press Fridge 3 0 C Fridge 3 0 C Fridge 5 0 C or Fridge 3 0 C Fri...

Страница 33: ...n adjusted and engaged If water is turned on purge before first use All panel gaps and any potential clashing points have been checked All covers are in place Product is robustly attached to cabinetry...

Страница 34: ...move from alcove Ensure doors are taped shut and safe handling practices are observed 1 2 3 SAFE PRODUCT REMOVAL Remove the flow divider and panel bracket before removing all door panel side screws an...

Страница 35: ...ge at any time The product specifications in this guide apply to the specific products and models described at the date of issue Under our policy of continuous product improvement these specifications...

Отзывы: