


8
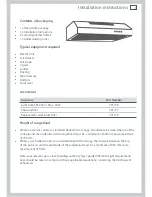
Installation instructions
Under cupboard installation
1
Ensure the fitted height of the rangehood
above the cooking surface is in
accordance with the ‘Installation height
requirements’ on page 4.
2
Remove the grease filters (this is to make
installation easier). Press inward on the
catch, found on the handle, and pull the
filter downward.
3
Mark the position of the rangehood
(ensuring that the line can easily be
erased or will be hidden after installation)
showing the position where the centre
of the rangehood will be. This is normally
over the centre of the cooktop.
4
Determine the position of the 133 mm
diameter cutout required for external
ducting on the underside of the cabinetry.
Mark the centre point of the cutout
87 mm in from the position where the
back of the hood will sit under the
cabinetry.
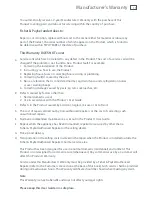
5
Determine location of the fixing
“keyholes”. The hood is secured to the
underside of the cabinetry by four
“keyholes” located on the top panel of the
hood. From the line where the back edge
of the hood will sit, measure and mark where to drill.
6
Drill 6 mm diameter holes and secure the rangehood to the cabinetry using the small wood
screws supplied. The rangehood should now be able to be hung on these screws through the
four keyholes in the hood.
7
Create additional means of attachment. Keyholes alone are insufficient means of attachment.
There are extra holes found on top panel of the hood. Select one on each side and fit screws to
ensure proper attachment, as shown in (fig.15). Ensure all fixings are secure.
8
If ducting externally, assemble and fit ducting as per manufacturer’s instruction.
9
Test the operation of the rangehood. Plug the rangehood in and test its operation on all speed
levels. This will ensure that any imperfections in the installation, such as unwanted sounds or
lack of suction can be addressed. Over 95% of service calls are a result of faulty installation.
Please be aware that in the event of a service call for a faulty installation, you will be charged as
this is not covered under the manufacturer’s warranty.
Ø 6 mm
530 mm
265 mm
60 mm
Extra safety holes
Keyholes
Fig.15 Mounting under cupboard
87 mm
Fig.14 Finding centre line
Содержание HF60CSW2
Страница 1: ...NZ AU Installation instructions and User guide Freestanding canopy HF60CSW2 HF60CSX2 models ...
Страница 2: ......
Страница 15: ......