8
HotPort Series 6000 Mesh Nodes
The dual-radio capability of the Series 6102 and Series 6202 nodes
must be considered when selecting operating frequencies and ar-
ranging antennas. Each transmitter is powerful enough to drown
out the other unless steps are taken to provide adequate isolation.
The amount of isolation between the antennas depends on how
close in frequency the two radios are.
Operating Modes
Series 6000 nodes can be operated in either of two modes. Firetide’s
Auto-Channel Assignment (ACA) mode is also known as linear mode.
This mode is recommended for most applications. In Auto-Channel
Assignment mode, you select three or more channels for the mesh
to use, and you designate the ‘exit point’ of the network - the point
where traffic density is highest. The ACA algorithm will test each link
in the mesh at the various frequencies and select a topology which
optimizes traffic throughput. When you are using directional anten-
nas or otherwise deploying a mesh where most nodes can only hear
a few other nodes, ACA will produce the best throughput.
In bonded mode, you simply assign a frequency to the radio 1 in
each node and another frequency to the radio 2 in each node. This
mode works well in a mesh where most nodes can hear each other.
Note that if you use ACA on a mesh where essentially all nodes can
hear each other, the algorithm will converge on a set of channel as-
signments that will deliver performance equal to bonded mode.
For a complete discusssion of the advantages and characteristics of
each mode, refer to the HotView Pro Reference Guide.
Regardless of the mode chosen, you should configure the antennas
to minimize inter-antenna interference. Firetide recommends that
the antennas be placed such that there is 60 dB of isolation.
Antenna Separation in Dual Band Operation
The easiest solution is to operate one radio in the 2.4 GHz band and
the other radio in the 5 GHz band, with the antenna a minimum of
1 meter (3 ft) apart. A separation of 1.6 m (5 ft) is preferred. This
usually provides sufficient isolation to avoid overload problems.
If this is not possible, you must select and place the antennas to
achieve the necessary isolation. The best way to do this depends on
the radiation pattern of the antenna.
Directional Antennas
If the antennas are directional, place them so that they are not in
each other’s radiation pattern. Consult the antenna maker’s radia-
tion plot; note that many directional antennas have a small side-
lobe directly to the rear of the main lobe. For panel or patch anten-
nas, a diagonal placement is often best.
Omni-Directional Antennas
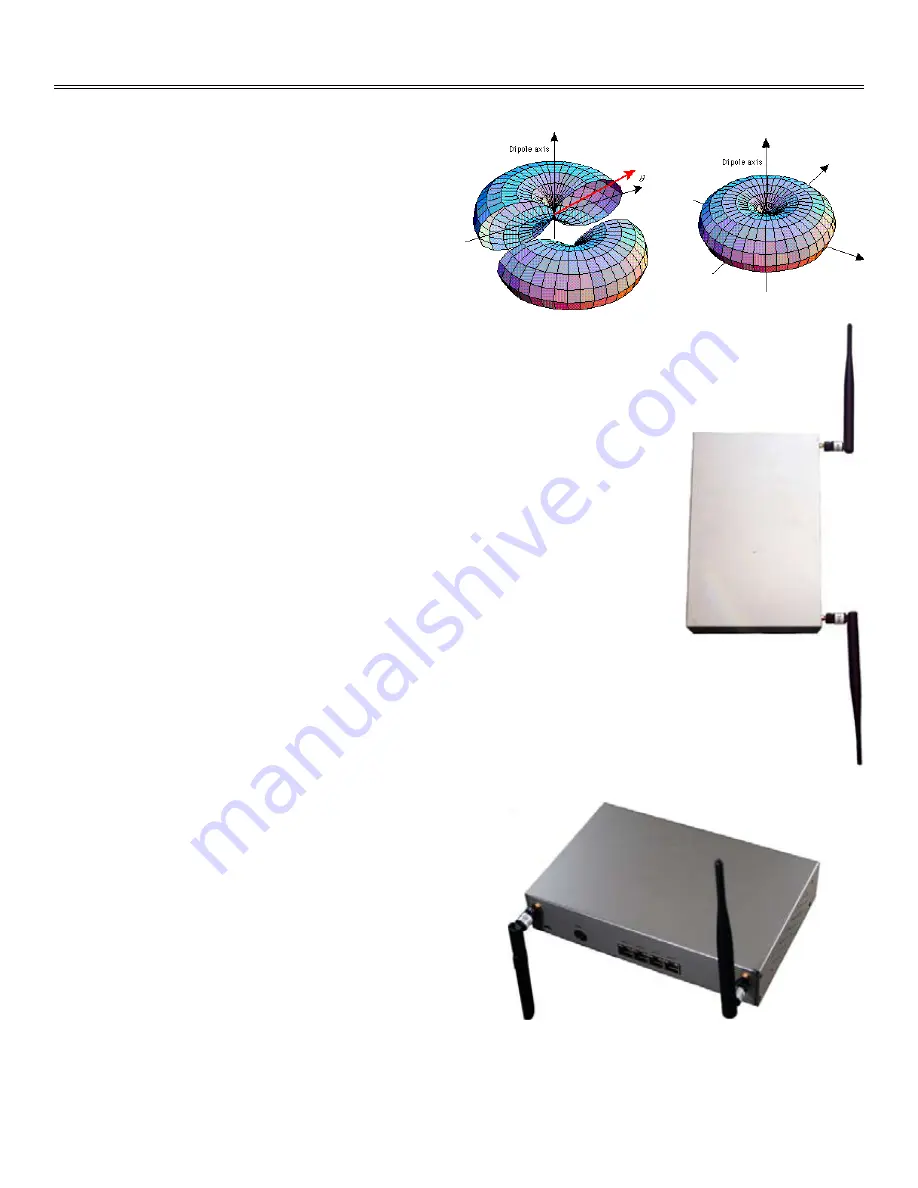
Omnidirectional antennas transmit in a plane perpendicular to the
shaft of the antenna, as shown in Figure 5. This pattern is often de-
scribed as a doughnut (or torus) shape.
Figure 5. Typical Omni Antenna Pattern
Antenna Placement
Note that an omni antenna does not radiate power from either
end. As a result, if the antennas are placed in line with one
another, they will not interfere. This arrangement, called co-
linear, is shown in Figure 6. The node is mounted vertically on a
wall, and the two antennas point in opposite directions.
Figure 6. Co-linear Antenna Placement
Note that in this arrangement,
the unit is oriented so that both
antennas are vertical. Thus, both
antennas provide good coverage in
the horizontal plane.
Also note that this configuration is
applicable to outdoor units as well.
Simply mount both antennas adja-
cent to each other on the mast or
cross-bar, with one pointing up and
one pointing down.
If exact co-linear placement is not
possible, sufficient isolation can still
be provided by pointing one antenna
up and the other one down. Because
of the vertical offset, antenna pat-
tern overlap will be minimized if the
antennas are not too far apart. This
is shown in Figure 7.
Figure 7. Up-down Antenna Placement
If the two omnidirectional antennas must be placed parallel and at
the same height, mount them at least 1.6 meters (5ft.) apart. If you
are using higher-gain omnidirectional antennas, more separation
may be required.
January 2009


