background image


fig. 7


1) water drain pipe 
2) squeegee blade replacement screws 

4) squeegee soluction pipe 

5) squeegee adjiusting screws 

6) squeegee fastening screws 

SQUEEGEE ADJUSTMENT


The squeegee must be perfectly adjusted to get a perfect floor drying. ICM 38 is equipped 

with a V-shaped squeegee, as shown in (fig.). This type of squeegee performs very well in 

collecting water from the floor to the suction hose, but is particularly sensitive to the paralle- 

lism to the floor. Therefore, adjust first its angular position through the screws (fig.) so that its 

rubber blades get the same slanting on the floor along its entire width. If blades are 

more pressed at their ends than in their centers, unscrew the upper screws (fig.) and screw 

the lower ones (fig.), then tighten the lock nuts. If, on the contrary, blades are more pres- 

sed at their centers than in their ends, perform the opposite operation. After having rea- ched 

the right angular position, adjust the pressure. Turn the ring nut (fig.) and tighten it to 

increase pressure to the floor, or loosen to decrease it. The right pressure is got when the 

edge of the rear blade touches the floor with a slanting of approx. 60°-45° referring to the 

floor. If the pressure is too high, the rear blade will touch the floor with its side surface, and 

not with its edge. If the pressure is too low, the edge 

doesn’t work well and lets some water 

on the floor, particularly on an uneven floor. Of course the optimal adjustment is confirmed 

by very good results of the drying operation, and the 

operator’s experience will contribute 

to enhance such good results. Note that often drying is negatively affected by a wrong suc- 

tion operation. If the suction hose 

doesn’t work well, drying will continue to be bad, even 

with all adjustments attempts. In this case: 

a) accurately clean the suction hoses, their inlets and filters and the squeegee itself 

b) check the vacuum motors operation 

c) confirm that all inspection openings of the tank are closed. 

fig. 8


1) squeegee slanting adjusting screws 
2) squeegee release knob 

3) squeegee lifting jack 

4) squeegee pressure adjustement ring nut 

Содержание I38UE

Страница 1: ...Ing O Fiorentini Operator manual I38UE EEEE E ENGLISH ING O FIORENTINI S p A INDUSTRIAL CLEANING MACHINES ...

Страница 2: ...gy source bat tery voltage 36Volt brush ratiomotor permanent magnet 3 x 500Watt 16 5Ampere 2400rpm traction ratiomotor permanent magnet 2 x 500Watt 16 5Ampere 2400rpm vacuum motor 2 x 500Watt 13Ampere 16000rpm FUNCTIONAL CHARACTERISTICS drive at earth steering wheel revolutions 1 5 min turning radius 1370mm brush lift control electric squeegee lift control electric emergency brake mechanical by le...

Страница 3: ...or lifting it to remarkable heights without any reasons It is forbidden to stack the packages one another fig 1 UNPACKING THE MACHINE The unpacking of the machine should be performed with caution and accuracy First of all cut the straps with proper cutting nippers thus paying attention to the spring back Then re move the clips on the paper board base which bind the paper board to the pallet by usi...

Страница 4: ...fig 2 TECHNICAL DATA LABEL Ing O FiorentiniS r l 50030Piancaldoli Fi MADE INITALY Mod V I 38U 36 S N Hz 1997 kg 750 A W 3500 ...

Страница 5: ...uted The performed adjustments and their results Any other information considered useful for this purpose Address the requests to the authorized customer service WARNING The manufacturer can make any changes to the machine for constructive or commercial reasons without being obliged to change the instruction manual at the right time according to these modifications GENERAL SAFETY STANDARDS The mac...

Страница 6: ...acciden tal movements by pressing the emergency pushbutton or detaching the plug from the batte ry While the machine is working pay attention to strangers and in particular to children Al ways keep handy the instruction and maintenance handbook on the working place of the machine Beyond the use and maintenance instructions observe and prepare the binding general legislative rule regarding the acci...

Страница 7: ...e explosive do not cause any shortcircuits do not invert polarities GENERAL NOTE For any maintenance revision or repair engage qualified personnel or call an authorized workshop Use only original fuses with the prescribed current intensity In case of a power failure disconnect the machine or the plant immediately The electric installation should be periodically inspected and checked Any possible f...

Страница 8: ... is consigned with the support and the manual of operating and maintenance instructions ANNUAL CHECK The responsible person should perform an annual check to determine if the machine com plies with the technical safety standards After this check the responsible person should ap ply a test plate on the machine INFORMATION FOR USING THE MACHINE IN EXPLOSIVE ATMOSPHERE The machine has not been design...

Страница 9: ......

Страница 10: ...otation locking switch 5 switch for rotating headlight 6 steering stem 7 fuse 8 selector swicht for forward reverse running 9 main key switch 10 solution flow adjusting lever 11 battery charge indicator 12 vacuum motor overload cutout 13 vacuum motor overload cutout 14 switch for brush up and brush down 15 headlamp switch ...

Страница 11: ...n increase by translation brush lowering and pressure increase squeegee lowering squeegee lifting battery indicator water valve key switch forward ranning backward ranning fuse or overload cutout general stop scrubbing brush squeegee headlight rotating light vacuum by squeegee brush lifting ...

Страница 12: ...fig 3 1 brake pedal 2 seat adjusting lever 3 accelerator pedal fig 4 1 safety stop for battery charge plug 2 solution tank opening 3 hand brake retainer ...

Страница 13: ... adjusted at least once every three months PREPARING THE MACHINE FOR OPERATION Upon delivery of the machine remove the packing without damaging it It can be re used for any possible long displacements of the machine Check immediately the machine state and in case of damages due to the transport contact the trucking company to file a freight damage claim Before starting the machine read carefully t...

Страница 14: ...the brushes must be in working position Start the brushes and pass the machine over a surface of some tenth sq mt Let the detergent solution on the floor to dissolve the dirt then pass the machine again For this second machine passage lower the brushes and bring the squeegee in contact with the floor Look at the floor after this se cond passage and decide if the scrubbing operation was enough or i...

Страница 15: ...re Turn the ring nut fig and tighten it to increase pressure to the floor or loosen to decrease it The right pressure is got when the edge of the rear blade touches the floor with a slanting of approx 60 45 referring to the floor If the pressure is too high the rear blade will touch the floor with its side surface and not with its edge If the pressure is too low the edge doesn t work well and lets...

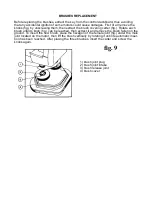
Страница 16: ...otate each brush until its knob fig can be reached then extract it and remove the brush fallen on the ground To insert the new brush place the hexagon of the female joint fig under the male joint located on the motor then lift the brush vertically by rotating it until its automatic inser tion has been reached After placing the three brushes insert the carter and screw the knobs again fig 9 1 brush...

Страница 17: ...referred at 30 C If density is between 1 26 30 Bè and 1 20 24 Bè the battery is partially discharged but if density is lower than 1 14 18 Bè the battery is completely discharged DENSITY MEASUREMENT The density measurement of the electrolyte is the most important check on a battery This measure should be performed with extreme caution by means of a densimeter The syringe densimeter should be introd...

Страница 18: ...harge pipes that should not lead to the flues When necessary air exchange should be made in the fastest way by means of fans BATTERIES INACTIVE OR NOT IN CONTINUOUS OPERATION During inactive periods batteries are subject to a spontaneous discharge auto discharge The auto discharge substracts every day from the battery a part of its charge and causes a sulphation of the plates which increases in th...

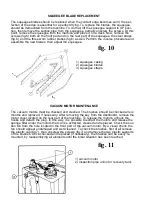
Страница 19: ... MOTOR MAINTENANCE The vacuum motors must be checked and cleaned The brushes should be checked all six months and replaced if necessary After removing the key from the dashboard remove the motor cover located on the rear part of the machine To release the motors unhook the hooks and detach the plug In this way it is possible to extract the motors and release the sponge filter under the motors that...

Страница 20: ...ard gard 2 carbons brushes 3 carbons brsshes screws CAUTION Each maintenance and repair operation not described under the ordinary maintenance should be performed by qualified personnel authorized by FIORENTINI S p A only ...

Страница 21: ... risen above Vmax 2 35 V el or it has exceeded the maximum supported Check battery wiring 5 10 Block of remote control switch The maximum power consumption on an output for the contactor is exceeded Check coils and wiring 6 1b Pot interrupted Check the potentiometer and relative wiring white blue and red black lines 7 18 Temperature outside the allowed limits Improve heat dissipation of the contro...

Страница 22: ... 211 a Tel 02 27207783 2564810 00012 Guidonia Montecelio ROMA Fax 0774 353419 353314 Via B Pontecorvo 20 Tel 0774 357184 353015 STABILIMENTO 50030 PIANCALDOLI FI Fax 055 817144 Loc Rombola Tel 055 8173610 Mat n Serial no Nr de serie Data di spedizione Date of shipment Date de spedition Distribuito da ...

Отзывы: