background image

English

   - 4 -

Viewing the TV 

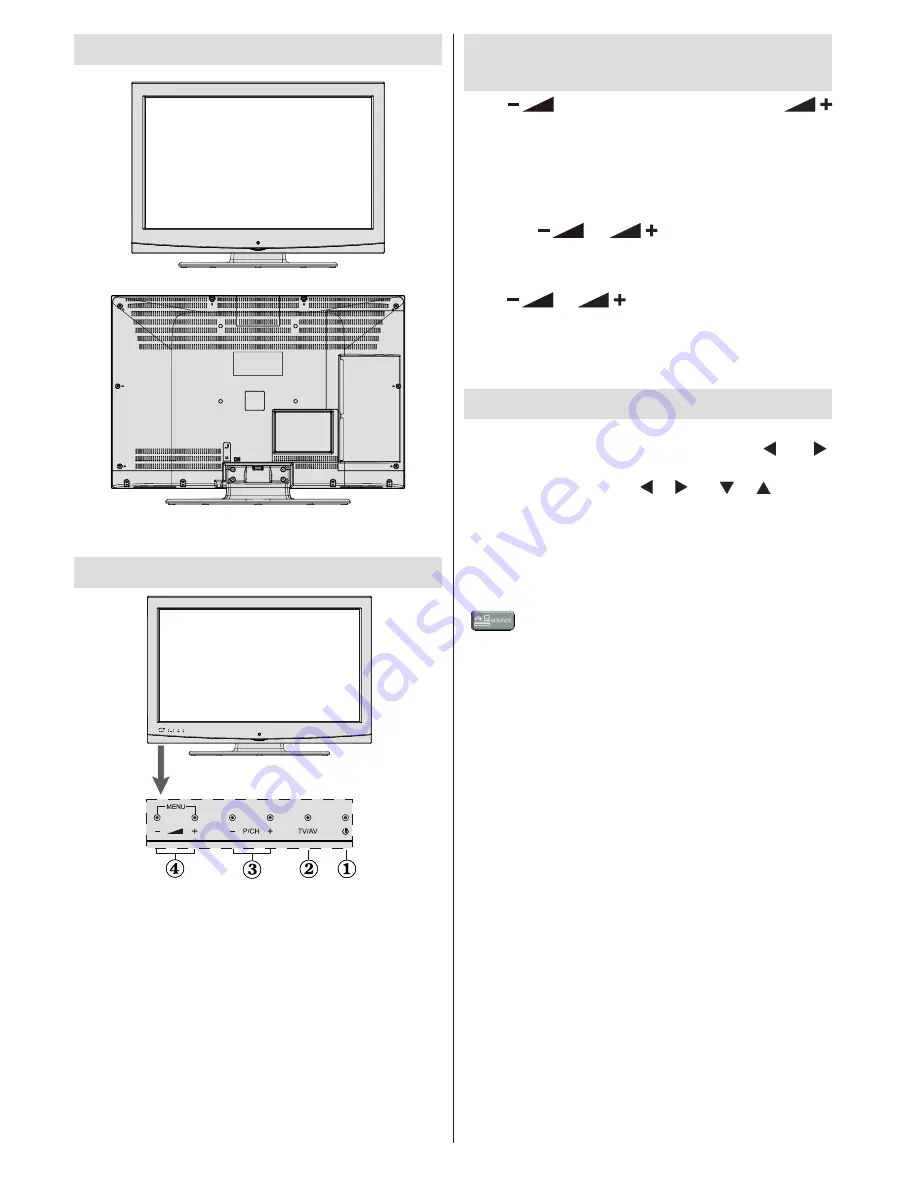
TV Control Buttons & Operation

1. 

Standby On/Off button

2. 

TV/AV button

3. 

Programme Up/Down buttons

4. 

Volume Up/Down buttons

Operation with the Buttons on the 

TV

Press 

 button to decrease the volume or 


button to increase the volume, so a volume level scale 
(slider) will be displayed on the screen.


Press 

P/CH +


button to select the next programme or 

P/CH -

 button 

to select the previous programme.
Press the 

 or 

 button at the same time 

to view the main menu. In the Main menu select a 
sub-menu using 

TV/AV

 button and set the sub-menu 

using 

 or 

 buttons. To see what options 

are available via the menu, refer to the menu system 
section of this manual.


Press the 

TV/AV

 button in the 

control panel on the TV to switch between AV modes.

Operation with the Remote Control

Press the 

MENU

 button on your remote control to 

display the main menu screen. Use the “ ” or “ ” 

buttons to select a menu tab and press the 

OK 

button 

to select option. Use the “ ” / “ ” or “ ” / “ ” buttons 

to select or set an item. Press 

BACK

 or 

EXIT

 or 

MENU


button to quit a menu screen.

Input Selection

Once you have connected external systems to your 

TV, you can switch to different input sources. Press the 

 - (

SOURCE

)” button on your remote control 

consecutively to select the different inputs.

Changing Channels and Volume

You can change the channel and adjust the volume 

using the 

V+/-

 and 

P+/-

 buttons on the remote. You 

can also change the channels by pressing the buttons 

on the front panel of your TV.

Содержание 32f502

Страница 1: ......

Страница 2: ...Menu 9 Changing Image Size Picture Formats 9 Using the Channel List 9 Menu Features and Functions 10 Electronic Programme Guide EPG 13 Recording a Programme 13 Timeshift Recording 14 Instant Recordin...

Страница 3: ...securely attached to the wall in accordance with the installation instructions Screen Occasionally a few non active pixels may appear on the screen as a fixed blue green or red point Please note that...

Страница 4: ...is used to receive and display TV programmmes The different connection options expand the reception and display sources possible various external devices This device is only suitable for operation in...

Страница 5: ...he menu system section of this manual Press the TV AV button in the control panel on the TV to switch between AV modes Operation with the Remote Control Press the MENU button on your remote control to...

Страница 6: ...l in TXT mode 27 Programme up down 28 Mute 29 Previous programme Now in EPG mode 30 Numeric buttons 31 AV Source TV NOTE The Remote Control range is approximately 7m 23ft Using My button 1 Press MYBUT...

Страница 7: ...scart socket When using the wall mounting kit optional we recommend that you plug all your cables into the back of the TV before mounting on the wall Insert or remove the CI module only when the TV i...

Страница 8: ...er is active The LED can also blink when you switch on the TV from standby mode First Time Installation When turned on for the first time the language selection menu appears The message Welcome please...

Страница 9: ...s may not be compatible with this TV The TV supports FAT32 and NTFS disk formatting but recording will not be available with NTFS formatted disks Note While formatting a USB hard disk that has 1TB Ter...

Страница 10: ...You can shift the screen up or down by using or buttons while in 14 9 Zoom Cinema or Subtitle Using the Channel List The TV sorts all stored stations in the Channel List You can edit this channel list...

Страница 11: ...um High or Off Colour Temp Sets the desired colour tone Picture Zoom Sets the picture size to Auto 16 9 Subtitle 14 9 14 9 Zoom 4 3 or Cinema Auto Only available in Scart mode with SCART PIN8 high vol...

Страница 12: ...headphones to the TV set this option as Headphone Dynamic Bass Enables or disables the Dynamic Bass Surround Sound optional Surround sound mode can be changed as On or Off Digital Out Sets digital aud...

Страница 13: ...the broadcaster Audio Description Audio description refers to an additional narration track for blind and visually impaired viewers of visual media including television and movies You can use this fe...

Страница 14: ...mer option The timer will be cancelled Note It is not possible to record two channels at the same time Recording a Programme IMPORTANT When using a new USB hard disk drive it is recommended that you f...

Страница 15: ...s Library Slow Forward If you press PAUSE button while watching recorded programmes the slow forward feature will be available You can use button to slow forward Pressing button consecutively will cha...

Страница 16: ...Do not spray cleaner directly onto the surface of the product This may result in discoloration and cracks and may cause the screen display to peel off Do not let water come into contact with the prod...

Страница 17: ...85Hz 36 1360x768 60Hz 37 1400x1050 60Hz 38 1400x1050 75Hz 39 1400x1050 85Hz 40 1440x900 60Hz 41 1440x900 75Hz 42 1600x1200 60Hz 43 1680x1050 60Hz 44 1920x1080 60Hz 45 1920x1200 60Hz Appendix B AV and...

Страница 18: ...HEAAC AC3 EAC3 LPCM ADPCM H 264 1080Px2 25fps 1080P 50fps Other 1080P 30fps 50Mbit sec RMVB RM rv30 rv40 LBR cook AAC HEAAC 1080P 30fps 50Mbit sec avi MPEG1 2 4 Xvid H 264 VC1 WMV3 Sorenson H 263 Moti...

Страница 19: ...on the Sky remote control blinks twice 4 Key in 065 The light on the Sky remote control should blink twice 5 Press the STANDBY button on your Sky remote control If your TV switches off press SELECT Th...

Страница 20: ...ual provided The product must be used solely for domestic purposes The guarantee will be invalid if the product is re sold or has been damaged by inexpert repair notice On site service is limited to V...

Страница 21: ...r and tear This includes but is not limited to parts D This Warranty does not cover any Finlux branded consumer product installed in a moveable dwelling Note that the performance of the product may be...

Страница 22: ......

Отзывы: