


10
Stair Railing Installation
SPECIAL NOTES ON STAIR RAILING
The stair systems are designed for the typical angles created by an approximate 7 in. rise/11 in. run with allowance for accepted
variation in components. The Deluxe stair system allows for a 30-36 degree stair angle. Building codes are very specific on allowable
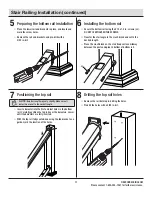
angles and widths. It is very important to consult with your local building code officials and plan your stair layout accordingly. Ensure that
you leave adequate space for graspable hand rail if applicable. “Dry fitting” intermediate post placement will result in easier and better
looking installations and may avoid placement of post mounting brackets in areas where screws cannot attach to the guardrail.
1
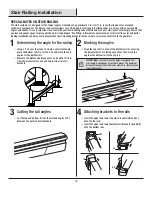
Determining the angle for the railing
□
Using a 2 x 4 over the steps to create a consistent angle,
place the bottom rail (1) over the 2 x 4 and mark the end
angles for the bottom rail.
□
Measure the distance between posts, and subtract 1/8 in.
from the measurement on each end to allow for stair
brackets.
1
2
Marking the angles
□
Align the top rail (1) on top of the bottom rail (2), ensuring
the baluster holes are facing each other. Then mark the
angle of the bottom rail to the top rail.
NOTE:
Make sure that when the holes are aligned, the
stair angle is continuous across both pieces. The minimum
distance from post to first baluster slot is 2 in. for clearance
from the brackets.
1
2
3
Cutting the rail angles
□
Cut the top and bottom rails at the marked angles to fit
between the posts and rail brackets.
4
Attaching brackets to the rails
□
Insert the upper and lower top stair brackets (HH and JJ)
onto the top rails.
□
Insert the upper and lower bottom stair brackets (II and KK)
onto the bottom rails.
HH
JJ
II
KK