8
6.1
Rough speeds for work with diffe-
rent materials
a)
Polishing
Work
Setting
Distribute polish
1-2
Polishing sensitive surfaces
(e.g. painted plastic parts)
3-4
High-gloss polishing
5-6
b)
Sanding
Work
Setting
Light sanding of thin topcoats
4-6
Sanding smearing paints / varnishes
4-6
Sanding off dry, cracked paint
6
Removing anti-fouling paint
6
Sanding out rust on varnished metal parts (6)
Sanding thermoplastics
2-4
Sanding wood
6
Smoothing stained wood with
sanding brush
2-4
Cleaning sandstone, concrete,
shuttering material
4-6
( ) Only conditionally suitable
7
AH-RAS 115 extractor hood
7.1
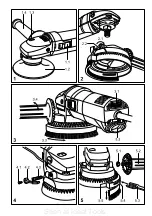
Fitting (Fig. 2)
Before fitting the hood, take care to
ensure that the clamping lever is in the
released position (2.2).
Press the extractor hood firmly onto the
clamping neck of the rotary polisher and fa-
sten by pushing the clamping lever forwards
(2.1).
Do not start work if the hood extractor
hood is not safely and firmly locked
onto the clamping neck.
If the clamping force should deteriorate after
frequent use, adjust the clamping lever:
loosen screw (4.1) on clamping lever and
remove clamping lever (4.2),
tighten square-head threaded bolt (4.3) by
hand,
replace clamping lever and fasten with screw.
The optimum position can be determined by
closing the clamping lever before tightening
the screw.
7.2
Changing the position of the
rotating handle
The rotating additional handle can be also be
fastened on the right of the extractor hood
depending on the users personal preferences.
It should be exchanged with the clamping lever.
Loosen screw (4.1) on clamping lever and
remove clamping lever (4.2).
Remove square-head threaded bolt (4.3).
Loosen additional handle (5.2) with Allen key,
size 6.
The clamping lever and additional handle can
now be exchanged. Reassemble in reverse
order.
You can adjust the free-running of the rotating
additional handle using the counternut (5.1)
by clamping this against the hood with an open-
end spanner, size 13, before tightening the ad-
ditional handle.
7.3
Changing the brush insert
Press the brush insert out by inserting a
screwdriver into the square hole (5.5).
Place the new brush insert into the groove,
adjust the radius by bending slightly and push
in firmly until the insert rests on the base of
the hood.
The bevel of the bristles must hereby point
outwards.
Two different brush inserts are available:
AH-RAS D 115 Poly (Order No. 484 727),
contains 2 polyamide brushes (as
replacements for worn brushes).
AH-RAS D 115 Metal (Order No. 484 728),
contains 1 metal brush (for use on materials
which produce sparks).
7.4
Changing the sanding pad
In normal cases the sanding pad (1.2) can be
unscrewed from the working spindle by hand
after the spindle stop (1.3) has been pressed.
However, should the sanding pad sit firmly
Remove brush insert
Insert special key (5.3) through slot (5.4)
into the tools key slot.
Press the spindle stop and loosen the tool by
turning the special key.
Always screw the sanding pad onto the
working spindle by hand.
This greatly facilitates a later loosening.
7.5
Sanding and dust extraction
Connect the hose (Ø 27 mm) of a
Festool dust extractor to the adapter
(3.2) on the rear of the rotary
polishers casing.
The brush (3.3) can be adjusted with the
rotating handle (3.4).
This permits an optimum adjustment to the
respective working position.
Always rotate the brush in the direction of flight
of the sanding dust.
When sanding metals and other
materials which produce sparks, a
spark trap (Order No. 484 733) must
be fitted between the dust extractor
and rotary polisher for safety reasons.
Seen at Ideal Tools.
Содержание RAP 80.02 E
Страница 3: ...Seen at Ideal Tools...

