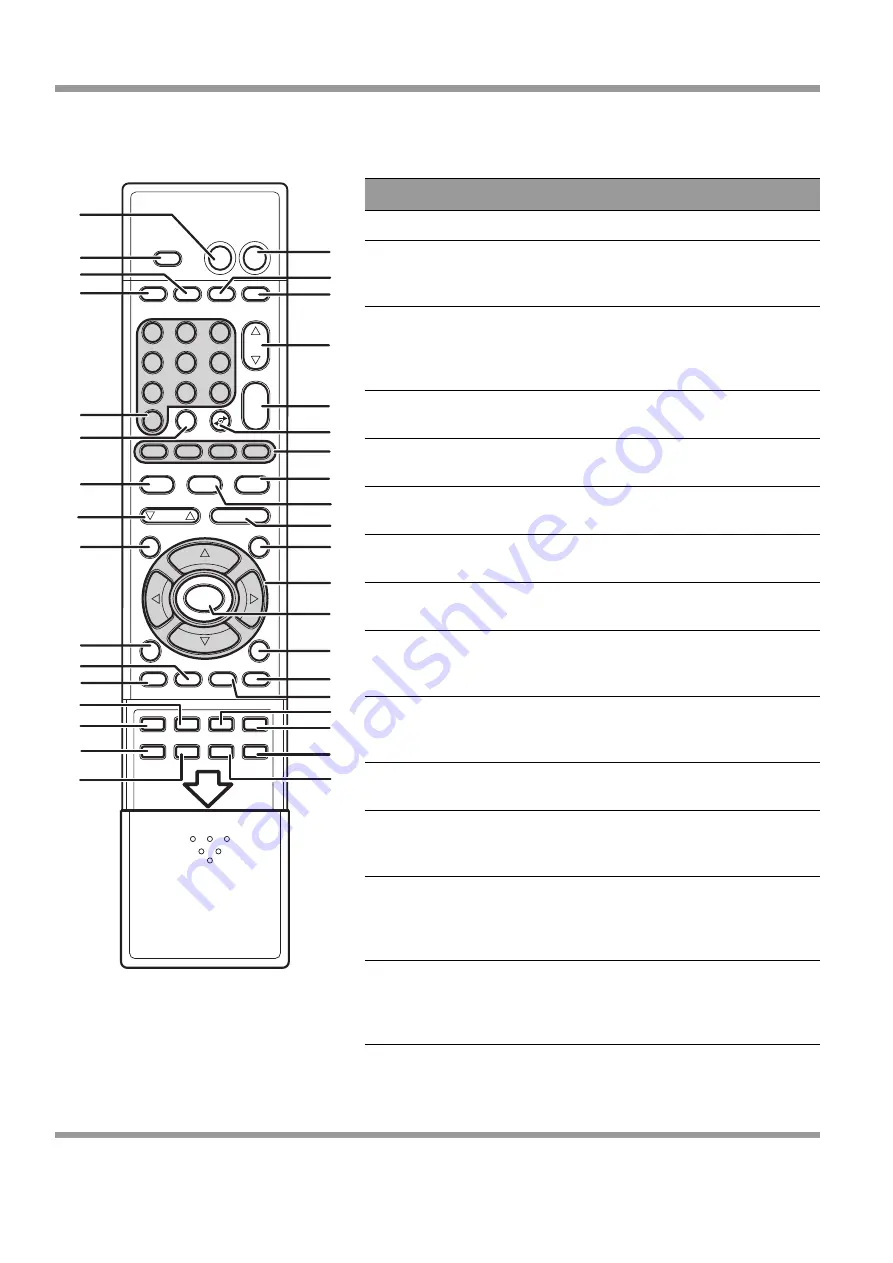
Ferguson FL32WX2 Скачать руководство пользователя страница 11

5

Remote control

Component

Function

1.

POWER

Turns power on or off.

2.

DISPLAY

Press repeatedly to display current 

time, channel number, or video 

input signal.

3.

OFF TIMER

Press repeatedly to set the off 

timer to 10 through 90 minutes. 

The TV enters stand-by mode after 

the specified time interval.

4.


/

Decreases   or increases   the 

channel number.

5.

VOL  – / +

Increases (+) or decreases (–) the 

volume.

6.

JUMP

Switches to the previously viewed 

channel.

7.

TELETEXT HOT KEYS Select groups of pages in teletext 

mode.

8.

INDEX

Displays a list and information 

about the teletext pages.

9.

SUB PAGE

Displays the teletext as an overlay 

over the programme you are 

currently watching.

10.

ZOOM / HOLD

Zoom enlarges the teletext page; 

Hold freezes the current teletext 

page on the screen.

11.

VIDEO MUTE

Turns off the video display. The 

TV screen turns blank.

12.

ARROW KEYS

Press the up, down, left, right 

arrow keys to scroll through the 

OSD menu options.

13.

MENU

Displays the OSD menu. Press 

repeatedly to view the different 

menu pages or exit the OSD 

menu.

14.

AI AUDIO

Adjusts the audio volume 

automatically according to the 

audio level of the channel or video 

programme.

SCART

SOUND

VIDEO MUTE

SURROUND

TELETEXT

SUB PAGE

INDEX

VOL

TV/AV/S

MUTE POWER

VIDEO
MODE

AUDIO
MODE

  0FF
TIMER

DISPLAY

CH

1

2

3

4

5

6

7

8

9

0

MENU

PAGE

ZOOM  HOLD

COMPONENT

PC

WIDE

+
-

- --

/

AI AUDIO

AUTO PLAY

PIP/POP

ROTATE

SUB SOURCE

CARD PLAY

POSITION

PREVIEW/FULL

SWAP

1

2
3

4

5

6
7

8

9

10

11

12

13

14

15
16
17
18

19

20

21

22

23

24

25

26

27

28

29

30

31

32

33

34

35

36

FERGUSON

Содержание FL32WX2

Страница 1: ...FERGUSON LCD MONITOR MODEL FL32WX2 PAL TV SYSTEM USER MANUAL EARPHONE MENU VOL POWER INPUT CF SD MMC SM MS...

Страница 2: ......

Страница 3: ...any language or computer language in any form or by any means electronic mechanical magnetic optical chemical manual or otherwise without the prior written permission of this company Copyright 2004 Al...

Страница 4: ...recommended that you leave a 10cm gap all around your TV Batteries Batteries are easily swallowed by young children Do not allow young children to play with the remote control unit Covers Do not remo...

Страница 5: ...ng the volume 18 Additional audio settings 19 Selecting stereo or bilingual programmes 19 Using surround sound mode 19 Using audio mode 19 Using auto volume level 19 Additional video settings 20 Using...

Страница 6: ......

Страница 7: ...res Enjoy the versatility of your LCD TV with its wide variety of features 32 inch colour active matrix TFT LCD TV with remote control Safe sturdy construction High contrast 500 1 typical and brightne...

Страница 8: ...your installation If you have subscribed to a cable TV system using scrambled or encoded signals requiring a cable box to view all channels connect the the ANT jack to the cable box s ANTENNA OUT jack...

Страница 9: ...button Turns the On screen Display OSD menu on or off 6 INPUT button Switches the input source displayed on the screen between the ANT AV IN and PC IN inputs 7 EARPHONE Connects to external headphones...

Страница 10: ...nd component video output jacks of your A V device 6 PC IN Connects to the VGA output of your PC or portable computer 7 PC AUDIO IN Connects to the audio output earphone jack of your PC or portable co...

Страница 11: ...0 ZOOM HOLD Zoom enlarges the teletext page Hold freezes the current teletext page on the screen 11 VIDEO MUTE Turns off the video display The TV screen turns blank 12 ARROW KEYS Press the up down lef...

Страница 12: ...y 90 in a clockwise right direction 24 AUTO PLAY Plays back all the images from the flash memory card automatically Press again to stop playback 25 SCART Selects the SCART1 IN or SCART2 IN inputs as t...

Страница 13: ...35 TV AV S Selects the ANT AV IN or S IN inputs as the video source signal 36 MUTE Disables the audio output If direct sunlight shines directly on the remote sensor the remote control s operation may...

Страница 14: ...the rear of the remote control and remove the cover 2 Insert the two supplied AAA batteries Check the and ends of the batteries before inserting them in the compartment 3 Replace the cover and make su...

Страница 15: ...V as a flash memory card reader and view your digital photographs or video clips directly on the TV without requiring a PC connection The back panel of the LCD TV provides input and output jacks to ma...

Страница 16: ...eo equipment e g DVD player VCR Camcorder This means it is possible you will not use all the jacks on the TV If you plan to watch TV with your DVD player or VCR off connect a coaxial cable to the DVD...

Страница 17: ...YCbCr or YPbPr connectors and provides the highest picture quality To connect your A V device to this port do the following 1 Using a component video cable connect the video YCbCr YPbPr jacks on the...

Страница 18: ...n This port produces picture very high picture quality An A V device can be connected to this port as follows 1 Using an S Video cable connect the video S Video jack on the TV to the corresponding S V...

Страница 19: ...rt to connect your LCD TV to an A V device such as a DVD recorder VCR home theatre audio equipment and so on as follows 1 Using a composite video cable connect the video VIDEO jack on the TV to the vi...

Страница 20: ...e following 1 Connect the video output of your PC or portable computer to the PC IN VGA video input on the back panel of the TV using a VGA cable 2 Connect the Line out audio output of your PC to the...

Страница 21: ...o read the card contents The TV supports CF SD MMC MS and SM card formats Insert the memory card in the appropriate memory card slot as shown in the illustration Inserting a CompactFlash card Insertin...

Страница 22: ...CH buttons to select a channel with a clear picture 2 Use your TV guide or Teletext to identify the channel e g BBC1 BBC2 ITV etc 3 Press MENU and then CH to highlight CH SETTINGS press VOL to select...

Страница 23: ...2 or 3 digit number To enter a number higher than 100 press the button first and then type in the lower two digits of the channel number Press the button to switch back to the previously viewed channe...

Страница 24: ...sing decreasing volume or changing channels If the mute has not been cancelled within 8 minutes from activation the system will automatically reset the volume level to 0 EARPHONE MENU VOL POWER INPUT...

Страница 25: ...set in the AUDIO ADJUST OSD menu Using auto volume level This feature balances the various audio volume levels of channels Press the AUDIO AI button on the remote control to lower the audio volume if...

Страница 26: ...de Press the WIDE button on the remote control to change the screen size The screen size can be set to the following options MODE 1 MODE 2 MODE 3 MODE 4 4 3 and FULL In order for the current time to b...

Страница 27: ...3 Press the SUB SOURCE button on the remote control repeatedly to select the secondary input from PC IN or COMPONENT IN inputs 4 Press the POSITION button on the remote control repeatedly to change th...

Страница 28: ...and select the desired one Press the PAGE buttons on the remote control to skip to the next or previous page In teletext mode if you want to enlarge the size of the text being displayed press the ZOO...

Страница 29: ...images as follows 1 When you insert the card into the memory card slot the TV switches automatically to card reader mode A thumbnail list of the images on the card are displayed 2 To view an image in...

Страница 30: ...Front Panel Controls Action MENU MENU Press to enter the OSD menus When in the OSD menus press to scroll between the different main menus or or Move up and down in the OSD menus or VOL or VOL Press to...

Страница 31: ...tting until the colours on the screen for example flesh tones look natural Tint Changes the colour balance Adjust this setting so that the colours for example flesh tones on the screen are neither too...

Страница 32: ...low frequency content in the audio output Balance Balances the volume of the left and right speakers Audio Mode Stores Audio settings The following options are available Soft loads audio settings that...

Страница 33: ...that will elapse before the TV turns off Options are from 0 _ _ M to 90 M in ten minute increments Language Changes the OSD display language The following options are available French Spanish Italian...

Страница 34: ...ource for the secondary image in the PIP mode The options are Off AV S Video TV and Component POP Enables and disables POP Picture on Picture mode In POP mode the screen is divided into two equal part...

Страница 35: ...the TV standard Pal D G Pal I Pal D K SECAM L Auto Automatically scans for available channels PR Edit Enables you to modify add or delete channels from the available channels Select PR Edit and press...

Страница 36: ...r to display the sub menu Select an item in the list and press to move the item down in the list Press to move an item up in the list Option Function 1 _ _ _ _ 2 _ _ _ _ 3 _ _ _ _ 4 _ _ _ _ 5 R _ _ _...

Страница 37: ...n Increasing this value makes images on the screen appear greener Blue Increasing this value makes images on the screen appear bluer Colour Temperature Enables you to set the colour temperature Cool s...

Страница 38: ...ystem PAL SECAM NTSC Vertical tilt Progressive scan 9 Separated tuner box 1 2 2 pull down 9 Dimensions H W D 620 mm x 1054 mm x 220 mm Noise reduction 9 Packing size H W D 715 mm x 950 mm x 355 mm Aud...

Страница 39: ...the polarity correctly aligned Check if the batteries are discharged Please replace with new batteries Make sure that you do not use the remote control under strong or fluorescent lighting Check if t...

Страница 40: ...compatible signal is being used as the input signal No sound Is the volume too low The MUTE button may have been pressed try pressing this button again Teletext not working The channel may have stoppe...

Отзывы: