background image

99

ESPAÑOL

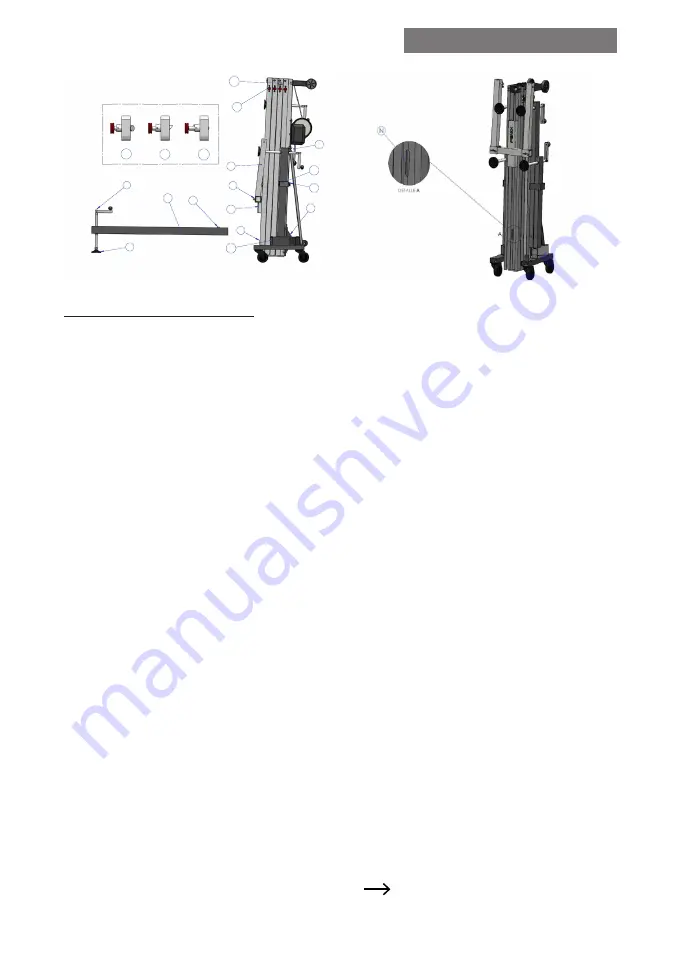
4. INSTRUCCIONES DE USO

1. Colocar la torre elevadora sobre una su-

perficie plana y firme en su emplazamiento 

de trabajo. 
2. Sacar las patas (H) de su soporte para 

transporte (C) liberando el pomo de plástico 

(V) y estirar de la pata (H) hacia arriba. In-

sertarlas en sus alojamientos de trabajo (G) 

comprobando que quedan sujetas por los ga-

tillos de seguridad (K). Las patas largas, de-

lante, bajo la carga.
3. Sacar el pasador (L) de la pletina de trans-

porte (F) y quitar el brazo de carga (E). Gi-

rar la manivela del cabestrante (B) hasta que 

el carro (X) haya subido lo suficiente como 

para que no toque con la pletina de transpor-

te (F). Poner los brazos de carga (E) en posi-

ción horizontal y asegurar con el pasador (L).
4. Insertar las patas (H) en sus alojamientos 

de trabajo (G) comprobando que quedan 

sujetas por los gatillos de seguridad (K). Las 

patas largas, delante, bajo la carga.
5. Ajustar la torre elevadora utilizando los 

platos de apoyo (J) girando la manivela (I) de 

la varilla reguladora hasta que quede nivela-

da, observando el nivel de burbuja estabiliza-

dor (Y) de la base.
6. Colocar la carga que se va a elevar lo más 

cerca posible de la torre elevadora. No sepa-

rar innecesariamente el equipo de sonido del 

cuerpo de la torre elevadora para evitar una 

sobrecarga. Ver fig. 2 (pág. 17). Seguir ins-

trucciones de carga. Ver fig. 3 (pág. 17).

7. Elevación: Para elevar los perfiles hay que 

seguir un orden concreto. El primer perfil 

que hay que subir siempre será el más aleja-

do del cabestrante. Liberar el gatillo de segu-

ridad (A) en posición abierta (T) y girar la 

manivela del cabestrante (B) en el sentido de 

las agujas del reloj elevando la carga hasta la 

posición deseada. Inmediatamente después, 

mover el gatillo de seguridad (A) en posición 

cerrada (S), hasta que haya llegado al final 

del tramo, y así sucesivamente entre las dis-

tintas posiciones de cada uno de los perfiles, 

hasta llegar a la altura deseada. En el caso de 

que el gatillo esté duro y sea difícil de sacar, 

hay que realizar un pequeño juego con el ca-

bestrante hasta encontrar la posición exacta 

donde se libere el gatillo y se pueda sacar có-

modamente. En ningún caso se deberá tirar 

con fuerza de ninguno de los gatillos. En caso 

de no elevar la torre elevadora hasta su altura 

máxima, se recomienda subir todos los per-

files proporcionalmente acorde a la altura, y 

no únicamente uno de ellos.


8. En caso de usar la torre elevadora al aire 

libre, existe el riesgo de vientos, para lo cual 

se ha previsto de dos argollas laterales de fi-

jación (M) situadas en la parte superior del 

segundo perfil, donde deberán fijarse los 

tensores que serán anclados a lugares firmes 

y seguros (nunca sobre un vehículo o cual-

quier otro elemento que pueda desplazarse). 

A partir de una velocidad de 30km/h es im-

prescindible bajar la torre elevadora.

9


S

A

C

J

G

M

B

X

I

H

V

K

F

Y

E

L

U

T

Содержание AT-06B

Страница 1: ...o Instrucciones Instructions LIFTING TOWERS Fabricante Manufacturer FENIX Stage S L U FENIX Stage S L U Avda de los Trabajadores 24 Horno de Alcedo 46026 Valencia Spain Tel 34 96 125 08 55 export fenixstage com www fenixstage com www fenixstage com ...

Страница 2: ...2 2 FENIX STAGE S L U Avda de los Trabajadores 24 Horno de Alcedo 46026 Valencia Spain ...

Страница 3: ...midad del producto Nombre Modelo Descripción al que se refiere esta declaración con las disposiciones de la normativa de maquinaria CE 2006 42 EG y sus modificaciones Persona facultada para elaborar el expediente técnico y representante autorizado Mª Julia Niza del Rio TORRE ELEVADORA AT 06 Altura máxima 6 50m Altura mínima 1 97m Carga máxima 250kg Área de la base abierta 1 66 x 1 72m Peso 107kg C...

Страница 4: ...usions Fecha Date Verificador Verifier Firma Signature Partes comprobadas Tested parts Conclusiones Conclusions Fecha Date Verificador Verifier Firma Signature Partes comprobadas Tested parts Conclusiones Conclusions Fecha Date Verificador Verifier Firma Signature 1 2 3 4 5 6 7 8 9 1 0 1 1 1 2 14 15 16 17 18 19 BGV C1 BGG 912 verificado en verified on Primera verificación experto First expert veri...

Страница 5: ...o 3 pág 8 seguir las instrucciones de uso ver punto 4 pág 9 un manteniminto periódico ver punto 5 pág 9 conocer los sistemas de prevención ver punto 7 pág 10 BGV C1 is a regulation for staging and pro duction facilities for the entertainment and events industry Adopting BGV C1 is completely voluntary except in Germany where it is required The application of this regulation is highly recommended du...

Страница 6: ... DE SEGURIDAD 8 4 INSTRUCCIONES DE USO 9 5 MANTENIMIENTO 9 6 RIESGOS ESPECÍFICOS 10 7 SISTEMAS DE PREVENCIÓN 10 INDEX 1 INTRODUCTION 11 2 GENERAL DATA 11 2 1 Technical data 11 2 2 Applicable regulations 11 3 GENERAL SAFETY RULES 12 4 HOW TO USE 13 5 MAINTENANCE 13 6 SPECIFIC RISKS 14 7 PREVENTION SYSTEMS 14 ...

Страница 7: ...ación TORRE ELEVADORA Modelo AT 06B Características técnicas Altura máxima 6 50m Altura mínima 1 97m Carga máxima 250kg Carga mínima 25kg Material Aluminio según AL Si 6082 T6 Área de la base abierta 1 66 x 1 72m Área de la base cerrada 0 48 x 0 48m Peso 107kg Cabestrante 900kg de carga máxima con fre no automático de retención de la carga Cable Acero galvanizado según EN 12385 4 Carga máxima cabl...

Страница 8: ... elevadora ni apoyarlas en él para realizar ningún tipo de trabajo Tenga cuidado con todo tipo de salientes por encima de la torre elevadora como cornisas balcones letreros luminosos etc Es muy importante evitar la presencia de cables por debajo de la altura de trabajo de la torre elevadora Nunca se debe desplazar la torre elevadora si ésta se encuentra con la carga elevada No es aconsejable reali...

Страница 9: ... Ver fig 3 pág 17 7 Elevación Para elevar los perfiles hay que seguir un orden concreto El primer perfil que hay que subir siempre será el más aleja do del cabestrante Liberar el gatillo de segu ridad A en posición abierta T y girar la manivela del cabestrante B en el sentido de las agujas del reloj elevando la carga hasta la posición deseada Inmediatamente después mover el gatillo de seguridad A ...

Страница 10: ...razos de carga E en posición vertical y bajar el ca rro X girando la manivela del cabestrante B ejerciendo un poco de presión sobre el carro X Meter las patas H en su sopor te para transporte C ajustando los pomos de plástico V Asegurar el brazo de carga E poniendo el pasador L en la pletina de transporte F fijando así el carro X para no sufrir bloqueos del péndulo 5 MANTENIMIENTO 1 Comprobar peri...

Страница 11: ...ÓN Sobre fallo del sistema de freno Disponer de cabestrante conforme a las nor mas mencionadas en la directiva de seguri dad BGV C1 especialmente DIN EN ISO 12100 2011 03 y DIN EN ISO 12100 1 2004 04 Sobre pérdida de estabilidad El mantenimiento de la estabilidad de la to rre elevadora debe realizarse básicamente con las siguientes medidas Profesionalización adiestramiento forma ción y concienciac...

Страница 12: ... 06B Technical characteristics Maximum height 6 50m Minimum height 1 97m Maximum load 250kg Minimum load 25kg Material Aluminium AL Si 6082 T6 Open base area 1 66 x 1 72m Closed base area 0 48 x 0 48m Weight 107kg Winch 900kg maximum load with automa tic load retention brake Cable Galvanized steel under EN 12385 4 Cable maximum load 2 000kg Cable torsion resistance 1 770N mm Cable diameter 6mm Cab...

Страница 13: ...e lifting tower or lean against it for any kind of work Beware of any kind of projection above the lifting tower like cornices balconies luminous signs etc It is very important to avoid the presence of cables below the lifting tower s working height Never move the lifting tower when the load is raised It is inadvisable to make any kind of movement even small positioning adjustments Never use the l...

Страница 14: ... loading instructions See fig 3 page 17 7 Elevation To lift the profiles a specific or der must be followed The first profile to be raised will always be the one located furthest from the winch Release the safety pin A in open position T and turn the winch handle B clockwise lifting the load until the desi red height Immediately afterwards close the safety pin A in position S until the end of the ...

Страница 15: ...the safety pins A in closed position S Move the forklifts E in vertical position and lower the carriage X by turning the winch handle B and pressing down a little on the carriage X Place the outriggers H in their trans port support C and retighten the plastic knob V Fix the forklift E by placing the pin L into the transport plate F securing the carriage X to avoid the block of the pen dulum 5 MAIN...

Страница 16: ...la tions metioned in the BGV C1 directive spe cially DIN EN ISO 12100 2011 03 and DIN EN ISO 12100 1 2004 04 About loss of stability Maintenance of lifting tower stability must basically be as per the following measures Professionalization training and risk awareness of lifting tower users Equip with different safety devices and ad vices from the manufacturer to reinforce sta bility as Safety pins...

Страница 17: ...17 Distancia Distance Carga máxima Maximum load 20cm 250kg 45cm 195kg Distancia del centro de la carga a la torre Distance from the center of the load to the tower Figura 2 Figura 3 20cm 45cm ...

Страница 18: ...18 ...

Страница 19: ...19 ...

Страница 20: ...20 ...

Страница 21: ...21 ...

Страница 22: ...22 ...

Страница 23: ...23 NOTAS NOTES LIFTING TOWERS ...

Страница 24: ...FENIX Stage S L U FENIX Stage S L U Avda de los Trabajadores 24 Horno de Alcedo 46026 Valencia Spain Tel 34 96 125 08 55 export fenixstage com www fenixstage com www fenixstage com ...

Отзывы: