


Fan page
Line@
15.
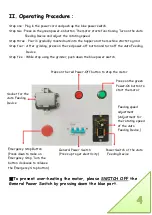
If the red Emergency Button has been pressed, users should turn the button clockwise to
release the Emergency function. To turn on the machine, if the red Emergency Button has
been pressed, users should turn the button clockwise to release the Emergency function,
in order to make the machine function.
16.
Users should never dismantle the auger. The installation of the auger defines the
functioning and the quality of the grinder. The proper installation of the auger requires
specialists.
17.
While using the grinder with the Auto Feeding Device, turn on the machine before pouring
in roasted nuts. At first, pouring into the hopper small amount of nuts, after the butter
flows out from the outlet, pouring into the hopper with more amount of nuts.
18.
To remove the Auto Feeding Device, un-plug the cord located at the electrical control
area, loosen the two securing knobs, and remove the whole Auto Feeding Device. Do not
dismantle any parts from the Auto Feeding Device.
19.
While grinding without the Auto Feeding Device, pour into the hopper at first with small
amount of roasted nuts. After the butter flows out from the outlet, pour into the hopper
with more amount of nuts. In the case necessary, use the given wooden stick to push the
nuts into the auger. Do not use metal or spoon to push nuts into the auger. It’s ok for a
wooden stick to touch the auger while operation, but if a metal like spoon touches the
auger, even if only for a few seconds, the auger can be damaged.
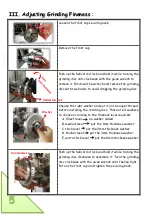
20.
To dismantle the grinding disc, users should use one hand to push up the helical rod lock
and use the other hand to turn anticlockwise the grinding disc with a given wrench. When
the grinding disc has been loosen up, put down the wrench, and turn out anticlockwise the
grinding disc.
21.
Users use the given wrench to dismantle the grinding disc. For reassembling the grinding
disc, users do not need a wrench. They push up the helical rod lock with one hand and turn
clockwise the grinding disc with the other hand until it is tight.
22.
Each of the given 4 washers is with a different thickness. Users need to assemble the
washer only when they want to grind butter with thickness. Before assembling the
grinding disc, they put on a washer according to the thickness of the output butter they
wish to make. Do not assemble more than 1 washer at a time.
VI. Contact Information
:
FELI Technology Co., Ltd.
Tel
:
886-2-2903-3330 Fax
:
886-2-2902-6291
Official Website
:
https://www.felilook.com/
:
Address: 6F,No.423, Sec. 3, Mingzhi Rd., Taishan Dist., New Taipei City 24355, Taiwan (R.O.C.)
Instruction of
dismantling
Feli Website
Содержание NBM-500
Страница 1: ......