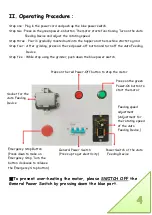
Feli NBM-500 Скачать руководство пользователя страница 5


Socket for the 
Auto Feeding 
Device 

Feeding speed 
adjustment 
(Adjustment for 
the rotating speed 
of the Auto 
Feeding Device,) 

Emergency Stop Button 
(Press down to make an 
Emergency Stop. Turn the 
button clockwise to release 
the Emergency Stop button.) 

General Power Switch 
(Press up to get electricity) 

Power Switch of the Auto 

Feeding Device 

Press on the green 
Power-On button to 
start the motor 

II. Operating Procedure


Step one

Plug in the power cord and push up the blue power switch.   

Step two

Press on the green power-on button. The motor starts functioning. Turn on the Auto 

Feeding Device and adjust the rotating speed. 

Step three

Pour in gradually roasted nuts into the hopper and the machine starts to grind. 

Step four

After grinding, press on the red power-off button and turn off the Auto Feeding   

Device.   

Step five

While stop using the grinder, push down the blue power switch. 


                                                      Press on the red Power-Off button to stop the motor 


To prevent over-heating the motor, please SWITCH OFF the 

General Power Switch by pressing down the blue part.


Содержание NBM-500

Страница 1: ......

Страница 2: ...additives during the grinding process By adding washers it is possible to adjust the fineness of the paste Feli grinders allow you to produce fresh and natural taste of nut paste Feli healthy nut gri...

Страница 3: ...paste in different ways eat directly spread on bread healthy seasoning for noodles salad dressing soup dressing BBQ sauce add flavor to ice cream coffee milk or soybean milk You can also make pastries...

Страница 4: ...ase 220V 20AMP Material of Machine Shell Stainless 304 Motor 3 horse power Device Safety device and Auto Feeding Device I Introduction 12 1 Auto Feeding Device 2 Hopper 3 Hopper Securing Knobs 4 Front...

Страница 5: ...one Plug in the power cord and push up the blue power switch Step two Press on the green power on button The motor starts functioning Turn on the Auto Feeding Device and adjust the rotating speed Ste...

Страница 6: ...nstalling the rotating disc There are 4 washers to choose according to the fineness level required A finest level no washer added B medium level put the 1mm thickness washer C thick level put the 2mm...

Страница 7: ...oosen up the grinding disc put down the wrench and turn out the grinding disc anticlockwise with two hands to avoid dropping it Loosen the hopper support securing knobs Remove the hopper support Clean...

Страница 8: ...the plug Dismantle the parts for cleaning After cleaning press the Over Current Safety Device black button located on the back of the grinder Once the power is on the grinder would be working normally...

Страница 9: ...y use the given wooden stick to push the nuts into the auger Do not use metal or spoon to push nuts into the auger It s ok for a wooden stick to touch the auger while operation but if a metal like spo...

Отзывы: