background image

SERVICE VALVE CONNECTIONS

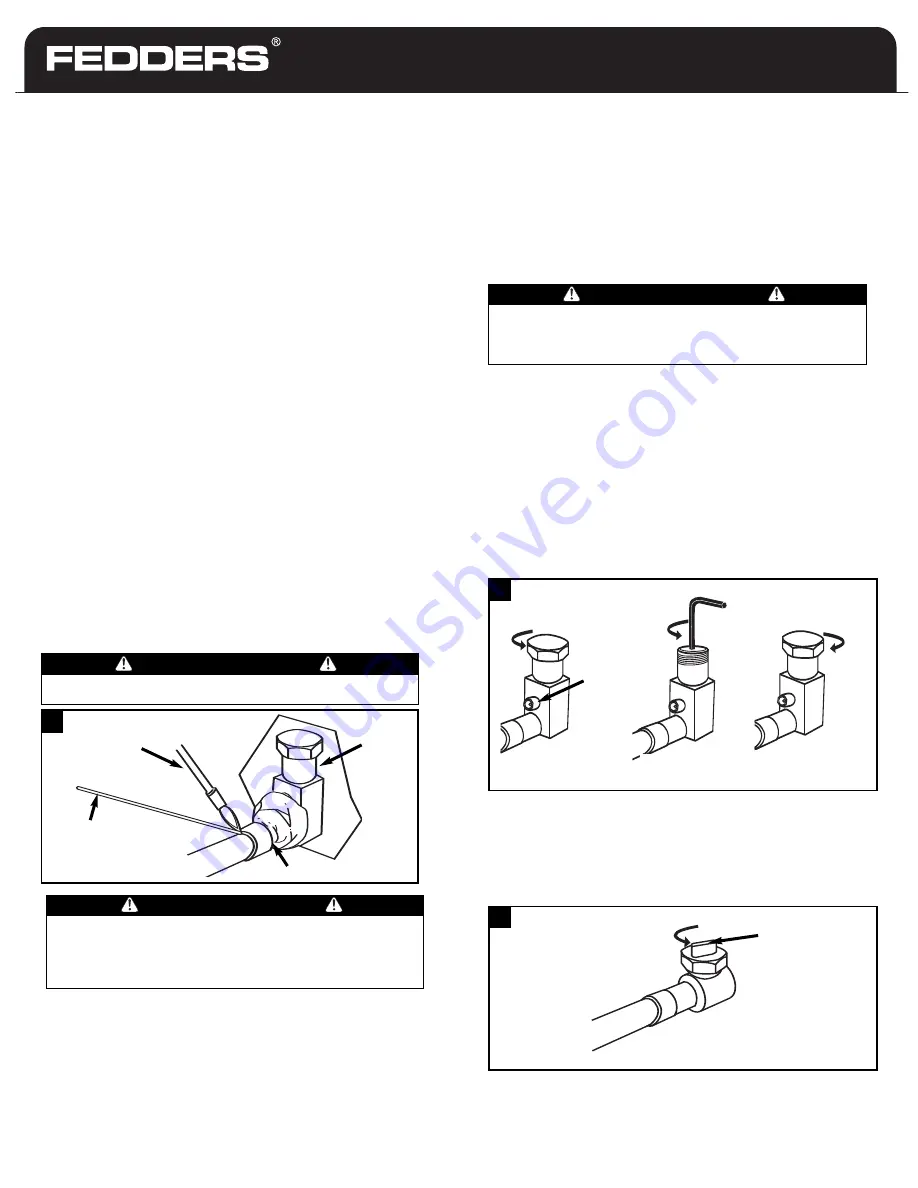
Braze joints

1.

Remove the valve core from the schrader port. Wrap a
quenching cloth around the service valve. Clean and flux
the joint and braze with brazing rod containing at least
10% silver (such as silphos type brazing rod). DO NOT USE
SOFT SOLDER. Replace the schrader valve core after
brazing has cooled.

2.

Leak-check all braze joints at approximately 80 psi
pressure, purge, and evacuate the lines. 

Evacuation

The outdoor unit is factory charged. Evacuation is necessary
on the uncharged portions of the total system. Purge the
system with dry nitrogen. Then connect a vacuum pump and
a vacuum gage capable of accurately measuring below
1,000 microns vacuum depth. The deep vacuum method is
the most positive way of assuring a system is free of air and
liquid water.

WARNING

IF THE INSTALLER IS MAKING UP HIS OWN LINE SETS,
HE MUST MAKE SURE THE TUBING IS CLEAN OF ANY
IMPURITIES OR MOISTURE. 

WARNING

DO NOT USE AIR TO LEAK-CHECK BRAZE JOINTS.
DRY NITROGEN SHOULD BE USED TO LEAK-CHECK.

WARNING

ALWAYS HAVE A FIRE EXTINGUISHER AVAILABLE
WHEN WORKING WITH AN OPEN FLAME.

ALWAYS USE SAFETY GLASSES, PROTECTIVE
CLOTHING, AND WORK GLOVES.

Torch

Brazing rod 

Quenching Cloth

Service
valve

Model

3

Connect Control Wiring

1. Route 24 volt control wires through control wiring

grommet and connect leads to control wiring.

2. Use No. 18 AWG color coded, insulated wire. If thermostat

is located more than 100 ft. from unit, as measured along
the control voltage wires, use No. 16 AWG wire to avoid
excessive voltage drop. 

3. All wiring must be NEC Class 1 and must be separated from

incoming power leads. Use furnace transformer, fan coil
transformer, or accessory transformer for control power. 

Note: Use of available 24 volt accessories may exceed the
minimum power requirement. Determine total transformer
load and increase the transformer capacity or split the load
with an accessory transformer as required.

Final wiring check

Check factory wiring and field wire connections to ensure
terminations are secured properly. Check wire routing to
ensure wires are not in contact with tubing, sheet metal,
etc.

Electrical Connections (cont.)

Opening the Service Valve (Step Valve) 

NOTE: This is not a back-seating valve.

1. Remove the valve cap using an adjustable wrench. 

2. Open the valve by inserting a hex wrench (3/16" for the

liquid line, 5/16" for the vapor line) into the stem and back
out counter-clockwise until the valve stem just touches the
retaining ring. Do not over tighten.

3. Replace the valve cap finger-tight, then tighten an

additional 

1

/

12

turn or 

1

/

2

hex flat. A metal-to-metal seal is

now complete.

Opening the Service Valve (Straight Valve) 

NOTE: This is not a back-seating valve.

Open the valve by using an adjustable wrench to turn the
adjusting flange 1/4 turn counter-clockwise. The flange will
come to a stop and the seal is now complete.

Remove cap

Replace cap

Open valve

Schrader
valve port

Open valve

Adjusting
flange

11

6

11

5

11

4

Содержание Split System Air Conditioner

Страница 1: ...Braze Joints 3 Evacuation 3 Opening the Service Valve Step Valve 3 CONNECT REFRIGERANT PIPING 4 Precautions 4 Liquid Line Sizes 4 Suction Line Sizes 4 SUBCOOLING CHARGING 5 OPERATION INSTRUCTIONS 5 MAINTENANCE INSTRUCTIONS 5 CONDENSING UNIT NOMENCLATURE 6 LIMITED WARRANTY 7 NOTE THESE INSTRUCTIONS ARE INTENDED AS AN AID TO QUALIFIED SERVICE PERSONNEL FOR PROPER INSTALLATION ADJUSTMENT AND OPERATIO...

Страница 2: ... representations contained in the limited warranty CODES The installer SHALL comply with all local state and federal codes and or regulations pertaining to this type of equipment and its installation Such codes and or regulations should take precedence over any recommendations contained herein in lieu of local codes Installations SHALL be made in accordance with the National Electrical Code local ...

Страница 3: ...denser as close as possible to the evaporator will increase the system capacities by reducing the line set refrigerant pressure drop and will make the system less susceptible to liquid migrations due to less refrigerant charge 1 The installer shall check available power to make certain it matches the unit rating plate located inside control box cover and that constant voltage can be maintained to ...

Страница 4: ...d wire If thermostat is located more than 100 ft from unit as measured along the control voltage wires use No 16 AWG wire to avoid excessive voltage drop 3 All wiring must be NEC Class 1 and must be separated from incoming power leads Use furnace transformer fan coil transformer or accessory transformer for control power Note Use of available 24 volt accessories may exceed the minimum power requir...

Страница 5: ... with tubing When necessary use hanger straps which are 1 in wide and conform to shape of tubing insulation Isolate hanger straps from insulation by using metal sleeves bent to conform to shape of insulation Condensing units are available with pre charged sweat type copper connecting fittings Units are factory charged for 15 of line set tubing Adjust charge 0 65 oz per foot of variation from chart...

Страница 6: ...icensed Contractor for filter replacement schedules and instructions WARNING SERIOUS PERSONAL INJURY OR DEATH MAY RESULT IF WATER SPRAY IS DIRECTED TOWARD LIVE ELECTRICAL CONNECTIONS OR POWER SOURCES Model 5 SUB COOLING CHARGING Coils with TXVs should be charged 10 12 degrees or one degree of sub cooling For proper sub cooling readings a standard high side gauge is required for pressure readings U...

Страница 7: ... Hz 2 230 Volts 1 Phase 50 Hz 3 208 230 Volts 3 Phase 60 Hz 4 460 Volts 3 Phase 60 Hz 5 230 Volts 3 Phase 50 Hz 6 380 Volts 3 Phase 50 Hz C Air Conditoner CH Heat Pump A F Fedders Poduct Type Brand V Sweat Fitting Type D R 22 Refrigerant Z R 410A Refrigerant Variations Electrical Designation B 21 1 2 W x 21 1 2 D x H C 29 1 2 W x 29 1 2 D x H Chassis Size Nominal Capacity Series CONDENSING UNIT NO...

Страница 8: ...pment nor for refrigerant used For warranty purposes the purchase date is established by a proof of purchase If a proof of purchase can not be verified then warranty period will be measured from the date of manufacture plus 6 months Cost of repair or replacement of consumable parts is not covered under the terms of this warranty Replacement parts are warranted only for the balance of the original ...

Отзывы: