


-30-
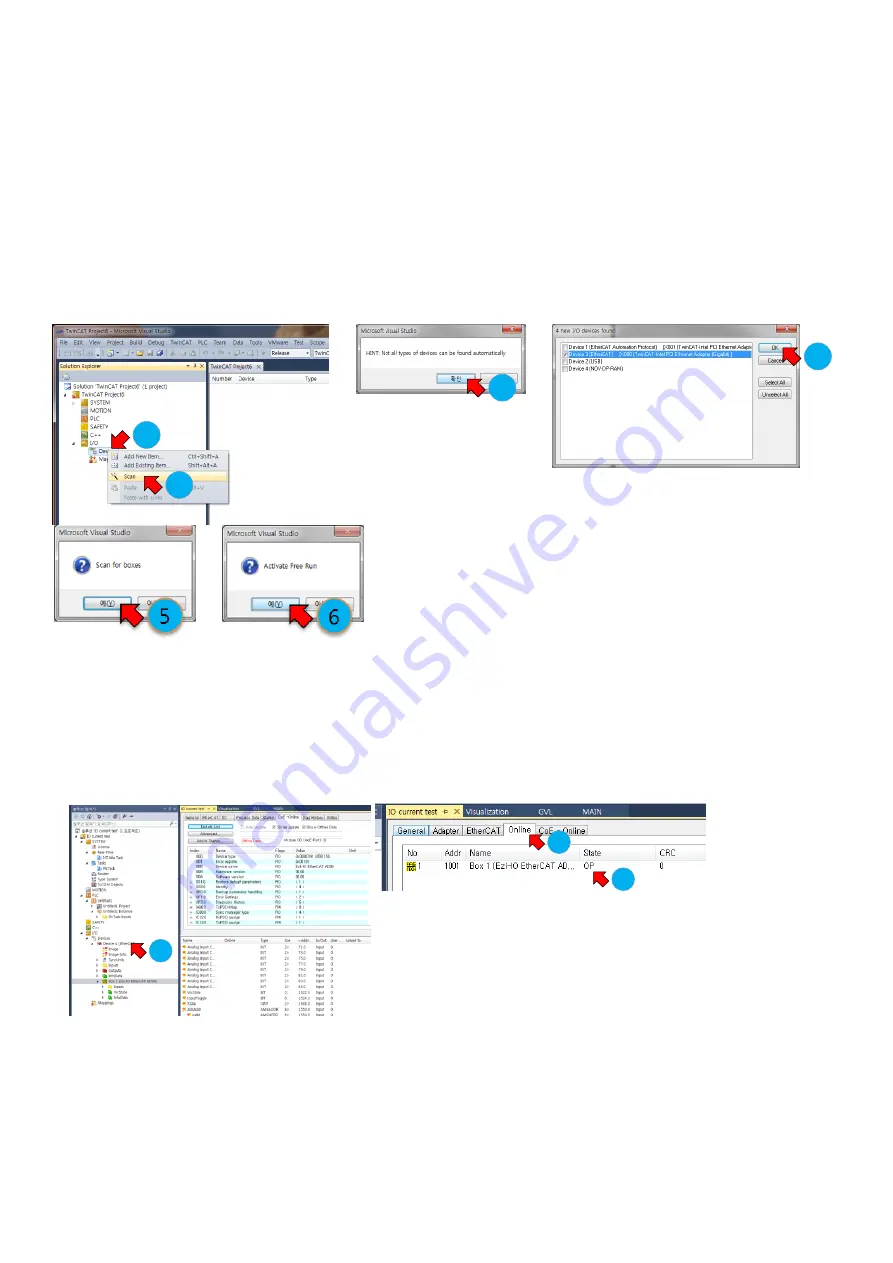
7. After creating a project,
① Go to ‘Solution Explorer’→ ‘I/O’. Right-click on the ‘Device’, and open the menu.
② Select ‘Scan’ on the menu.
③ When a ‘Hint’ pops up, click ‘OK’.
④ On the ‘new I/O devices founds’ window, check correct devices and click ‘OK’.
(If no device is found on the ‘new I/O devices founds’ window, check the power and cable connection for the
product and try again.)
⑤ When ‘Scan for boxes’ pops up, click ‘Yes’.
⑥ Make sure a device or box is added under the ‘Device’. When ‘Activate Free Run’ pops up, click ‘Yes’.
Figure 8-2. Order of Product Scanning
8. Check the followings.
① Check the EtherCAT network is in ‘OP’ state as shown in
Figure 8-3
.
② Check the EtherCAT Communication State LED (RUN) turns Green.
Figure 8-3. Checking EtherCAT Communication State
9. Then, you can configure and control local devices with EtherCAT network by setting and programming in your
preferences.
1
2
2
3
4
2
1
Содержание Ezi-IO EtherCAT DA
Страница 1: ...User Manual ...
Страница 9: ... 9 Configuration Chapter 2 2 1 Ezi IO EtherCAT DA Part Numbering 2 2 Ezi IO EtherCAT DA Part Number ...
Страница 10: ... 10 2 3 System Configuration ...
Страница 13: ... 13 3 3 Module Dimensions Unit mm Can be installed on 35mm DIN Rail Can be installed on 35mm DIN Rail ...
Страница 14: ... 14 Connection Panel View Chapter 4 4 1 Names and Functions Ezi IO EC DA04 T ...
Страница 20: ... 20 5 2 Internal Circuit Diagram Figure 5 4 Internal Circuit Diagram ...


