


OPERATING INSTRUCTIONS
46
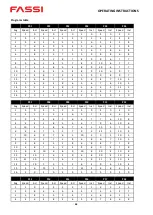
PROBLEMS AND REMEDY
PROBLEM
POSSIBLE CAUSES
REMEDY
The treadmill does not start
Power cord is not plugged in
Plug in power cable
The On/Off switch is not set to On
Set the On/Off switch to On
The house fuse has jumped out
Check the house fuses
The cable in the right tie bar is sheared off at the
top or bottom
Check cable connection according to assembly
instructions
The emergency stop safety key is not positioned
correctly on the console
Remove and reposition emergency stop safety key
The fuse of the device is defective
Replace the fuse of the device
The connection cable from the controller to the
console has come loose from the controller
Check plug connection on controller in engine
compartment
Transformer is not properly connected or
defective
Check transformer in engine compartment and replace
if necessary
The treadmill suddenly stops
The motor switches off due to overload
Check lubrication and tension of the running mat as
described in the assembly instructions.
Electronics problem
Check power supply as described above
The treadmill jerks when
running
Running mat is too loose and slips through
Readjust the tension of the running mat as described in
the assembly instructions.
The treadmill does not run
centrally
The treadmill is not aligned correctly
Center the running mat as described in the assembly
instructions
Treadmill squeaks without
load (without runner)
Motor drive belt does not run centered on
pulley of front idler pulley
Align drive belt
Drive belt defective
Replace drive belt
Front idler pulley defective
Replace front idler pulley
Rear idler pulley defective
Replace rear idler pulley
Treadmill squeaks under
load (with runner)
Treadmill is not adapted to unevenness of the
floor
Adjusting the adjustable feet on the front frame
Running deck has loosened
Retighten running deck
Damping elements worn out
Replace damping elements
Running deck broken
Replace running deck
Error message on display
E-01
Computer defective
Replace console
Transformer defective
Replace transformer in engine compartment
Controller defective
Replace controller in engine compartment
Содержание F 9.3
Страница 1: ......
Страница 9: ...ISTRUZIONI D USO 8 DISEGNO DELL ESPLOSIONE...
Страница 25: ...BEDIENUNGSANLEITUNG 24 EXPLOSIONSZEICHNUNG...
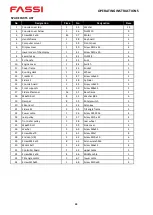
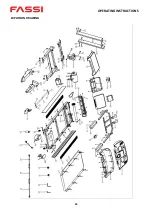
Страница 41: ...OPERATING INSTRUCTIONS 40 EXPLOSION DRAWING...
Страница 50: ......


