


OPERATING INSTRUCTIONS
42
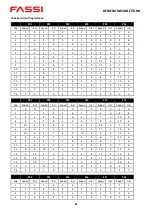
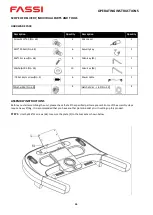
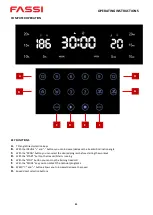
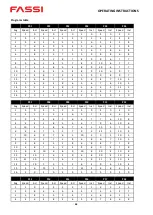
DISPLAY
TIME
0:00 - 99:00 min
SPEED
0.8 - 20 km/h
DISTANCE
0:00 - 99:99 km
CALORIES
1 - 999 kcal
PULSE
0 - 220 BPM
INCLINE
1-20%
Computer operation "Manual program
1.
Plug in the power cord
2.
Turn on the treadmill
3.
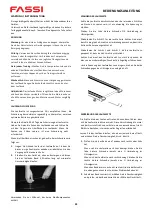
Place the security key on the designated spot on the computer.
4.
Press Start. A countdown runs 5-4-3-2-1, then the treadmill starts.
5.
With the SPEED +/- keys you can change the speed.
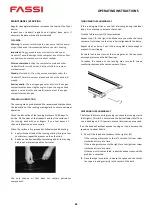
If you want to make settings such as time, distance, calories in the manual program, you can make presettings before the
start. Press the MODE key to jump to the respective displays:
•
Time
: The training time can be changed by pressing the SPEED +/- buttons (5-99 minutes). The default setting is 30:00
minutes. Press PROGRAM to enter the next input.
•
Distance
: The distance can be changed by pressing the SPEED +/- keys (1.0 - 99.0 km). The default setting is 1.0 km. Press
MODE to enter the next input.
•
Calories
: Calories can be changed by pressing the SPEED +/- buttons (20-990 cal). The default setting is 50 calories.
Once you have entered your targets, press Start. The treadmill will start and run until one of your targets is reached.
Pressing the STOP button stops the treadmill.
Pulling the safety line stops the treadmill. E-07 appears on the display and a warning signal sounds.
Computer operation "preset training programs
1.
Plug in the power cord
2.
Turn on the treadmill
3.
Place the security key on the designated spot on the computer.
4.
Press the PROGRAM key until the desired program (1-24) appears. You can confirm the desired program with the MODE
key. With the SPEED +/- keys you can change the time setting - the default setting is 30:00 minutes.
Pressing the START key starts the program - see below for details of the programs.
HRC programs (This function applies only to treadmills with HRC function)
Press the PROGRAM key until "HR1 or HR2 or HR3" appears.
Press the "START" key to start.
"HR1" program, top speed 8.0 km/h, age 30/deault heart rate 150
"HR2" program, maximum speed 9.0 km/h, age 30/deault heart rate 160
Содержание F 9.3
Страница 1: ......
Страница 9: ...ISTRUZIONI D USO 8 DISEGNO DELL ESPLOSIONE...
Страница 25: ...BEDIENUNGSANLEITUNG 24 EXPLOSIONSZEICHNUNG...
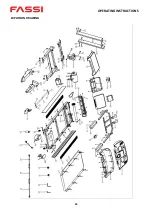
Страница 41: ...OPERATING INSTRUCTIONS 40 EXPLOSION DRAWING...
Страница 50: ......


