Fassi F 9.3 Скачать руководство пользователя страница 29


BEDIENUNGSANLEITUNG


28 

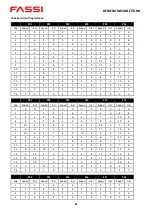
Tabelle zu den Programmen 


P01 

P02 

P03 

P04 

P05 

P06 

Seg 

Speed 

Incl   Speed 

Incl 

Speed 

Incl 

Speed 

Incl   Speed 

Incl 

Speed 

Incl 

10 

10 

10 

10 

11 

12 

10 

13 

10 

14 

11 

15 

16 


P07 

P08 

P09 

P10 

P11 

P12 

Seg 

Speed 

Incl   Speed 

Incl 

Speed 

Incl 

Speed 

Incl   Speed 

Incl 

Speed 

Incl 

10 

10 

10 

10 

11 

10 

10 

10 

10 

10 

10 

11 

10 

10 

10 

10 

12 

10 

10 

10 

13 

11 

10 

11 

10 

14 

10 

10 

15 

11 

11 

16 


P13 

P14 

P15 

P16 

P17 

P18 

Seg 

Speed 

Incl   Speed 

Incl 

Speed 

Incl 

Speed 

Incl   Speed 

Incl 

Speed 

Incl 

Содержание F 9.3

Страница 1: ......

Страница 2: ...utilizzare l attrezzatura a piedi nudi ma sempre con scarpe da ginnastica Non indossare scarpe slacciate con lacci penzolanti o con suole di cuoio 6 Tenere tutti gli indumenti appesi e gli asciugamani...

Страница 3: ...rugola S6 1 Vite 4 2x16 mm n 3 6 Cavo di alimentazione 1 Dado M6 n 69 4 Disco 8 5 n 52 4 ISTRUZIONI DI MONTAGGIO Prima di iniziare l assemblaggio dell unit verificare che siano presenti tutti i compon...

Страница 4: ...no Utilizzare i dadi M6 69 per fissare la console alla piastra 5 FASE 3 Collegare i cavi tra il telaio principale e il supporto anteriore destro 16R Utilizzare i bulloni M10 20 62 M10 60 68 e le ronde...

Страница 5: ...TRUZIONI D USO 4 Fase 4 collegare i cavi tra la console e il supporto anteriore destro 16R Fissare la staffa ai supporti anteriori utilizzando i bulloni M10 20 62 M10 60 68 e le rondelle 35 in dotazio...

Страница 6: ...3 per fissare i coperchi 59L R Fase 6 inserire la chiave di sicurezza colore rosso al centro della console Ora possibile mettere in funzione il tapis roulant ATTENZIONE Assicurarsi che tutte le viti s...

Страница 7: ...ercepisce che il meccanismo di sicurezza inserito Premere leggermente il battistrada verso l alto e appoggiare leggermente il piede sul collare di sicurezza A questo punto tirare leggermente la pedana...

Страница 8: ...terale 2 48 Cilindro 1 15 Scheda della console 1 49 Vite m8x30 1 16 Supporti anteriori 2 50 Vite M8x35 1 17 Fissaggio della guida laterale 16 51 Telaio di base 1 18 Bullone M6x20 8 52 Rondella 8 5 6 1...

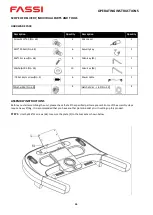
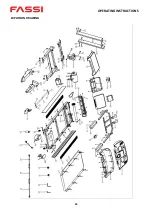
Страница 9: ...ISTRUZIONI D USO 8 DISEGNO DELL ESPLOSIONE...

Страница 10: ...n il pulsante PROG possibile selezionare il programma desiderato prima di iniziare l allenamento D Con il pulsante START il tapis roulant inizia a funzionare E Con il pulsante STOP possibile arrestare...

Страница 11: ...ll immissione successiva Calorie Le calorie possono essere modificate premendo i pulsanti SPEED 20 990 cal L impostazione predefinita 50 calorie Una volta inseriti gli obiettivi premere Avvio Il tapis...

Страница 12: ...on si ancora raggiunto l obiettivo di frequenza cardiaca il sistema aumenta il livello di inclinazione per aumentare l allenamento Se la frequenza cardiaca superiore all obiettivo impostato il sistema...

Страница 13: ...1 P12 Seg Velocit Incl Velocit Incl Velocit Incl Velocit Incl Velocit Incl Velocit Incl 1 3 0 3 0 2 0 3 0 4 0 4 0 2 4 1 5 3 4 6 5 7 5 6 6 8 3 9 4 8 8 5 6 6 7 7 6 10 8 4 4 4 3 8 5 3 6 7 9 6 10 6 5 10 4...

Страница 14: ...8 11 9 5 10 6 7 9 10 8 10 4 10 8 12 7 6 3 6 12 12 6 12 10 7 11 4 13 6 5 5 3 4 3 6 8 11 4 10 10 14 3 12 7 3 7 3 6 4 9 6 10 4 15 5 8 11 5 12 7 11 4 6 6 6 4 16 2 3 5 0 6 0 3 0 5 0 5 0 FORMAZIONE INERATTI...

Страница 15: ...istruzioni di montaggio Problema di elettronica Controllare l alimentazione come descritto sopra Il tapis roulant va a scatti durante la corsa Il tappetino di corsa troppo largo e scivola Regolare la...

Страница 16: ...play E 05 Corrente di alimentazione troppo alta Impostare la corrente di alimentazione Motore o battistrada bloccato Rimuovere l ostruzione Controllore difettoso Sostituire il controller nel vano moto...

Страница 17: ...ento sollevandolo di qualche centimetro ripetere l operazione sull altro lato 2 Accendere l apparecchio senza salire e far girare il nastro di corsa alla velocit minima per 5 minuti Utilizzare solo ol...

Страница 18: ...verfangen kann Benutzen Sie das Ger te nicht barfu sondern tragen Sie immer Turnschuhe Tragen Sie keine ungebundenen Schuhe mit baumelnden Schn rsenkeln und keine Schuhe mit Ledersohlen 6 Halten Sie a...

Страница 19: ...ssel S6 1 4 2x16mm Schraube Nr 3 6 Stromkabel 1 Muter M6 Nr 69 4 Beilgescheibe 8 5 Nr 52 4 AUFBAUANLEITUNG Bevor Sie anfangen das Ger t aufzubauen berpr fen Sie bitte dass alle angegebenen Teile vorha...

Страница 20: ...enden Sie die M6 Muttern 69 um die Konsole auf der Platte 5 zu befestigen SCHRITT 3 Verbinden Sie die Kabel zwischen dem Hauptrahmen und der rechten Frontst tze 16R Verwenden Sie die mitgelieferten M1...

Страница 21: ...Schritt 4 Verbinden Sie die Kabel zwischen der Konsole und der rechten Frontst tze 16R Befestigen Sie die Konsole mit den mitgelieferten M10 20 Schrauben 62 M10 60 Schrauben 68 und Unterlegscheiben 3...

Страница 22: ...auben 3 um die Abdeckungen 59L R zu befestigen Schritt 6 Stecken Sie den Sicherheitsschl ssel rote Farbe in die Mitte der Konsole Nun k nnen Sie das Laufband in Betrieb nehmen ACHTUNG Stellen Sie sich...

Страница 23: ...ein Klicken h ren und Sie sp ren dass der Sicherheits mechanismus eingerastet ist ENTRIEGELN Dr cken Sie die Lauffl che leicht nach oben und treten mit dem Fu leicht gegen die Sicherheitsmanschette Z...

Страница 24: ...platine 1 49 Schraube m8x30 1 16 Frontst tzen 2 50 Schraube M8x35 1 17 Seitenschienenbefestiger 16 51 Grundrahmen 1 18 Schraube M6x20 8 52 Unterlegscheibe 8 5 6 19 D mpfer 8 53 Drehschalter 1 20 Silik...

Страница 25: ...BEDIENUNGSANLEITUNG 24 EXPLOSIONSZEICHNUNG...

Страница 26: ...it der PROG Taste k nnen Sie vor Beginn des Trainings das gew nschte Programm ausw hlen D Mit der START Taste beginnt das Laufband zu laufen E Mit der STOP Taste k nnen Sie das Training Laufband anhal...

Страница 27: ...u gelangen Kalorien Die Kalorien k nnen durch Dr cken der SPEED Tasten ver ndert werden 20 990 cal Die Voreinstellung sind 50 Kalorien Haben Sie Ihre Zielvorgaben eingegeben dr cken Sie Start Das Lauf...

Страница 28: ...tgeschwindigkeit erh hen und Ihr Herzfrequenzziel immer noch nicht erreicht haben erh ht das System die Steigungsstufe um Ihr Training zu steigern Wenn die Herzfrequenz h her ist als das eingestellte...

Страница 29: ...3 0 2 0 3 0 3 0 P07 P08 P09 P10 P11 P12 Seg Speed Incl Speed Incl Speed Incl Speed Incl Speed Incl Speed Incl 1 3 0 3 0 2 0 3 0 4 0 4 0 2 4 1 5 3 4 6 5 7 5 6 6 8 3 9 4 8 8 5 6 6 7 7 6 10 8 4 4 4 3 8 5...

Страница 30: ...11 8 3 8 8 7 7 8 10 2 3 7 3 5 3 9 9 9 4 7 8 11 9 5 10 6 7 9 10 8 10 4 10 8 12 7 6 3 6 12 12 6 12 10 7 11 4 13 6 5 5 3 4 3 6 8 11 4 10 10 14 3 12 7 3 7 3 6 4 9 6 10 4 15 5 8 11 5 12 7 11 4 6 6 6 4 16...

Страница 31: ...der Laufmatte pr fen wie in Aufbauanleitung beschrieben Elektronikproblem Stromzufuhr wie oben beschrieben pr fen Das Laufband ruckt beim Laufen Laufmatte ist zu locker und rutsch durch Laufmattenspa...

Страница 32: ...E 05 Leistungsstrom zu hoch Leistungsstrom einstellen Motor oder Lauffl che blockiert Blockade entfernen Controller defekt Controller im Motorraum austauschen Fehlermeldung auf Display E 06 Eingangssp...

Страница 33: ...organg auf der anderen Seite 2 Schalten Sie das Ger t ein ohne aufzusteigen und lassen Sie das laufende Band 5 Minuten lang mit minimaler Geschwindigkeit laufen Verwenden Sie nur Silikon l das keine E...

Страница 34: ...Do not wear untied shoes with dangling laces or shoes with leather soles 6 Keep all hanging garments and towels away from the running belt If an object gets stuck switch off the device immediately 7...

Страница 35: ...10 5 No 35 10 Allen key S6 1 4 2x16mm screw No 3 6 Power cable 1 Mother M6 No 69 4 Hatchet disc 8 5 No 52 4 ASSEMBLY INSTRUCTIONS Before you start assembling the unit please check that all the specif...

Страница 36: ...ct them one by one Use the M6 nuts 69 to secure the console to the plate 5 STEP 3 Connect the cables between the main frame and the right front support 16R Use the supplied M10 20 bolts 62 M10 60 bolt...

Страница 37: ...TING INSTRUCTIONS 36 Step 4 Connect the cables between the console and the right front support 16R Attach the bracket to the front supports using the supplied M10 20 bolts 62 M10 60 bolts 68 and washe...

Страница 38: ...upplied M6 12 screws 3 to attach the covers 59L R Step 6 Insert the security key red color into the center of the console Now you can put the treadmill into operation ATTENTION Make sure that all scre...

Страница 39: ...il you hear a click and feel that the safety mechanism is engaged DOWN FOLDING Press the tread slightly upwards and step lightly against the safety collar with your foot Now pull the deck down slightl...

Страница 40: ...48 Cylinder 1 15 Console board 1 49 Screw m8x30 1 16 Front supports 2 50 Screw M8x35 1 17 Side rail fastener 16 51 Base frame 1 18 M6x20 bolt 8 52 Washer 8 5 6 19 Damper 8 53 Rotary switch 1 20 Silic...

Страница 41: ...OPERATING INSTRUCTIONS 40 EXPLOSION DRAWING...

Страница 42: ...ion angle C With the PROG button you can select the desired program before starting the workout D With the START button the treadmill starts running E With the STOP button you can stop the training tr...

Страница 43: ...es Calories can be changed by pressing the SPEED buttons 20 990 cal The default setting is 50 calories Once you have entered your targets press Start The treadmill will start and run until one of your...

Страница 44: ...to increase your workout If the heart rate is higher than the set target then the system will reduce the incline step by 1 step 10 seconds to 0 If your heart rate is still higher than the target then...

Страница 45: ...2 0 3 0 3 0 P07 P08 P09 P10 P11 P12 Seg Speed Incl Speed Incl Speed Incl Speed Incl Speed Incl Speed Incl 1 3 0 3 0 2 0 3 0 4 0 4 0 2 4 1 5 3 4 6 5 7 5 6 6 8 3 9 4 8 8 5 6 6 7 7 6 10 8 4 4 4 3 8 5 3 6...

Страница 46: ...2 3 7 7 8 11 8 6 7 10 5 9 5 8 5 3 11 8 3 8 8 7 7 8 10 2 3 7 3 5 3 9 9 9 4 7 8 11 9 5 10 6 7 9 10 8 10 4 10 8 12 7 6 3 6 12 12 6 12 10 7 11 4 13 6 5 5 3 4 3 6 8 11 4 10 10 14 3 12 7 3 7 3 6 4 9 6 10 4...

Страница 47: ...mat as described in the assembly instructions Electronics problem Check power supply as described above The treadmill jerks when running Running mat is too loose and slips through Readjust the tension...

Страница 48: ...compartment Error message on display E 05 Power current too high Set power current Motor or tread blocked Remove blockage Controller defective Replace controller in engine compartment Error message on...

Страница 49: ...the running mat by lifting it a few centimeters repeat the process on the other side 2 Switch on the device without ascending and let the running belt run at minimum speed for 5 minutes Use only silic...

Страница 50: ......

Отзывы: