LUBRICATING AND MAINTENANCE
INSTRUCTIONS
CH 140 CHIPPER
www.farmiforest.fi
--- 28 ---
8.4. CHANGING THE SPLINED AXLE
IMPORTANT! Only a qualified person is allo-
wed to change the splined axle.
1.Disengage the PTO, cut the engine and re-
move the keys.
2.Open the upper housing bolts and remove it.
3.Remove / turn aside the feed chute.
4.Remove the top of the bearing housings.
5.Lift away the disk.
6.Remove the bearings, fig. 13.
IMPORTANT! Welding damages the bea-
rings.
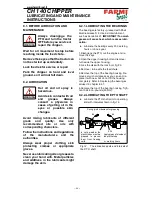
7.Grind a 7/16” (11 mm) deep groove about
11/16”” (17 mm) from the edge of the axle,
fig.19.
8.Turn the axle so that it comes loose and can
be removed.
9.Clean the hole before mounting the new axle.
Tap the new axle slightly in place.
10.Protect the joint faces from splashes before
welding.
11.Weld a fillet weld, for example ESAB 68.81,
OK 48, OK Femax 38.65 with 3 runs. Finish the
welding.
12.Reassemble the chipper.
Grind a 7/16” (11 mm) deep groove about
11/16” (17 mm) from the edge of the axle
19/32” (15 mm)
1/18” (2 mm)
11/18” (17 mm)
43510420
Fig.19. Changing the splined axle.


