background image

MOUNTING INSTRUCTIONS

JL 601

B // En // 141001MRu

www.normet.fi

Normet Corporation

Ahmolantie 6
FIN --- 74510 PELTOSALMI
FINLAND
Tel. + 358 (0) 17 83 241
Fax. + 358 (0) 17 823 606

13

Page

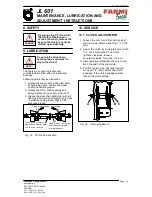
4.4. FASTENING THE CABLE TO THE

DRUM

1. Tape the cable end to prevent loosening of

the core wires.

2. Pass the cable through the hole in cable

guard, over the upper snatch block and
then inside the winch.

3. Insert the cable from behind the roll of the

drum brake.

4. Pull the cable onto the drum from the left

hand side (the same side as the clutch
lever).

5. Pass the cable end through the hole in the

drum plate, pull about 15 cm (6”), and
insert under the wedge of the cable lock
device. See fig. 19.

6. Tighten the cable lock screw.
7.

Winch the cable on the drum. BUT
REMEMBER THAT THE CABLE HAS TO
BE LOADED HEAVILY, WHEN
WINCHING THE CABLE BACK ON THE
DRUM.

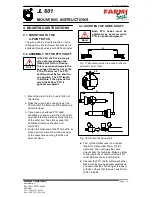
Fig. 19.Fastening the cable.

Do not use longer cable than needed. With
correct length you achieve good pulling
strength and proper winding of the cable.

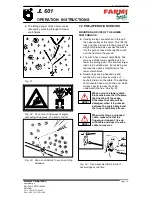
5. PRE--OPERATION CHECKS

CABLE
Check that:

D

The cable is faultless (breakage risk).

D

There are no twists or kinks (breakage risk)
in the cable.

D

the cable has been properly fastened to the
winch.

WINCH
Check that:

D

All the pins and lynch pins are in place.

D

All bolts and nuts have been tightened.

D

Roller chain is tight.

D

The drum brake has been properly
adjusted.

D

The clutch has been correctly adjusted.

D

Lubrication is carried out correctly. See
lubricating instructions.

MOUNTING TO THE TRACTOR
Check that:

D

The tractor’s top link point is locked. (with
the help of a support, if necessary).

D

The pins are properly secured.

D

The sway bars or turnbuckles are suitably
tight.

D

The PTO--shaft is suitably long, properly
fastened and the shield chains attached.

D

The support leg of the winch is turned
upward.

Содержание JL 601

Страница 1: ...normet fi 03121060 Normet Corporation Ahmolantie 6 FIN 74510 PELTOSALMI FINLAND Tel 358 0 17 83 241 Fax 358 0 17 823 606 1 Page From machine 03121000 SKIDDING WINCH JL 601 IT IS VERY IMPORTANT TO READ THIS INSTRUCTION MANUAL THOROUGHLY BEFORE USING THE MACHINE www normet fi ...

Страница 2: ...manual describes the JL601 skidding winch and includes information and maintenance instructions for a safe and efficient machine operation Please read the operation and service manual carefully even if you are an experienced winch user The manuals include information required for an efficient and safe operation of the machine Regular maintenance guarantes economical and correct machine operation T...

Страница 3: ...Farmi winch make JL 601 type serial number conforms to Machine Directives 98 37 EC 89 366 EC to the amendments related to it as well as to the national statutes which bring them into force The following unified standards have been applied to the design of the machine EN292 2 EN 294 The following national standards and specifications have been applied to the design of the machine prEN 1553 Peltosal...

Страница 4: ...k that 13 WINCH 13 Check that 13 MOUNTING TO THE TRACTOR 13 Check that 13 6 CONTROLS 14 6 1 PULLING OUT THE CABLE 14 6 2 WINCHING 14 7 OPERATION 14 7 1 SAFETY PRECAUTIONS 14 7 2 PRE OPERATION CHECKS 15 MOUNTING AND USE OF THE LOWER SNATCHBLOCK 16 7 3 WINCHING 16 7 4 SKIDDING 16 WORKING IN ROUGH TERRAIN 17 IF YOU GET STUCK WITH THE TRACTOR 17 7 5 DROPPING THE LOAD 17 7 6 TRANSPORTATION 17 8 SAFETY ...

Страница 5: ... Before using the winch get acquainted with the controllers of the winch test the stopping functions of the winch and of the tractor and all the other functions Each function has to be in perfect order D D D D Check that the winch is free of rubbish and other obstructions D D D D Check that all the outsiders are in a safe area at a distance of at least 15 metres from the running machine Warning si...

Страница 6: ...ust be switched off D With running engine it is to be made certain absolutely that no part of the body is in the area of the winch D D D D Make sure that the cable is in good condition before using of the winch corrosion sharp bends the breaking of strands and thickness The cable can fly towards the user when breaking or away from the winch D D D D Never handle cable without first shutting off the...

Страница 7: ...01 MRu www normet fi Normet Corporation Ahmolantie 6 FIN 74510 PELTOSALMI FINLAND Tel 358 0 17 83 241 Fax 358 0 17 823 606 7 Page 4 5 6 2 13 10 11 12 1 7 8 9 14 15 3 Fig 1 Machine plate Fig 2 Note See manual for operation and maintenance ...

Страница 8: ...blique position Fig 4 Crushing danger Do not use the winch for the lifting Fig 5 Watch out for a breaking cable Always use the protective screen Fig 6 Note Before doing maintenance work turn off the motor remove the ignition key and disengage the P T O Fig 7 Accident danger Keep the safety equipment where it belongs Fig 8 Winding danger Do not wear too loose clothes and keep the hair bound inside ...

Страница 9: ...3 606 9 Page F A R M I 43402070 30730501 Fig 9 Falling danger Do not winch at sideways angles exceeding 30 degrees Fig 10 Crushing danger Do not stand in front of the winch when working Stand on the side at a distance of at least 6ft from the winch Fig 11 Crushing danger Do not winch downhill Fig 12 Maximum rpm Fig 13 METSÄ sticker Fig 14 FARMI sticker ...

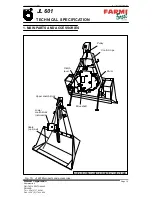
Страница 10: ...FIN 74510 PELTOSALMI FINLAND Tel 358 0 17 83 241 Fax 358 0 17 823 606 10 Page 1 MAIN PARTS AND ACCESSORIES Drum Clutch lever Drive shaft Control rope Cable optional Upper snatchblock Lower snatchblock optional Pulley ACCESSORIES ARE SEPARATELY SPECIFIED Fig 15 JL 601 Main parts and accessories ...

Страница 11: ...trength of the cable recommendation 96 0 kN mm2 130m of Æ10mm 426ft of 6 16 cable 100m of Æ12mm 328ft of 15 32 cable 60m of Æ14mm 196ft of 9 16 cable Winching speed 350 r min 540 r min 0 5 6 1 26 m s 1 87 4 1ft s Shipping weight without cable 390 kg 859lbs Clutch Mechanical friction plate clutch with heat sink Power transmission Universal shaft from tractor Mounting To 3 point hitch Kat II Power n...

Страница 12: ...the tractor and the winch to a horizontal level 3 If you have a shortened PTO shaft available put one end into the drive shaft and check that the distance of the locking of the other end Take into account the additional clearance of approx 20 mm 0 78 4 Fasten the other end of the PTO shaft in its place and also move the winch sideways at the same time securing that the axis does not base 4 3 SHORT...

Страница 13: ...CHING THE CABLE BACK ON THE DRUM Fig 19 Fastening the cable Do not use longer cable than needed With correct length you achieve good pulling strength and proper winding of the cable 5 PRE OPERATION CHECKS CABLE Check that D The cable is faultless breakage risk D There are no twists or kinks breakage risk in the cable D the cable has been properly fastened to the winch WINCH Check that D All the pi...

Страница 14: ...oose a horizontal hard based skidding route for the tractor Avoid steep slopes especially when winching from the side Check that the winching trail is clear and that the tractor s parking brake is on Do not run the tractor at a high idle when winching Maximum P T O speed is 540 rpm Ensure that the logs can be drawn freely Be especially careful when working on slopes Avoid winching sideways at angl...

Страница 15: ...winch and the tractor to the ground D The winch has a lower snatchblock The main use of the lower snatchblock is to lower the pulling point This enables larger loads to be skidded out For skidding out the load the cable is transferred to the lower snatchblock D Several logs can be hooked up and winched in at one time by means of keyhole sliders on the cable The skidding chain should have a pin on ...

Страница 16: ...PTO on Use the winch with the control rope and stand in a safe place at a distance of at least 2m 6ft from the winch Use the upper snatchblock when winching 3 Operate the clutch firmly Avoid sliding the clutch to avoid warming of the clutch Stop winching by letting go of the control rope for the leave The clutch will slip when the load is heavier than the selected pull This prevents damages to the...

Страница 17: ... terrain IF YOU GET STUCK WITH THE TRACTOR 1 Drop the load Drive the tractor to firm ground Winch in the load 2 If you cannot move the tractor release the load and winch the tractor out When winching the tractor out always run the cable under the lower pulley Fig 30 Winching the tractor out 7 5 DROPPING THE LOAD 1 Let down the 3 point hitch 2 Pull the clutch rope until the brake ratchet releases t...

Страница 18: ...rly and aways before use as shown in figure 31 3 Grease the drum chain lightly not with oil after every 50 working hours with spray type hardening chain grease Wipe off the excessive grease Swing joints sideways for greasing 8h 8h h working hours 20h Apply grease inside the outer telescopic profile When used in winter the guard tubes must be grea sed to avoid freezing Fig 31 P T O shaft lubricatio...

Страница 19: ...lling out the rope This will reduce risk of tangling and backlash D To increase the braking effect tighten the adjustment bolt See fig 34 To decrease the braking effect loosen the adjustment bolt Friction piece Drum brake adjustment bolt Lock nut Fig 34 Drum brake adjustment 10 4 REMOVING THE WINCH MECHANISM The whole winch mechanism can be removed in one piece from the frame To remove the winch m...

Страница 20: ...r side fig 36 Two studs on the back of the front plate will fit into these holes later on when the winch is assembled 3 Place one clutch engagement half without the handle so that the halves bottom out when the handle is at 8 o clock position and the two holes are at 12 o clock and 6 o clock fig 36 Be careful there is only one correct position Tape the halves together so that htey will stay togeth...

Страница 21: ...d Roller chain comes off Roller chain too loose some part is broken or the aligning is incorrect Check the aligment of the chain Check possible dam ages Adjust the roller chain change if necessary See chap ter 10 2 Adjusting the roller chain Rattling sound Roller chain too tight some part is broken or the aligning is incorrect Check the aligment of the chain Check possible dama ges Adjust the roll...

Страница 22: ...SPARE PARTS JL 601 B En 141001MRu www normet fi Normet Corporation Ahmolantie 6 FIN 74510 PELTOSALMI FINLAND Tel 358 0 17 83 241 Fax 358 0 17 823 606 22 JL 601 FRAME 11 ...

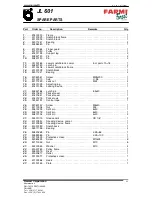
Страница 23: ... Axle L 96 1 18 52117249 Lock nut M24 2 19 43401025 Adjusting lug 1 20 43401355 Locking device 1 21 52842168 Lynch pin 6 5x40 1 22 43401640 Pocket cover 1 23 43401641 Pocket cover 1 24 43401215 Pocket axle 2 25 02454197 Control rope 1 26 52060142 Screw M8x40 1 27 52110038 Nut M8 1 28 52813235 Split pin 6x50 1 29 52813219 Split pin 6x40 1 30 52813102 Split pin 4x20 2 31 52401015 Grease zerk CR 1 8 ...

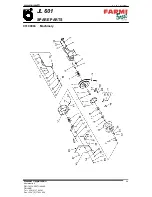
Страница 24: ...SPARE PARTS JL 601 B En 141001MRu www normet fi Normet Corporation Ahmolantie 6 FIN 74510 PELTOSALMI FINLAND Tel 358 0 17 83 241 Fax 358 0 17 823 606 24 03100006 Machinery ...

Страница 25: ...Plain bearing 4 12 42271130 Plain bearing 1 13 42722744 Friction piece 8 14 52830015 Rivet Æ 1 4 x 3 4 16 15 43110700 Sprocket compl 1 16 54642194 Spring 4 17 43100155 Bushing 1 18 52390820 Filt ring 1 19 33100025 Drum 1 20 33100298 Drum cover 1 21 43100478 Drum brake compl Incl parts 22 32 58 1 22 43100486 Frame 1 23 43100544 Roller 1 24 42723445 Bushing 2 25 43100536 Axle 1 26 42723197 Friction ...

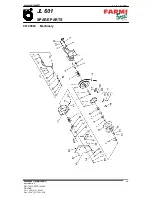
Страница 26: ...SPARE PARTS JL 601 B En 141001MRu www normet fi Normet Corporation Ahmolantie 6 FIN 74510 PELTOSALMI FINLAND Tel 358 0 17 83 241 Fax 358 0 17 823 606 26 03100006 Machinery ...

Страница 27: ... 54 43100437 Chain tightener 1 55 42723163 Wedge 22 x 43 1 56 52060118 Screw M8 x 16 1 57 52060134 Screw M8 x 40 1 58 52060514 Screw M10 x 20 2 59 60 61 52062015 Screw M12 x 20 2 62 52062023 Screw M12 x 30 4 63 64 65 52062106 Screw M16 x 30 2 66 52110038 Nut M8 1 67 52110053 Nut M12 1 68 52110079 Nut M16 1 69 52110103 Nut M24 1 70 71 52200052 Washer M12 4 72 52200102 Washer M24 2 73 43010412 Bushi...

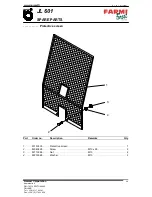
Страница 28: ...oration Ahmolantie 6 FIN 74510 PELTOSALMI FINLAND Tel 358 0 17 83 241 Fax 358 0 17 823 606 28 Protective screen 2 4 3 1 Part Order no Description Remarks Qty 1 33130303 Protective screen 1 2 52060225 Screw M10 x 25 2 3 52110046 Nut M10 2 4 52200045 Washer M10 2 ...

Страница 29: ...poration Ahmolantie 6 FIN 74510 PELTOSALMI FINLAND Tel 358 0 17 83 241 Fax 358 0 17 823 606 29 Drive shaft cover 1 2 4 3 Part Order no Description Remarks Qty 1 54821756 Drive shaft cover 1 2 43402180 Cover holder 1 3 52063435 Screw M8x10 2 4 52110038 Nut M8 2 ...

Страница 30: ...tion Ahmolantie 6 FIN 74510 PELTOSALMI FINLAND Tel 358 0 17 83 241 Fax 358 0 17 823 606 30 11 ASV 10 SV 1 VAIJ 3 LL 4 LK 6 JK 14 ATP 15 PLL 12 HOF 2 TP 8 JS 13 NK JL SKIDDING WINCH ACCESSORIES 7 JP 5 NK EV NEV LET 10 1 2 3 4 5 6 7 9 11 12 14 15 1 3 4 6 ...

Страница 31: ... 10 1 43181577 Protective screen SV300T 1 10 2 33130303 Protective screen SV600T 1 10 3 33170010 Protective screen SV2 x 600T 1 11 Lower protective screens 11 1 43020502 Lower protective screen ASV 400 1 11 2 33130071 Lower protective screen ASV 600 1 12 Mounting kits HOF 12 1 03151320 Mounting kit HOF501 1 12 2 03151280 Mounting kit HOF501T 1 12 3 03151330 Mounting kit HOF601 1 12 4 03151290 Moun...

Страница 32: ......

Страница 33: ......

Страница 34: ......

Страница 35: ......

Страница 36: ......

Отзывы: