background image

RESTRICTED USE ONLY


Fargo Electronics, Inc.


DTC400/DTC300/DTC300M Card Printer User Guide (Rev. 1.1) 

10-3

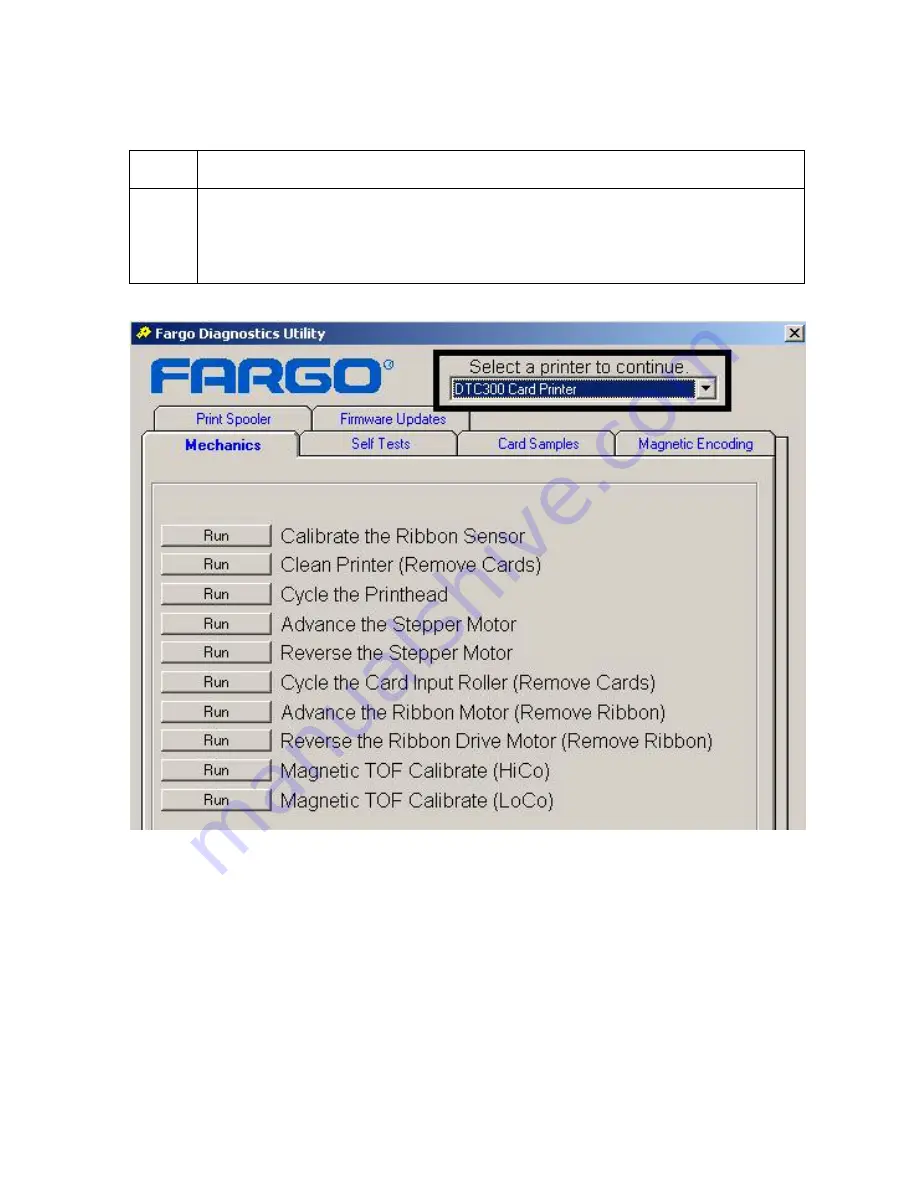
Reviewing customized Diagnostic Utility tabs for your Printer 

Step Procedure 

1

Select a Printer from the Printer Selection menu that will customize the tabs that 
are available. (

Note:

 Only the Diagnostic Utility tabs for the selected Printer will 

be shown. For example, the Lamination tab will not be shown if the Printer does 
not have Lamination capabilities.)  

Содержание FARGO DTC 400

Страница 1: ...DTC400 DTC300 DTC300M Card Printer User Guide Rev 1 1 Part Number XXXXXX...

Страница 2: ...provide Fargo with professional and international standards requirements guidelines and models for our technical training and user documentation At all times the Copyright Protection Notice for each d...

Страница 3: ..._____________________________2 7 HoloMarkTM and Custom HoloMarkTM Application Specifications __________2 7 Functional Specifications________________________________________________2 8 Printer Componen...

Страница 4: ...4 28 Resolving a Card Jam Error___________________________________________4 30 Resolving a Headlift Motor or Sensor Error ______________________________4 32 Resolving the Cover Open Error Message_____...

Страница 5: ...g the Overlay Heat O option _______________________________________5 28 Using the Image Color tab DTC400 DTC300 ______________________________5 29 Using the Resin Heat K option _______________________...

Страница 6: ..._____________________________________5 84 Reviewing the Ribbon Information _____________________________________5 85 Reviewing the Ribbon Level Indicator __________________________________5 86 Using t...

Страница 7: ..._____________10 12 Selecting the Mechanics tab in the Diagnostics Utility _____________________10 13 Selecting the Self Tests tab in the Diagnostics Utility______________________10 24 Selecting the Ca...

Страница 8: ...ts to quickly locate for example an error message a procedure the index or an appendix Troubleshooting Replacement Removal Diagnostic and Navigation Procedures in hyper linked Sections You can go dire...

Страница 9: ...tive It may be damaged if exposed to static electricity discharges Information that raises potential electrostatic safety issues is indicated by a warning symbol as shown to the below To prevent equip...

Страница 10: ...otors Sensors Parts 1 Card Feed 6 Card Feed 13 Card Input Roller 2 Print Stepper 7 Ribbon Sensor 14 Cleaning Roller 3 Ribbon Drive 8 Ribbon Encoder 15 Card Feed Roller 4 Print Headlift 9 Headlift Sens...

Страница 11: ...encoding Step Process 1 The File information is received from the PC 2 Printer checks the installed Ribbon type stored in memory against the Ribbon type command that was sent from the Printer a If Rib...

Страница 12: ...per Motor queues card to the middle of the platen Roller All Stop 10 The Print Headlift Motor engages 11 The Print Headlift Sensor detects closed state 12 The Print Headlift Motor disengages 13 The Pr...

Страница 13: ...eed Stepper Motor engages to queue card for magnetic encoding 24 The Encoding data is written to the card 25 The Card Feed Stepper will re queue card for each verification pass required 26 After Ribbo...

Страница 14: ...M Boot up Sequence Step Process 1 On Power up the Printer checks the current state of the Card Feed Sensor and the Headlift Sensor 2 If the Headlift Sensor is found to be open the Headlift Motor will...

Страница 15: ...ons _________________________________ 2 6 VeriMarkTM Cards 2 D holographic foil application_____________________ 2 6 Custom HoloMarkTM Cards _________________________________________ 2 6 Visual Securi...

Страница 16: ...ial area causes unacceptable interference to radio and TV reception the operator is required to take whatever steps are necessary to correct the interference ITS EMC The Card Printer has been tested a...

Страница 17: ...d Card Sizes CR 80 3 375 L x 2 125 W 85 6mmL x 54mmW Accepted Card Thickness 20 mil and 30 mil 030 76mm Accepted Card Types PVC or polyester cards with polished PVC finish monochrome resin required fo...

Страница 18: ...t Speed DTC400 DTC300 30 seconds per card 120 cards per hour YMCKO DTC300M 5 seconds per card 720 cards per hour K Note Indicates the print Ribbon type and the number of Ribbon panels printed where Y...

Страница 19: ...nical Specifications continued Type Description Supply Voltage 100 240 VAC 6 1 3 A Supply Frequency 50 Hz 60 Hz System Requirements IBM PC or compatible Windows 98SE Me 2000 and XP Pentium class 233 M...

Страница 20: ...organizations card design around which no printing and overlay will be placed Custom HoloMarkTM Cards A Custom HoloMark TM Card is a three dimensional holographic image transferred to metal foil and...

Страница 21: ...he top two locations on portrait orientation cards positions E F The foil will be located 0 9 cm from the top of the card and 0 4 cm from the sides of the card HoloMarkTM and Custom HoloMarkTM Applica...

Страница 22: ...the magenta panel and the cyan panel Note As the print Ribbon passes beneath the Printhead hundreds of thermal elements within the Printhead heat the dyes on the Ribbon When these dyes are heated the...

Страница 23: ...the Printer for the next print job If a card is left within the Printer after a print job is canceled it will automatically be ejected when the Printer is turned back ON Pause button The Pause button...

Страница 24: ...n thermal transfer print methods each provide their own unique benefits print Ribbons are available in resin only dye sublimation only and combination dye sublimation resin versions To make it easier...

Страница 25: ...e ID card applications Resin black bar codes are readable by both infrared and visible light bar codes scanners Premium Resin Black K provides 1 000 prints This Ribbon provides maximum resin durabilit...

Страница 26: ...dropped or soiled Note Printhead damage caused by contaminated or poor quality cards will automatically void the Printhead s factory warranty 4 If printing onto cards with a pre punched slot do not pr...

Страница 27: ...quality images with the dye sublimation panels along with sharp black text and bar codes with the resin black panel A clear overlay panel O is also included on most Ribbons to protect the dye sublima...

Страница 28: ...ompletely smooth level surface in order for the Printer to achieve consistent color coverage Certain types of Proximity cards have an uneven surface that will inhibit consistent color transfer Certain...

Страница 29: ...__3 6 Connecting the Printer power___________________________________________3 7 Installing the Print Ribbon Cartridge_____________________________________3 8 Installing the Print Ribbon Cartridge con...

Страница 30: ...inting a Test Print Image ___________________________________________3 27 Printing a Test Print Image continued ________________________________3 28 Printer Transport _________________________________...

Страница 31: ...equate clearance in front of the unit to accommodate the unit with its Covers open Do not install unit a near heat sources such as radiators or air ducts or b in a place subject to direct sunlight exc...

Страница 32: ...rinter inspect the carton to ensure that no damage has occurred during shipping Make sure that all supplied accessories are included with your unit Check that the following items are included Power Su...

Страница 33: ...RESTRICTED USE ONLY Fargo Electronics Inc DTC400 DTC300 DTC300M Card Printer User Guide Rev 1 1 3 5 Reviewing the Printer front view Reviewing the Printer front view Cartridge being installed...

Страница 34: ...RESTRICTED USE ONLY Fargo Electronics Inc DTC400 DTC300 DTC300M Card Printer User Guide Rev 1 1 3 6 Reviewing the LCD top front part of Printer...

Страница 35: ...not connect the Printer s USB cable until prompted during the Printer Driver installation Step Procedure 1 Plug the AC adapter power cable into the back of the Printer See Display A 2 Plug the wall p...

Страница 36: ...DTC300 DTC300M Card Printer uses a one piece disposable Ribbon Cartridge load system Every full color Ribbon Cartridge contains a 250 full color card count Ribbon and a Card Cleaning Roller Step Proce...

Страница 37: ...A upper right arrow of display b Remove the Ribbon securing tape as shown in Display A middle right arrow of display 3 Slide the Ribbon Cartridge into the Printer as shown in this section 4 Raise the...

Страница 38: ...ED USE ONLY Fargo Electronics Inc DTC400 DTC300 DTC300M Card Printer User Guide Rev 1 1 3 10 Installing the Print Ribbon Cartridge continued Display B Shows direction that Cartridge is inserted in the...

Страница 39: ...the print side down and if applicable the magnetic strip up and towards the front of the Printer To print using Batch mode follow the instructions below Step Procedure 1 Open the Card Hopper Cover 2 P...

Страница 40: ...300 DTC300M Card Printer User Guide Rev 1 1 3 12 Installing Blank Cards into the Card Hopper continued Display B Press the Card Hopper Load Lever down Insert the cards Here the Lever is still up Here...

Страница 41: ...lectronics Inc DTC400 DTC300 DTC300M Card Printer User Guide Rev 1 1 3 13 Installing Blank Cards into the Card Hopper continued Here are the cards ready to insert Here the Input Hopper Door is closed...

Страница 42: ...d Printer User Guide Rev 1 1 3 14 Lowering the Card Output Hopper Step Procedure 1 The Fargo DTC400 DTC300 DTC300M comes with a Card Output Hopper to hold cards after they have been printed Pull on th...

Страница 43: ...ogram will automatically open Follow the CD s on screen Procedures to complete installation Note If the CD does not automatically open use My Computer or Windows Explorer to view the contents of the C...

Страница 44: ...TED USE ONLY Fargo Electronics Inc DTC400 DTC300 DTC300M Card Printer User Guide Rev 1 1 3 16 Installing the Printer Driver continued Step Procedure 3 Wait during the installation Continued on the nex...

Страница 45: ...rgo Electronics Inc DTC400 DTC300 DTC300M Card Printer User Guide Rev 1 1 3 17 Installing the Printer Driver continued Step Procedure 4 Click on the Next button to continue with the Setup program Cont...

Страница 46: ...TC300 DTC300M Card Printer User Guide Rev 1 1 3 18 Installing the Printer Driver continued Step Procedure 5 Read the License Agreement Select the I accept the terms of the license agreement option and...

Страница 47: ...inter Driver continued Step Procedure 6 a Select the Complete option to install the following components Printer Driver Software Printer Driver User s Guide Fargo Diagnostics Utility Note Selecting Cu...

Страница 48: ...SE ONLY Fargo Electronics Inc DTC400 DTC300 DTC300M Card Printer User Guide Rev 1 1 3 20 Installing the Printer Driver continued Step Procedure 7 Click Install to begin the installation Continued on t...

Страница 49: ...00 DTC300M Card Printer User Guide Rev 1 1 3 21 Installing the Printer Driver continued Step Procedure 8 Select the port that your Printer is connected to at this time Click on the OK button and conti...

Страница 50: ...DTC400 DTC300 DTC300M Card Printer User Guide Rev 1 1 3 22 Installing the Printer Driver continued Step Procedure 9 a Connect the USB cable to the Printer b Turn ON the Printer at this time if it is...

Страница 51: ...go Electronics Inc DTC400 DTC300 DTC300M Card Printer User Guide Rev 1 1 3 23 Installing the Printer Driver continued Step Procedure 10 Wait while the Driver components are being copied to your PC Con...

Страница 52: ...Electronics Inc DTC400 DTC300 DTC300M Card Printer User Guide Rev 1 1 3 24 Installing the Printer Driver continued Step Procedure 11 Click on the Finish button to complete the Setup as shown below Co...

Страница 53: ...User Guide Rev 1 1 3 25 Installing the Printer Driver continued Step Procedure 12 a Click on the Yes button to exit the installer as shown below b Click on the No button to return to the installer s m...

Страница 54: ...RESTRICTED USE ONLY Fargo Electronics Inc DTC400 DTC300 DTC300M Card Printer User Guide Rev 1 1 3 26 Installing the Printer Driver continued Step Procedure 13 You have completed the installation...

Страница 55: ...Card Printer under the Printers window c Select Printing Preferences under the Printer drop down menu This will bring up the DTC400 DTC300 DTC300M Printing Preferences window 2 a Select the Card tab...

Страница 56: ...Printing a Test Print Image continued Step Procedure 3 This completes the DTC400 DTC300 DTC300M Card Printer Encoder Installation Guide For additional help regarding the Test Print and other related i...

Страница 57: ...inter User Guide Rev 1 1 3 29 Printer Transport Moving the Printer to another location Step Procedure 1 The Printer can be transported by gripping it under the back lid as shown in the photo below 2 Y...

Страница 58: ...n RFID Error Ribbon RFID Sensor is Corrupted __________4 13 Resolving the Mag Verify Error _______________________________________4 14 Resolving a Mag Verify Error continued __________________________...

Страница 59: ..._______________________________4 42 Resolving Ribbon Wrinkle problems continued ________________________4 43 Resolving the Excessive Resin Printing problems__________________________4 44 Resolving the...

Страница 60: ...tive It may be damaged if exposed to static electricity discharges Information that raises potential electrostatic safety issues is indicated by a warning symbol as shown to the below To prevent equip...

Страница 61: ...if an obsolete Driver was recently removed d Ensure the correct setup options within the Printer Driver are selected e Confirm that the Driver is current by checking at www fargo com 3 Determine the p...

Страница 62: ...files on the computer can cause communications errors a Access the temporary files by following this process Search for all folders called TEMP Once found clear out the contents of the folders If usin...

Страница 63: ...er Resolving a Card Not Fed Error Cards will not feed off the Hopper Step Procedure 1 Review the following information Symptom Cards will not feed at all Printer Error State Card is not being detected...

Страница 64: ...e print side down e Close the Card Hopper Cover to release the Card Tray f Press on the Resume button g If the cards do not feed continue to Step 3 3 Press the Cancel Print button on the Driver Monito...

Страница 65: ...ed Roller 7 Card Hopper Feed Roller is not turning during a print job a Remove the Printer rear cover b Ensure that the Card Hopper Feed Motor power cable is securely connected to J 20 on the Printers...

Страница 66: ...n use in the Printer Step Procedure 1 Review the following information Symptoms Two or more cards feed at the same time causing the cards to jam at the Card Hopper Roller Printer is out of cards Print...

Страница 67: ...to the Hopper with the print side down e Close the Card Hopper Cover to release the Card Tray f Press on the Resume button g If the cards do not feed continue to Step 3 3 Press the Cancel Print button...

Страница 68: ...ures assume that only factory authorized supplies are in use in the Printer Step Procedure 1 Review the following information Symptom Printer RFID Sensor does not detect a recognizable signal from the...

Страница 69: ...4 12 Resolving a Ribbon RFID Error Ribbon RFID Antenna is Corrupted continued Step Procedure 2 Replace the Print Ribbon a Replace the Print Ribbon Cartridge b Press on the Resume button c If the erro...

Страница 70: ...rinter Step Procedure 1 Review the following information Symptom Printer RFID Sensor does not detect a recognizable signal from the Ribbon Printer Error State The Ribbon tag information is corrupted o...

Страница 71: ...ng procedures assume that only factory authorized supplies are in use in the Printer Step Procedure 1 Review the following information Symptom The Printer is unable to verify encoded data Printer Erro...

Страница 72: ...the Printer and reapplying power b Remove the failed card c Use a Magnetic Stripe reader or magnetic developer spray to determine if data is being written to the Magnetic Stripe d If data is not being...

Страница 73: ...SE ONLY Fargo Electronics Inc DTC400 DTC300 DTC300M Card Printer User Guide Rev 1 1 4 16 Resolving a Mag Verify Error continued Step Procedure 6 Verify that the coercivity of the cards matches the Dri...

Страница 74: ...only factory authorized supplies are in use in the Printer Step Procedure 1 Review the following information Symptom There is not Magnetic Encoder installed Printer Error State A print job with Magne...

Страница 75: ...r b Remove the Magnetic Module cover screw c Remove the Magnetic Module cover d Verify that the Printer has a Magnetic Module installed Note If the Printer is equipped with a Magnetic Encoder Module e...

Страница 76: ...g procedures assume that only factory authorized supplies are in use in the Printer Step Procedure 1 Review the following information Symptom The Printer rolls through Ribbon and errors out Printer Er...

Страница 77: ...or wrinkled repair the Ribbon and wind up the take up roll 4 color panels past the damaged area 3 Press on the Resume button If the issue persists continue to Step 4 4 Replace the Ribbon Cartridge a...

Страница 78: ...nly factory authorized supplies are in use in the Printer Step Procedure 1 Review the following information Symptom The Print Ribbon has become jammed or has broken in the Printer Printer Error State...

Страница 79: ...e area a Press on the Resume button If the issue persists continue to Step 5 5 Use the Fargo Diagnostic utility to cycle the Printhead to ensure proper printhead operation See the Using the Diagnostic...

Страница 80: ...es assume that only factory authorized supplies are in use in the Printer Step Procedure 1 Review the following information Symptom Printer will not print Printer Error State The Ribbon Sensor has det...

Страница 81: ...sume that only factory authorized supplies are in use in the Printer Step Procedure 1 Review the following information Symptom Printer errors out as soon as it receives data from PC Printer Error Stat...

Страница 82: ...ge is installed in the Printer a Press on the Resume button If the issue persist continue to Step 3 3 Remove the rear cover and check that the Ribbon RFID cable is securely connected to the Main Board...

Страница 83: ...assume that only factory authorized supplies are in use in the Printer Step Procedure 1 Review the following information Symptom Printer errors out as soon as it receives data from the PC Printer Erro...

Страница 84: ...s designed for the correct Printer model 3 Press on the Resume button If the issue persists continue to Step 4 4 Remove the rear cover and check that the Ribbon RFID cable is securely connected to the...

Страница 85: ...that only factory authorized supplies are in use in the Printer Step Procedure 1 Review the following information Symptom Printer errors out as soon as it receives data from the PC Printer Error Stat...

Страница 86: ...XP right click on the DTC400 DTC300 Card Printer and select Printing Preferences b Click on the Device Option tab c Click on the auto select button d Check that the Ribbon type matches the Ribbon sele...

Страница 87: ...ll Troubleshooting procedures assume that only factory authorized supplies are in use in the Printer Step Procedure 1 Review the following information Symptom Card is jammed Printer Error State Card T...

Страница 88: ...ion continue to Step 4 3 Clearing a jammed card a If a card is jammed in the Printer use the Cancel button and the Pause button to move the Feed Rollers and free the card b The card can then be fed ou...

Страница 89: ...assume that only factory authorized supplies are in use in the Printer Step Procedure 1 Review the following information Symptom The Printhead continuously cycles or does not cycle at all Printer Erro...

Страница 90: ...Remove the back cover c Verify that connection J20 is properly connected to the Main Board d If the Motor does not turn continue to Step 7 6 Test the Headlift Sensor a Remove the back cover b Attach...

Страница 91: ...Open Driver Monitor Error Display None 2 Check for debris as follows a Open the front cover and check that no debris has accumulated in the lid Sensor opening Use compressed air to clean the opening i...

Страница 92: ...r Display None Driver Monitor Error Display None 2 Run a self test a Clear any card jams b Unplug power from the Printer c While holding down the Pause button reapply power Note A self test card will...

Страница 93: ...on the OK button g Print a self test h After adjusting the Image Placement if a white border appears on the card adjust the image placement back toward its original value in increments of 2 until the...

Страница 94: ...b Using a Digital Voltmeter connect the negative lead to ground c Probe Pins 1 to 5 of the Printhead power connection on J16 d Ensure that a voltage between 22 to 23 VDC is read on each pin If less t...

Страница 95: ...ure 1 Review the following information Symptom A thin line or scratch travels the entire length of the card See sample image below Printer Error State None LCD Error Display None Driver Monitor Error...

Страница 96: ...he following information Symptom Prints have spots white or colored voids and or dust on them See sample image below Printer Error State None LCD Error Display None Driver Monitor Error Display None 2...

Страница 97: ...n use in the Printer Step Procedure 1 Review the following information Symptom Printed cards are too dark or too light Printer Error State None LCD Error Display None Driver Monitor Error Display None...

Страница 98: ...Electronics Inc DTC400 DTC300 DTC300M Card Printer User Guide Rev 1 1 4 41 Resolving the Incorrect Image Darkness problems continued Step Procedure 4 Correct the Image Darkness See the Using the Image...

Страница 99: ...nter Step Procedure 1 Review the following information Symptom Printed cards have off colored lines or streaks on them Printer Error State None LCD Error Display None Driver Monitor Error Display None...

Страница 100: ...Fargo Electronics Inc DTC400 DTC300 DTC300M Card Printer User Guide Rev 1 1 4 43 Resolving Ribbon Wrinkle problems continued Step Procedure 4 Reduce the Image Darkness See the Using the Image Darknes...

Страница 101: ...y factory authorized supplies are in use in the Printer Step Procedure 1 Review the following information Symptom Black resin text and barcodes appear smeared or too thick Printer Error State None LCD...

Страница 102: ...Electronics Inc DTC400 DTC300 DTC300M Card Printer User Guide Rev 1 1 4 45 Resolving the Excessive Resin Printing problems continued Step Procedure 3 Reduce the Image Darkness See the Using the Image...

Страница 103: ...ies are in use in the Printer Step Procedure 1 Review the following information Symptom Black resin text and barcodes appear faded or too light Printer Error State None LCD Error Display None Driver M...

Страница 104: ...iew the following information Symptom Printing is cut off or is not centered on the card or a white border appears Printer Error State None LCD Error Display None Driver Monitor Error Display None 2 V...

Страница 105: ...e Position Setting is set correctly or incorrectly See the graphic below If the white border is on the leading edge of the card adjust the Horizontal value by 2 If the white border is on the trailing...

Страница 106: ...the Vertical Image Position Setting is set correctly or incorrectly See the graphic below If the white border is on the top edge of the card adjust the Vertical value by 2 If the white border is on t...

Страница 107: ...m Photos on the cards look pixilated or grainy as shown below Printer Error State None LCD Error Display None Driver Monitor Error Display None 2 Use high resolution 24 bit color images to always capt...

Страница 108: ...alled and that cards are properly loaded Caution If the power is ON disconnect the Power Cable from the Printer s rear panel 2 Press and hold the Pause Resume button 3 While holding down the Pause Res...

Страница 109: ...ONLY Fargo Electronics Inc DTC400 DTC300 DTC300M Card Printer User Guide Rev 1 1 4 52 Running the Standard Self Test Print Display A Full Color Test Print Display B Resin Test Print insert image of re...

Страница 110: ...cted or c a part has been replaced to check for proper Printer operation Step Procedure 1 Remove Ribbon Cartridge from the Printer and close the front cover Caution If the power is ON disconnect the P...

Страница 111: ...Adjusting the Ribbon Type option______________________________________5 16 Selecting the Auto Ribbon Select option _________________________________5 17 Adjusting the Color Matching option __________...

Страница 112: ...55 Using the Overlay Print Area continued _____________________________5 56 Using the Defined Area Option ________________________________________5 57 Using the Defined Area Option continued ________...

Страница 113: ...Reviewing the Ribbon Level Indicator __________________________________5 86 Using the Printer Calibration Utility ______________________________________5 87 Using the Image Darkness Option __________...

Страница 114: ...tive It may be damaged if exposed to static electricity discharges Information that raises potential electrostatic safety issues is indicated by a warning symbol as shown to the below To prevent equip...

Страница 115: ...river Options Reviewing DTC400 DTC300 and DTC300M Printer Drivers The functionality of the DTC400 DTC300 and DTC300M Printer Drivers is identical The window title reflects the specific Printer Driver...

Страница 116: ...RESTRICTED USE ONLY Fargo Electronics Inc DTC400 DTC300 DTC300M Card Printer User Guide Rev 1 1 5 6 Reviewing DTC300 Printer Driver This section applies to the DTC300 Printer...

Страница 117: ...RESTRICTED USE ONLY Fargo Electronics Inc DTC400 DTC300 DTC300M Card Printer User Guide Rev 1 1 5 7 Reviewing DTC300M Printer Drivers This section applies to the DTC300M Printer...

Страница 118: ...to choose the desired unit of measurement Note No 1 When designing a card format always set the card size or page size within the card design program to the exact dimensions of a CR 80 card Note No 2...

Страница 119: ...the Orientation Option Step Description 1 Select Portrait under Orientation to cause the card to print in a vertical orientation OR Select Landscape under Orientation to cause the card to print in a h...

Страница 120: ...ONLY Fargo Electronics Inc DTC400 DTC300 DTC300M Card Printer User Guide Rev 1 1 5 10 Selecting the number of copies Step Description 1 Select the number of copies by clicking on the UP or DOWN arrows...

Страница 121: ...400 DTC300 DTC300M Card Printer User Guide Rev 1 1 5 11 Using the Diagnostics button under the Card tab Step Description 1 Click on the Diagnostic button to bring up the Fargo Diagnostics Utility wind...

Страница 122: ...tep Description 1 Click on the Clean Printer button to display the Clean Printer Utility window 2 Remove all cards from the Card Hopper and close the Hopper door 3 Open the Front Cover and remove the...

Страница 123: ...e Rev 1 1 5 13 Using the Clean Printer Option Continued Step Description 6 Click on the Clean button at the bottom of the window Note The Printer will begin to feed the cleaning card through the card...

Страница 124: ...tton Step Description 1 Click on the Test Print button to send a simple self test print to the Printer Ensure that a YMCKO Ribbon is installed for DTC400 DTC300 or a Premium Resin Ribbon installed for...

Страница 125: ...DTC400 DTC300 DTC300M Card Printer User Guide Rev 1 1 5 15 Using the About button Step Description 1 Click on the About button to open a dialog box containing the copyright and version date code infor...

Страница 126: ...C300 Adjusting the Ribbon Type option Use the Ribbon Type option to select print Ribbons Step Description 1 Select the appropriate print Ribbon Type option from the dropdown menu for the type of print...

Страница 127: ...Step Description 1 Click on the Auto Ribbon Select button to verify that the Ribbon type selected matches the Ribbon installed in the Printer Note The Printer Driver will change the Ribbon type to the...

Страница 128: ...ple yet fast color balance adjustments b for more natural looking images without actually utilizing any specific color matching or c for customized printed coloring of the cards through the Image Colo...

Страница 129: ...ct the appropriate dither method according to the type of image to be printed This option affects objects printed with a resin only print Ribbon Step Procedure 1 Select Optimized for Photo when printi...

Страница 130: ...1 1 5 20 Using the Rotate Image 180 Degrees option Use this option to rotate the image on the front of the card 180 degrees when printed Step Description 1 Select this option to change the position of...

Страница 131: ...capabilities of the Printer yet still allows the Printer to encode cards Step Description 1 Select this option to encode or re encode cards without wasting additional time effort or printing supplies...

Страница 132: ...Options tab DTC300M Adjusting the Ribbon Type option Use the Ribbon Type option to select print Ribbons Step Description 1 Select the appropriate print Ribbon Type option from the dropdown menu for t...

Страница 133: ...Step Description 1 Click on the Auto Ribbon Select button to verify that the Ribbon type selected matches the Ribbon installed in the Printer Note The Printer Driver will change the Ribbon type to the...

Страница 134: ...ct the appropriate dither method according to the type of image to be printed This option affects objects printed with a resin only print Ribbon Step Procedure 1 Select Optimized for Photo when printi...

Страница 135: ...1 1 5 25 Using the Rotate Image 180 Degrees option Use this option to rotate the image on the front of the card 180 degrees when printed Step Description 1 Select this option to change the position of...

Страница 136: ...capabilities of the Printer yet still allows the Printer to encode cards Step Description 1 Select this option to encode or re encode cards without wasting additional time effort or printing supplies...

Страница 137: ...sin black panel s of a full color Ribbon or when printing with a resin only Ribbon by adjusting the Resin Heat slide Step Procedure 1 Move the slide to the left to cause less heat to be used in the pr...

Страница 138: ...ses when printing with the overlay panel of a Ribbon Step Procedure 1 Move the slide to the left to cause less heat to be used in the printing process Note Certain card types may need additional heat...

Страница 139: ...low Magenta and Cyan Note In most cases the default settings of these options will suffice 2 Control the overall darkness and lightness of the printed image by adjusting the Dye Sub Intensity slide by...

Страница 140: ...lor Ribbon or when printing with a resin only Ribbon by adjusting the Resin Heat slide Step Procedure 1 Move the slide to the left to cause less heat to be used in the printing process causing resin i...

Страница 141: ...ses when printing with the overlay panel of a Ribbon Step Procedure 1 Move the slide to the left to cause less heat to be used in the printing process Note Certain card types may need additional heat...

Страница 142: ...rgo Electronics Inc DTC400 DTC300 DTC300M Card Printer User Guide Rev 1 1 5 32 Using the Color Matching option and Default button Step Procedure 1 To return all options to their factory settings click...

Страница 143: ...uide Rev 1 1 5 33 Using the Calibrate tab Use the Calibrate tab to a control the position of the printable area in relation to the card b calibrate Sensors and c adjust the internal Printer settings t...

Страница 144: ...Horizontal adjustment arrows to adjust the Image Position values When adjusting these values keep in mind that cards always remain in the same position while moving through the Printer regardless of i...

Страница 145: ...rear of the Printer if a positive number is entered Move toward the front of the Printer if a negative number is entered OR Use the Horizontal adjustment to move the image Move toward the card output...

Страница 146: ...Inc DTC400 DTC300 DTC300M Card Printer User Guide Rev 1 1 5 36 Using the Sensors button Use the Sensors button to bring up a separate dialog box for calibrating the Printer s Ribbon Sensor see instruc...

Страница 147: ...Settings button see above to bring up a separate dialog box for adjusting the internal Printer settings which are customized for every Printer at the factory and saved directly within the Printer s me...

Страница 148: ...e following describes these options and the Printer s magnetic encoding process The Card Printer comes with either a high coercivity factory installed Magnetic Stripe Encoding Module or a low coercivi...

Страница 149: ...s Note Although the default ISO Magnetic Track Options should be correct for almost all applications these options can be customized if the application requires it Step Procedure 1 Select a Track sele...

Страница 150: ...ch each of the three magnetic tracks will encode Note No 1 They do not designate which tracks the Printer will encode e g to encode only Track 2 This must be done through the specific software program...

Страница 151: ...for each of the Magnetic Stripe s three tracks Customize each track independently of the other two Specify which of the three tracks to customize by selecting one of the three track options Note No 1...

Страница 152: ...o buttons Use this option to customize the Bit Recording Density Bits per Inch used to encode the magnetic data on the currently selected track Step Procedure 1 Select 75 BPI to change the bits per in...

Страница 153: ...mize the Character Data Size Bits per Character used to encode the magnetic data on the currently selected track Note This character size includes the parity bit if enabled Step Procedure 1 Select 5 B...

Страница 154: ...eckbox Multi Language Extension MLE support in Windows XP can cause text strings to be broken up into fragments This fragmentation of the text string prevents magnetic encoding Note This option may he...

Страница 155: ...ASCII Offset used to encode the magnetic data on the currently selected track Note This character offset value is subtracted from the ASCII value of each Magnetic Stripe data character prior to encodi...

Страница 156: ...ation to none OR Select Even Parity to change the LRC Generation to Even Parity OR Select Odd Parity to change the LRC Generation to Odd Parity Using the Character Parity radio buttons Use this option...

Страница 157: ...se this option to shift the recorded magnetic data to the left hand side of the card s Magnetic Stripe OR Use this option for situations that require cards to be readable with insert type readers that...

Страница 158: ...uide Rev 1 1 5 48 Reviewing the ISO Track Locations Review the magnetic encoding module which encodes onto tracks in accordance with an ISO 7811 2 Magnetic Stripe Note Refer to the diagram below for t...

Страница 159: ...added to the string of track data by customized ID software applications In most cases however the User must manually add these characters to the string of magnetic track data Entering the Track Info...

Страница 160: ...inel Field Separator Valid Characters Maximum Number of Characters Track 1 ASCII 32 95 See the table below 78 Track 2 ASCII 48 63 See the table below 39 Track 3 ASCII 48 63 See the table below 106 Rev...

Страница 161: ...ble ASCII Code Character ASCII Code Character ASCII Code Character 32 space 56 8 80 P 33 57 9 81 Q 34 58 82 R 35 No 59 83 S 36 60 84 T 37 61 85 U 38 62 86 V 39 63 87 W 40 64 88 X 41 65 A 89 Y 42 66 B...

Страница 162: ...Overlay O Panel and or the print area appear on a card Note This option is helpful if for example you would like to omit or block out the overlay or printing around a card s smart chip or Magnetic Str...

Страница 163: ...nt only in the space outside the selected and defined area OR Select the Omit Smart Chip Area option for the Printer to overlay and or print only in the space outside the standard location of a smart...

Страница 164: ...RESTRICTED USE ONLY Fargo Electronics Inc DTC400 DTC300 DTC300M Card Printer User Guide Rev 1 1 5 54 Using the Overlay Print Area dropdown menu continued...

Страница 165: ...ing and overlay process OR Select For Overlay Only for the defined area to apply only to the overlay process Note In this mode printing will still be allowed over the entire card and only the overlay...

Страница 166: ...RESTRICTED USE ONLY Fargo Electronics Inc DTC400 DTC300 DTC300M Card Printer User Guide Rev 1 1 5 56 Using the Overlay Print Area continued...

Страница 167: ...C300M Card Printer User Guide Rev 1 1 5 57 Using the Defined Area Option Step Procedure 1 Select the Defined Area s option to activate the card grid in the upper half of the window It is through this...

Страница 168: ...efined area Determine the area of the card needed to define for a signature panel with a different size and location than the Driver s standard Omit Signature Area setting Note This area is indicated...

Страница 169: ...ng the Defined Area Option continued Step Procedure 4 Measure from the lower left corner of the card up and over to the lower left corner of for the defined area to begin and enter these values into t...

Страница 170: ...Note The location of a defined area is based on the card orientation as it exits the Printer b Measure the defined area location based on the printed card Note If selecting the Rotate Front 180 Degre...

Страница 171: ...Area UP arrow Another 2 x 2 5mm x 5mm area will appear in the lower left hand corner Note This is the location in which all newly defined areas will first appear Up to 5 areas can be defined however...

Страница 172: ...menu list will be used to enable and select which type of visual security will be used The Visual Security dropdown list will be selectable only on the Front side see below Visual Security is not an o...

Страница 173: ...TC300M Card Printer User Guide Rev 1 1 5 63 Selecting Orientation Landscape under Card tab Step Procedure 1 Select the Landscape radio button below under Orientation under the Card Size tab to use the...

Страница 174: ...00M Card Printer User Guide Rev 1 1 5 64 Selecting the Visual Security Solutions dropdown menu A to D Step Procedure 1 Click on the Visual Security Solutions dropdown menu below under the Landscape Or...

Страница 175: ...DTC300M Card Printer User Guide Rev 1 1 5 65 Selecting Orientation Portrait under Card tab Step Procedure 1 Select the Portrait radio button below under Orientation under the Card Size tab to use the...

Страница 176: ...300 DTC300M Card Printer User Guide Rev 1 1 5 66 Selecting the Visual Security Solutions dropdown menu E to H Step Procedure 1 Click on the Visual Security Solutions dropdown menu under the Portrait O...

Страница 177: ...utton Step Procedure 1 Click on either the VeriMark or HoloMark radio button as shown below The foil options are used to control the size of the exclusion area Note When VeriMark is selected a rectang...

Страница 178: ...USE ONLY Fargo Electronics Inc DTC400 DTC300 DTC300M Card Printer User Guide Rev 1 1 5 68 Selecting the HoloMark radio button Step Procedure 1 Click on the HoloMark radio button below for the squared...

Страница 179: ...Custom Graphic in a 2D foil The custom VeriMark image is stamped on blank standard sized cards You can select one of eight positions A to H as shown in the Portrait and Landscape samples below Sample...

Страница 180: ...Custom Graphic in a 2D foil The custom HoloMark image is stamped on blank standard sized cards You can select one of eight positions A to H as shown in the Portrait and Landscape samples below Sample...

Страница 181: ...option to control where the resin black K panel of a full color Ribbon is printed If printing with a resin only Ribbon type all K Panel Resin options will be grayed out Resin black text is desirable...

Страница 182: ...s are not TrueType fonts and or are not printing with the resin black panel Note The Printer Driver will print areas of the image where it finds black coloring with the print Ribbon s resin black K pa...

Страница 183: ...DTC400 DTC300 DTC300M Card Printer User Guide Rev 1 1 5 73 Selecting the Full Card option Step Procedure 1 Select the Full Card option for the Printer Driver to print the resin black K panel for all...

Страница 184: ...00 DTC300M Card Printer User Guide Rev 1 1 5 74 Selecting the Defined Area s option Step Procedure 1 Select the Defined Area s option for the Printer Driver to print the resin black K panel for all bl...

Страница 185: ...lecting the Undefined Area s option Step Procedure 1 Select the Undefined Area s option for the Printer Driver to print the resin black K panel for all black found only in the space outside the define...

Страница 186: ...activate the card grid in the upper half of the window It is through this card grid that up to five areas can be defined When the card grid is first activated a small square will appear at its default...

Страница 187: ...the sample below this area is indicated by the dashed outline b Determine the size of this area by actually printing a card and looking at it in the same orientation as when it exits the Printer 3 Mea...

Страница 188: ...grid lines are spaced at 2 inch 5mm intervals 5 a Print the card design and note how the image is oriented on the card as it ejects from the Printer Note The location of a defined area is based on the...

Страница 189: ...RICTED USE ONLY Fargo Electronics Inc DTC400 DTC300 DTC300M Card Printer User Guide Rev 1 1 5 79 Selecting the Defined Area s function continued Refer to the previous procedure Continued on the next p...

Страница 190: ...nics Inc DTC400 DTC300 DTC300M Card Printer User Guide Rev 1 1 5 80 Selecting the Defined Area s function continued Refer to the previous procedure 172355 Karen Atkins Access Level 2 ID 1234478 Y 0 2...

Страница 191: ...RICTED USE ONLY Fargo Electronics Inc DTC400 DTC300 DTC300M Card Printer User Guide Rev 1 1 5 81 Selecting the Defined Area s function continued Refer to the previous procedure Continued on the next p...

Страница 192: ...will first appear 7 Use the Defined Area arrows to navigate back and forth from area to area Note The active area will always be highlighted with a dotted outline Up to 5 areas can be defined Size and...

Страница 193: ...nated areas will print with the Yellow Y Magenta M and Cyan C Ribbon panels directly beneath the resin black K panel OR Select this option if printing resin black text or bar codes onto a colored back...

Страница 194: ...USE ONLY Fargo Electronics Inc DTC400 DTC300 DTC300M Card Printer User Guide Rev 1 1 5 84 Using the Printer Supplies tab Use the options on this tab to view information about the Ribbon installed in t...

Страница 195: ...Electronics Inc DTC400 DTC300 DTC300M Card Printer User Guide Rev 1 1 5 85 Reviewing the Ribbon Information Step Procedure 1 Use the Ribbon information to determine which Ribbon is being used to print...

Страница 196: ...NLY Fargo Electronics Inc DTC400 DTC300 DTC300M Card Printer User Guide Rev 1 1 5 86 Reviewing the Ribbon Level Indicator Step Procedure 1 Use the Ribbon Level indicator to view approximately how much...

Страница 197: ...Use the adjustment mode to change the Printer s internal settings Note The Card Printer is equipped with an internal adjustment mode programmable through the Settings dialog box This dialog box is acc...

Страница 198: ...increasing or decreasing the amount of heat used by the Printhead when printing Step Procedure 1 Lighten the printed image by clicking the down arrow to enter a negative value and decrease the amount...

Страница 199: ...image will move in relation to the fixed card position as a positive or negative Image Placement value is entered Step Procedure 1 Enter a negative value to move the printed image toward the leading e...

Страница 200: ...osition as a positive or negative Print End of Form value is entered Step Procedure 1 Enter a negative value to reduce the Print End of Form and move the end of the printable area more toward the lead...

Страница 201: ...in mind that cards always remain in the same landscape orientation while moving through the Printer Step Procedure 1 Enter a negative value to move the image towards the bottom edge of the card See i...

Страница 202: ...24vdc for Hi Co Magnetic cards and 2 54vdc for Lo Co Magnetic cards Depending on the cards that are being used it may be necessary to adjust the encoder voltage out of default See the next two procedu...

Страница 203: ...rder to properly set the Encoder Voltage Offset value This information should be available through the card manufacturer or reseller 2 Use the following equation to identify the proper Mag Hi Co Volta...

Страница 204: ...r to properly set the Encoder Voltage Offset value This information should be available through the card manufacturer or reseller 2 Use the following equation to identify the proper Mag Lo Co Voltage...

Страница 205: ...red Note For this diagram imagine that the card is transparent and the card s Magnetic stripe can be seen through the top or front side of the card Step Procedure 1 Enter a negative value to move the...

Страница 206: ...RESTRICTED USE ONLY Fargo Electronics Inc DTC400 DTC300 DTC300M Card Printer User Guide Rev 1 1 5 96 Using the Mag Top of Form Option continued...

Страница 207: ...o decrease the amount of tension that is placed on the ribbon during printing OR Enter a positive value to increases the amount of tension that is placed on the ribbon during printing Using the LCD Co...

Страница 208: ...____________________________________6 1 Table of Contents______________________________________________________6 1 Safety Messages review carefully ________________________________________6 2 Using th...

Страница 209: ...tive It may be damaged if exposed to static electricity discharges Information that raises potential electrostatic safety issues is indicated by a warning symbol as shown to the below To prevent equip...

Страница 210: ...leaning the Printer s Printhead Cleaning Cards with an adhesive backing for cleaning the Printer s Card Feed Rollers and Platen Roller Cleaning Pads pre moistened with 99 99 isopropyl alcohol for clea...

Страница 211: ...t transferred Warning Never use a sharp tool or abrasive object of any kind to clean the Printhead which can damage it Step Procedure 1 Open the Printer s Front Cover 2 Remove print ribbon 3 Use a Pri...

Страница 212: ...Rollers if the Rollers appear dirty or if the cards start showing speckles or debris on the printed surface by following Steps 2 to 7 below 2 Leave the Printer power ON and open the Printer s Front Co...

Страница 213: ...late inside the Printer with continued usage These particles are attracted to the print Ribbon or blank card by static produced during printing and can contaminate the printed card causing spots or sp...

Страница 214: ...RESTRICTED USE ONLY Fargo Electronics Inc DTC400 DTC300 DTC300M Card Printer User Guide Rev 1 1 7 1 Section 7 Parts Replacement Refer to the appropriate User Guide for this printer for this section...

Страница 215: ...Card Printer Table of Contents Section 8 Packing the Card Printer 8 1 Table of Contents 8 1 Follow this instruction to pack the Card Printer for transport Step Procedure 1 Clean the inside of the Prin...

Страница 216: ...ion to provide the User with specific Board Level Diagnostic procedures for Board Errors and Sensor Testing for this Card Printer Table of Contents Section 9 Board Level Diagnostics 9 1 Table of Conte...

Страница 217: ...tive It may be damaged if exposed to static electricity discharges Information that raises potential electrostatic safety issues is indicated by a warning symbol as shown to the below To prevent equip...

Страница 218: ...sent 02 Not Present 70 Headlift J9 1 3 Not Depressed 0 17 Depressed 4 9 5 5 Print Cover Sensor Sensor mounted to Main Board J4 1 2 Not Depressed 0 17 Depressed 4 9 5 5 Print Ribbon Encoder Sensor J4 3...

Страница 219: ..._____________________________10 10 Selecting the Firmware File __________________________________________10 10 Placing the Printer in the Upgrade Mode________________________________10 11 Sending the...

Страница 220: ...1 10 2 Using the Diagnostic Tool Utility Selecting from the Printer Selection menu Step Procedure 1 Click on the dropdown Printer selection menu to view a list of currently installed Fargo Printer Dri...

Страница 221: ...stic Utility tabs for your Printer Step Procedure 1 Select a Printer from the Printer Selection menu that will customize the tabs that are available Note Only the Diagnostic Utility tabs for the selec...

Страница 222: ...lectronics Inc DTC400 DTC300 DTC300M Card Printer User Guide Rev 1 1 10 4 Using the Diagnostic Utility tabs Selecting the Print Spooler tab in the Diagnostics Utility Step Procedure 1 Select the Print...

Страница 223: ...TC300 DTC300M Card Printer User Guide Rev 1 1 10 5 Selecting the Print Spooler tab in the Diagnostics Utility continued Step Procedure 2 Click on the Select File button to bring up the Browse for Prin...

Страница 224: ...d Printer User Guide Rev 1 1 10 6 Selecting the Print Spooler tab in the Diagnostics Utility continued Step Procedure 3 a Click on the Browse button to browse through an open file dialog box as shown...

Страница 225: ...rgo Electronics Inc DTC400 DTC300 DTC300M Card Printer User Guide Rev 1 1 10 7 Selecting the Print Spooler tab in the Diagnostics Utility continued Step Procedure 4 Select the number of copies to be p...

Страница 226: ...nc DTC400 DTC300 DTC300M Card Printer User Guide Rev 1 1 10 8 Selecting the Print Spooler tab in the Diagnostics Utility continued Step Procedure 5 Click on the Send File button in order to send the s...

Страница 227: ...E ONLY Fargo Electronics Inc DTC400 DTC300 DTC300M Card Printer User Guide Rev 1 1 10 9 Selecting the Firmware Updates tab in the Diagnostics Utility Step Procedure 1 Select the Firmware Updates tab a...

Страница 228: ...and click on the Submit button Click on the Firmware file link labeled for the specific Printer model 3 Click on OK when prompted to Save this Program to Disk and then select a folder in which to save...

Страница 229: ...1 10 11 Placing the Printer in the Upgrade Mode Step Procedure 1 Disconnect Power from the Printer 2 Press and hold down the power and pause buttons on the Printer 3 Reapply power to the Printer Note...

Страница 230: ...uide Rev 1 1 10 12 Sending the Firmware File Step Procedure 1 Ensure that the firmware File is selected 2 Ensure that the Printer LCD says Upgrade Firmware Send File Now 3 Click on the Send Firmware b...

Страница 231: ...s tab in the Diagnostics Utility Step Procedure 1 a Select the Mechanics tab to test Motors and Sensors in the Printer Note This section has a procedure for each function by a Run button as shown belo...

Страница 232: ...rd Printer User Guide Rev 1 1 10 14 Selecting the Mechanics tab in the Diagnostics Utility continued Step Procedure 2A Click on the Calibrate the Ribbon Sensor button to calibrate the Print Ribbon Not...

Страница 233: ...Card Printer User Guide Rev 1 1 10 15 Selecting the Mechanics tab in the Diagnostics Utility continued Step Procedure 2B Click on the Clean Printer Remove Cards button to activate the function See the...

Страница 234: ...User Guide Rev 1 1 10 16 Selecting the Mechanics tab in the Diagnostics Utility continued Step Procedure 2C Click on the Cycle the Printhead button to verify operation of the Printhead Headlift Motor...

Страница 235: ...nc DTC400 DTC300 DTC300M Card Printer User Guide Rev 1 1 10 17 Selecting the Mechanics tab in the Diagnostics Utility continued Step Procedure 2D Click on the Advance the Stepper Motor button to move...

Страница 236: ...c DTC400 DTC300 DTC300M Card Printer User Guide Rev 1 1 10 18 Selecting the Mechanics tab in the Diagnostics Utility continued Step Procedure 2E Click on the Reverse the Stepper Motor button to move t...

Страница 237: ...de Rev 1 1 10 19 Selecting the Mechanics tab in the Diagnostics Utility continued Step Procedure 2F Click on the Cycle the Card Input Roller Remove Cards button to activate the Card Input Motor Note E...

Страница 238: ...go Electronics Inc DTC400 DTC300 DTC300M Card Printer User Guide Rev 1 1 10 20 Selecting the Mechanics tab in the Diagnostics Utility continued Step Procedure 2F Click on the Advance the Ribbon Motor...

Страница 239: ...Electronics Inc DTC400 DTC300 DTC300M Card Printer User Guide Rev 1 1 10 21 Selecting the Mechanics tab in the Diagnostics Utility continued Step Procedure 2G Click on the Reverse the Ribbon Drive Mot...

Страница 240: ...Y Fargo Electronics Inc DTC400 DTC300 DTC300M Card Printer User Guide Rev 1 1 10 22 Selecting the Mechanics tab in the Diagnostics Utility continued Step Procedure 2H Click on the Magnetic TOF Calibra...

Страница 241: ...Y Fargo Electronics Inc DTC400 DTC300 DTC300M Card Printer User Guide Rev 1 1 10 23 Selecting the Mechanics tab in the Diagnostics Utility continued Step Procedure 2I Click on the Magnetic TOF Calibra...

Страница 242: ...0M Printers Click on the Barcode Test Card button to test the resin printing capabilities of the Printer Note A full color ribbon YMC with a resin panel K or a resin ribbon is required for this test C...

Страница 243: ...a Select the Card Samples tab to print sample images from the Printer b Select the desired Image as shown below Note You will see the enlarged Image after you select it from several options c Check th...

Страница 244: ...ostics Utility Step Procedure 1 a Select the Magnetic Encoding tab to test the Magnetic Encoding capabilities of the Printer b Click on the Auto Fill Track Data button to automatically fill in Track 1...

Страница 245: ...onics Inc DTC400 DTC300 DTC300M Card Printer User Guide Rev 1 1 10 27 Selecting the Help button in the Diagnostics Utility Step Procedure 1 Select the Help button to access the Fargo Diagnostics Utili...

Страница 246: ...d Printer User Guide Rev 1 1 10 28 Selecting the About button in the Diagnostics Utility Step Procedure 1 Select the About button to access version information for the Diagnostics tool Note A list of...

Страница 247: ...Electronics Inc DTC400 DTC300 DTC300M Card Printer User Guide Rev 1 1 10 29 Selecting the Exit button in the Diagnostics Utility Step Procedure 1 Select the Exit button to close out and exit from the...

Страница 248: ...RESTRICTED USE ONLY Fargo Electronics Inc DTC400 DTC300 DTC300M Card Printer User Guide Rev 1 1 11 1 Section 11 Firmware Upgrades See Firmware Updates in Section 8 Diagnostic Tool Utility...

Страница 249: ...on a Fargo Printer _____________________________12 2 Finding out when a Fargo Card Printer was manufactured ___________________12 2 Reviewing Example No 1 Serial Number 80453289 _____________________...

Страница 250: ...were built Reviewing Example No 1 Serial Number 80453289 1 80453289 The first two digits in the serial number indicate the year the Printer was built e g the digits 80 indicate the year 1998 2 804532...

Страница 251: ...User Guide Rev 1 1 13 1 Section 13 Reviewing the Spare Parts List Reviewing the DTC400 DTC300 DTC300M Spare Parts List DTC400 DTC300 DTC300M ID Card Printer Recommended Spare Parts List Effective Date...

Страница 252: ...braic A type of color matching that takes the colors value of pixels and applies them to an algebraic equation to adjust the levels of hue saturation and brightness ANSI American National Standards In...

Страница 253: ...n chip based non volatile memory Bit An abbreviation for binary digital Each bit is an element of information that can have two states off and on Bit map A graphic produced by an array of pixel elemen...

Страница 254: ...used for dedicated high speed communication between the PC and the Printer port Centronics A parallel communications interface that has become the standard for connections to Printers designed by the...

Страница 255: ...in serial port interfaces DC Motor A Motor that works on DC with continuous motion DC Direct Current Electronic flow that is unidirectional flowing from the positive to negative of a power source Defa...

Страница 256: ...gh device and is connected in serial to the parallel cable Dot The smallest unit of an image that the Printer is able to produce The smaller the dot see dot pitch the sharper the image Dot pitch A mea...

Страница 257: ...card with built in electronic devices such as smart cards or prox cards E card Docking Station The device in the Printer that accepts smart cards with an ISO smart card contact station This allows th...

Страница 258: ...to increase the port throughput EPROM Electronically Programmable Read Only Memory A microchip based non volatile memory storage device that cannot be rewritten in the field Firmware for many Fargo Pr...

Страница 259: ...cteristic curve relating optical density to relative log exposure Glossy Matte A smooth polished surface in comparison to a rougher matte surface Fargo matte cards have a surface index Ra of approxima...

Страница 260: ...lor match Head Abbreviation for Printhead Heat sink A device used to dissipate heat into the ambient Heat Seal A resinous film transferred by the Printhead onto the back of an HDP intermediate transfe...

Страница 261: ...Ribbon by the Printhead The film is then transferred to the card surface by the hot lamination Roller ISO For the Greek iso meaning same Used to represent data from the International Organization for...

Страница 262: ...m LoCo Low Coercivity The coercivity value of magnetic media between 250 600 Oe ISO 7811 2 Fargo s Low Coercivity encodes at 300 Oe LPT Port Line Printer Port The system abbreviation for a PC s parall...

Страница 263: ...und the science of electromagnetism Offset The prescribed distance between a reference point and the target point The offset in card printing may refer to the position of the image relative to the lea...

Страница 264: ...ansfer in which serial data is divided into sections and sent simultaneously down parallel wires to speed transfer rate Parallel port A communication socket on a device that allows for parallel data t...

Страница 265: ...polyester material that enhances card security and durability applied over the printed surface with a hot Roller Available as clear or with embedded holographic type security images Portrait A documen...

Страница 266: ...Plus reader mounted on the e card docking station inside the Printer encoder The ProxPoint is a read only device producing a Wiegand signal that is converted to RS 232 using a Cypress Computer Systems...

Страница 267: ...GB model Ribbon The dye impregnated film that is used for color printing Ribbon cable Parallel wires held flat in a row by plastic insulation RibbonTraq A Fargo Electronics method of placing bar code...

Страница 268: ...installs in a slot on the main board Simplex Single sided printing SmartGuard An application from Fargo Electronics that allows users to prevent access to the Printer through the use of a personally...

Страница 269: ...ard Surge Protector An electronic device placed in serial to the Printer s power supply that prevents damage to the Printer from electronic surges and electrical current that is outside of the normal...

Страница 270: ...magnetic data string Troubleshooting The process of investigating and determining the cause of a problem TrueType TT A font format that produces each character using a mathematical equation rather th...

Страница 271: ...n the order in which they are printed Yellow Y Magenta M Cyan C YMCK The designation of colored Ribbon by the panels of color in the order in which they are printed Yellow Y Magenta M Cyan C Black K Y...

Страница 272: ...ard Cleaning Roller 2 9 Card Design 2 14 Card Feeding Errors 4 7 4 8 4 10 4 12 4 15 4 16 4 18 4 20 4 22 4 25 4 27 4 29 4 31 4 33 card grid 5 58 card grid area 5 57 card grid lines 5 59 card input 5 89...

Страница 273: ...DMA Direct Memory Access 14 3 Dongle 14 5 Dot 14 5 Dot pitch 14 5 Download 14 5 DPI Dot Per Inch 14 5 DRAM Dynamic Random Access Memory 14 5 Driver 14 5 DTC400 DTC300 DTC300M 2 4 DTC400 DTC300 DTC300M...

Страница 274: ...ment 5 35 HTML HyperText Markup Language 14 9 HTTP HyperText Transfer Protocol 14 9 Humidity 2 4 I IC Integrated Circuit 14 9 ID Identification 14 9 Identification Card sample 5 77 IEEE 1284 Institute...

Страница 275: ...11 Memory 2 4 14 12 Menu 14 12 Metallic Resin 2 11 Monitor 5 18 Monochrome 14 12 Monochrome Dye Sub B 4 52 Monochrome Resin K 4 52 Motor Voltages when active 9 3 Multi Language Extension MLE 5 44 N N...

Страница 276: ...cess Memory 14 15 Rasterize 14 15 Reboot 14 15 Registration 14 15 Regulatory Compliances 2 2 Reject Hopper 4 15 Reset Printer 4 36 Resident Font 14 15 Resin 14 15 resin black K panel 5 72 5 73 5 83 Re...

Страница 277: ...rmocouple 14 19 Through hole 14 19 Timeout 14 19 TOF Top of Form 14 19 Track 14 19 Track 2 5 40 Track Data Note 5 50 track number 1 2 or 3 5 49 tracks 5 40 tracks 1 2 and 3 5 50 troubleshoot the Print...

Страница 278: ...RESTRICTED USE ONLY Fargo Electronics Inc DTC400 DTC300 DTC300M Card Printer User Guide Rev 1 1 8 YMCKO 14 20 YMCKOK 14 20...

Отзывы: