background image

5.  Pull on the ribbon and slide Hard Drive carrier out.
6.  Remove the four screws that anchors the HDD and remove 

HDD.

7.  Slide the replacement HDD into the carrier. Make sure label 

is facing inside the carrier and SATA port is facing oriented 

towards the open end of carrier. Reattach the screws to the 

HDD.

8.  Reinsert the carrier back into the drive bay and attach the 

screw removed in step 4.

9.  Slide the drive bay cover back into place.

Step 3C: Hard Drive Upgrade For 

PS4 Pro

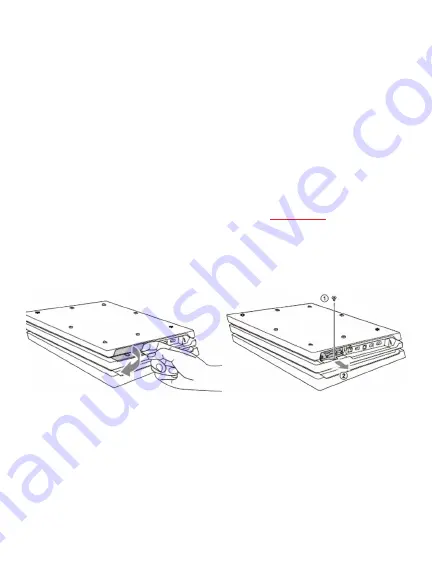
1.  Power down your PS4 PRO and disconnect all cables attach to 

the PS4 PRO.

2.  Turn the PS4 PRO around to face the rear panel and place the 

PS4 PRO upside down.

3.  Locate the Hard Drive plastic cover on the left. Apply pressure 

to remove (see image). There may be a sticker covering the 

HDD bay cover. It’s safe to remove this and it will not affect the 

warranty. 

4.  Once you reveal the HDD bay, use a screwdriver to remove the 

screw.

5.  Pull and Slide the Hard Drive carrier out.
6.  Remove the four screws that anchors the HDD and remove 

HDD.

Содержание PS4

Страница 1: ...e Kit Manual FOR PLAYSATION 4 PLAYSTATION 4 SLIM AND PLAYSTATION PRO What s Included 2 5 Hard Disk Drive Fantom Drives G Force Aluminum External Enclosure Usb 3 0 Flash Drive Screw Driver Quick Installation Guide ...

Страница 2: ... sure to download the larger file under Perform a New Installation of the System Software 2 Connect the USB Flash Drive and create a folder within the USB Flash Drive name in capital letters PS4 Inside the PS4 folder create another folder name in capital letters UP DATE 3 Place the downloaded PS4UPDATE PUP file into the UP DATE folder Step 2 Backing Up Games 1 Connect USB Flash Drive after turning...

Страница 3: ...bay and attach the screw removed in step 3 8 Slide the drive bay cover back into place Complete installa tion instructions are available at the PlayStation website Step 3B Hard Drive Upgrade For PS4 Slim 1 Power down your PS4 SLIM and disconnect all cables attach to the PS4 SLIM 2 Turn the PS4 SLIM around to face rear panel 3 Locate Hard Drive bay cover on the right and slide the drive bay cover o...

Страница 4: ...e drive bay cover back into place Step 3C Hard Drive Upgrade For PS4 Pro 1 Power down your PS4 PRO and disconnect all cables attach to the PS4 PRO 2 Turn the PS4 PRO around to face the rear panel and place the PS4 PRO upside down 3 Locate the Hard Drive plastic cover on the left Apply pressure to remove see image There may be a sticker covering the HDD bay cover It s safe to remove this and it wil...

Страница 5: ...tton 1st beep for 8 seconds and upon 2nd beep release the button 4 Screen should display SAFE MODE and prompt you to 5 connect DUALSHOCK 4 controller via USB cable and press PS4 button If it doesn t detect the controller remove and retry the connection 6 Select option Initialize PS4 Reinstall System Software and press OK 7 Your screen should flag The PS4 will be initialized All users and all data ...

Страница 6: ...to place remove the screws first 2 Carefully slide out the hard drive tray 3 Connect the 2 5 hard drive to the SATA power connector in the tray 4 Place the plastic end cover back into the enclosure and secure it with the screws provide 5 You can use the external hard drive for Windows PC or Mac OS For Windows format it to NTFS For Mac format it to HFS You can find more information on how to upgrad...

Страница 7: ...e Fantrom Drives Logo are registered trademarks of BNL Technologies Inc PlayStation is a registered trademark of Sony Corporation This product is made by Fantom Drives and is not endorsed manufactured or distributed by Sony All other names logos and images are property of their respective owners Copyright 1999 2017 Fantom Drives All rights reserved This publication may not be reproduced stored in ...

Отзывы: