background image


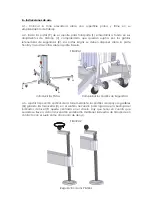
4.3.- Adjust the vertical position of the tower by means of the support plates (Q) turning 
the handle (H) in the required sense in order to achieve that the bubble of the level (F) 

become centered in the circle. It is necessary when leveling that the transporting 

wheels will have to keep in contact with the ground as another supporting point


SEE FIGURE 2. 

 
4.4.-Unlock the security trigger (R1). Extract the loading forks (U) removing safety bolts 

(L),


and place them in position to support the load. Place the safety bolts.


SEE FIGURE 3. 


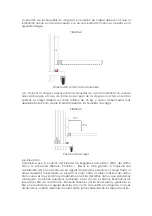
The position of the loading forks (U) in position to charge must be such that the 
indication be left in the topside and itself has a slope as is shown up in the following 

figure.


SEE FIGURE 4. 


4.5.- Place the load to lift on the forks of the tower by means of a suitable support,


so 

that the load only aperate in vertical sense.


The load will have to be as minimal of 25 

Kg. and it will never  have to be more displaced of 25 cm


from the rear end of the 

loading forks.


SEE FIGURE 5. 

 
4.6.- Elevation: 

Remove the brake (O) and t.


Check that the position of the Automatic Security System of the last profile is not 

blocked, Position 1. Lift the tower turning the winch’s handle in clockwise (N

1

),


raising 

the load to the required height. At the beginning the carriage will lift until the maximum 
height of the last profile, then the carriage will be blocked by the  Automatic Security 

System of the last profile, so we will block that one. As soon as we wanted to continue 

lifting the tower we will have to unlock the other Automatic Security Systems. In order to 
unlock each one we must pull out the Automatic Security System and then we turn it in 

clockwise, as it is shown in the figure 6. Once we reach the desired height we will block 

all the Automatic Security Systems.  
 

SEE FIGURE 6. 

 
4.7.- Holaing on: 

Release the winch’s handle (W), once we have blocked all the automatic security 

systems. 
 

SEE FIGURE 7. 

 
The tower can be left in any intermediate needed position just releasing the handle, 

and adjusting the height to one of the placement of the automatic security system. 

 
It is  recommended linking the winch’s handle with a chain to avoid the manipulation 

by not authorized people.


4.8.- Descending: 

The load descending is obtained by the opposite way. Turn the winch’s handle (W) in 
counterclockwise (N

2

), Lowering the load lifting down the different profiles until the 

tower become completely folded to its minimal height. At the same time you must pull 

Содержание T-109

Страница 1: ...T 109 TORRE ELEVADORA MANUAL DE INSTRUCCIONES E ELEVATOR TOWER OPERATING INSTRUCTIONS GB TRAVERSENLIFT BEDIENUNGSANLEITUNG D...

Страница 2: ......

Страница 3: ...N1 N2 W Q H P V S R F J U L T R1 N1 N2 W N1 N2 N1 N2 W Q H P Q H P V S R F J U L T R1...

Страница 4: ...A B T 109 016 T 109 004 A B T 109 016 T 109 004...

Страница 5: ...012 T 109 016 T 109 001 T 109 014 ACC 26 ACC 29 T 109 009 T 109 010 C T 108 031 T 109 033 T 109 015 T 109 011 T 109 006 T 109 034 T 109 005 T 109 007 ACC 13 ACC 21 ACC 18 T 109 013 T 109 012 T 109 016...

Страница 6: ...CC 26 T 109 002 T 109 026 ACC 26 T 109 020 T 109 017 T 109 020 B T 109 029 T 109 003 T 109 033 A ACC 26 T 109 002 T 109 026 ACC 26 T 109 020 T 109 017 T 109 017 T 109 020 B T 109 029 T 109 003 T 109 0...

Страница 7: ...T 109 018 T 109 032 T 109 019 T 109 026 T 109 021 T 109 022 T 109 027 T 109 018 T 109 032 T 109 019 T 109 026 T 109 021 T 109 022 T 109 027 T 109 027...

Страница 8: ...T 109 017 T 109 025 T 109 028 T 109 004 T 109 034 T 109 017 T 109 017 T 109 025 T 109 028 T 109 004 T 109 034...

Страница 9: ...T 109 024 ACC 14 002 ACC 14 001 ACC 14 ACC 14 002 T 109 024 ACC 14 003 ACC 14 003 C T 109 024 ACC 14 002 ACC 14 002 ACC 14 001 ACC 14 ACC 14 002 T 109 024 ACC 14 003 ACC 14 003 C...

Страница 10: ...nima elevable de 25 Kg 2 3 Altura m xima 7 9 m 2 4 Altura m nima 2 00 m Altura m nima para la carga 0 20 m 2 5 rea de la base 2 17 x 1 83 m 2 6 rea de la base cerrada 0 57 x 0 68 m 2 7 Peso 237 Kg 2...

Страница 11: ...ido y acabado anodizado tambi n en color negro 2 17 Dispositivo de conexi n de toma a tierra ACC 29 2 18 Ruedas direccionales para el transporte de la torre en posici n vertical y plegada hasta su emp...

Страница 12: ...n caso de ser necesario se deber conectar la torre a tierra a trav s del dispositivo de conexi n habilitado para ello ACC 29 3 6 No usar escaleras encima de la torre ni apoyarlas en ella 3 7 Cuidado c...

Страница 13: ...e la parte frontal y las patas cortas sobre la parte trasera FIGURA 1 Introducir las Patas Comprobar los Gatillos de Seguridad 4 3 Ajustar la posici n vertical de la torre mediante los platillos de ap...

Страница 14: ...a U quitando los pasadores L y colocarlos en posici n para soportar la carga Colocar los pasadores de seguridad FIGURA 3 Desbloquear Gatillo R1 Quitar los pasadores L Sacar las horquillas de carga U P...

Страница 15: ...e la carga 4 6 Elevaci n Comprobar que la posici n del Sistema de Seguridad Autom tico SSA del ltimo tramo se encuentra liberado Posici n 1 Elevar la torre girando la manivela del cabestrante W en el...

Страница 16: ...cabrestante y elevaci n del carro Altura m xima del carro sobre el ltimo tramo Bloquear SSA del ltimo tramo Posici n 2 SSA bloqueado Liberaci n SSA Tramo Intermedio Paso 1 Liberaci n SSA Tramo Interm...

Страница 17: ...d de cada tramo FIGURA 7 Posici n de la torre elevada La torre puede dejarse en cualquier posici n intermedia que se necesite ajustando la altura a uno de los alojamientos del Sistema de Seguridad Se...

Страница 18: ...vayan bajando los diferentes tramos hasta que la torre quede completamente plegada a su altura m nima Teniendo en cuenta de mantener sujeto cada SSA conforme se van bajando los tramos FIGURA 8 Giro de...

Страница 19: ...mos Hay que bloquear todos los tramos con los SSA y el carro hay que fijarlo mediante el Gatillo de Seguridad R1 Desmontar las patas liberando los gatillos de retenci n y colocarlas en su posici n de...

Страница 20: ...han sido engrasados con una grasa especial resistente al calor y la presi n No deben ser utilizados otros productos distintos al original suministrado por la empresa para evitar influir negativamente...

Страница 21: ...a sujetacable Acero Zincado Negro T 109 021 Polea nylon Nylatron Nylatron T 109 022 Juego tornillo polea nylon Acero Zincado T 109 023 Tapon Nylon Nylon Blanco T 109 024 Usillopata Zamak Zamak T 109 0...

Страница 22: ...ures and gadgetry of illumination 2 1 Max load 320 kg 2 2 Min load 25 kg 2 3 Max height 7 9 m 2 4 Min height 2 00 m Minimal height for the load 0 20 m 2 5 Base area 2 17 x 1 83 m 2 6 Folded base area...

Страница 23: ...not use stairs upon the tower neither lean them in it 3 7 Be careful with cables prominent objects etc placed above the tower 3 8 Do not stay under the load 3 9 Do not move the tower when it is lifte...

Страница 24: ...blocked Position 1 Lift the tower turning the winch s handle in clockwise N1 raising the load to the required height At the beginning the carriage will lift until the maximum height of the last profil...

Страница 25: ...recommended greasing periodically according to the use the crown wheel of the winch pads of the axle of actuating and the bushing the thread of the handle and the profiles of the tower ATTENTION Do no...

Страница 26: ......

Страница 27: ...y fabricaci n han sido tenidos en cuenta tanto en su totalidad como parcialmente los aspectos recogidos en las normas armonizadas siguientes UNE EN ISO 12100 1 2004 Seguridad de las m quinas Conceptos...

Отзывы: