background image

72 / 159 

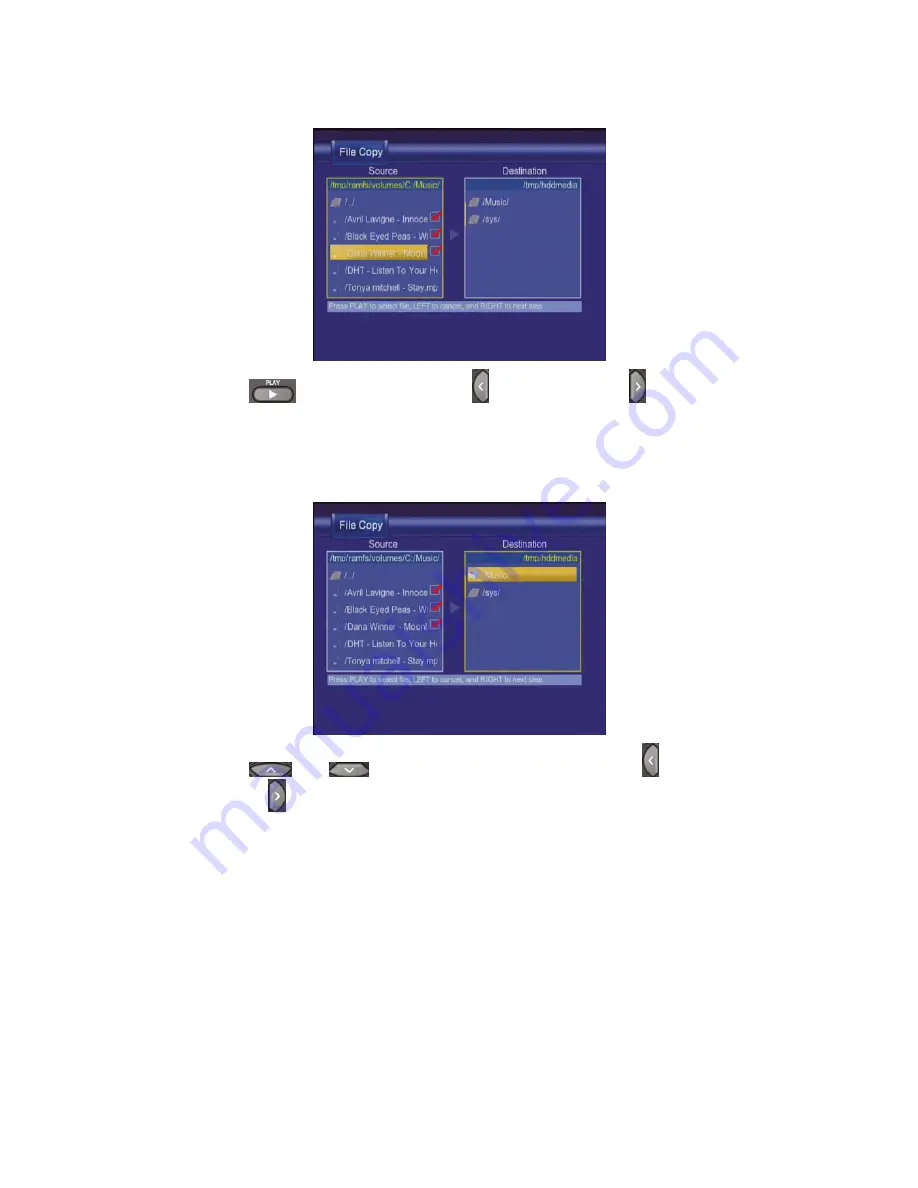
Schritt 2: Wählen Sie die Dateien aus, die Sie kopieren wollen. 


Drücken Sie 

, um Dateien auszuwählen, 

  zum Abbrechen und 

. um zum 

nächsten Schritt zu gelangen.   


Schritt 3: Wählen Sie den Ordner aus, in den Sie die gewählten Dateien kopieren wollen. 


Drücken Sie 

 und 

, um den Ordner anzuwählen. Drücken Sie 

 zum 

Abbrechen und     für den nächsten Schritt.  


www.fantec.de

Содержание MM-HDRTV

Страница 1: ...www fantec de DVB T ANALOG TUNER HDMI RECORDING MM HDRTV MEDIA RECORDER ANALOGTV www fantec de ...

Страница 2: ...Multimedia DVB T Recorder Player FANTEC MM HDRTV Bedienungsanleitung www fantec de ...

Страница 3: ...ernsehen 25 4 1 DVB T TV ansehen 25 4 2 Analog TV ansehen 28 5 Das Titellistenmenü für aufgenommene Videos 29 5 1 Das Titellistenmenü 29 5 2 Wiedergabe von Titeln 30 5 3 Löschen von Titeln 30 5 4 Umbenennen von Titeln 31 5 5 Sortieren von Dateien 31 5 6 Titel Bearbeitungsmenü 32 5 7 Extras 35 5 8 Speichern ihrer aufgezeichneten Titel 36 6 Zeitgesteuerte Aufnahme 36 6 1 Einen neuen Termin anlegen 3...

Страница 4: ...hsuchen 64 8 5 Das Netzwerk durchsuchen 64 8 6 Umbenennen Löschen von Dateien 68 8 7 Playlist 69 9 Dateien kopieren 71 10 NAS Funktion 73 11 Firmware Updates einspielen 74 12 Anhang 76 12 1 Spezifikationen 76 12 2 FAQ 78 12 3 Copyrights and Trademarks 81 12 4 Garantie 81 ENGLISCHES HANDBUCH AB SEITE 82 ENGLISH MANUAL STARTING FROM PAGE 82 www fantec de ...

Страница 5: ...ehmen und diese im MPEG 2 mpg Format speichern Zusätzlich können Sie ihre aufgenommenen Titel bearbeiten Time Shift Zeitversetztes Fernsehen Film Wiedergabe unterstützt VOB DVD IFO DVD MPG MPEG 2 1 AVI MPEG 4 ASP XviD DAT VCD und MPEG 2 TS Dateien maximale Auflösung bis 1080i Musik Wiedergabe unterstützt MP3 OGG AAC WAV und WMA Dateien unterstützt Musik Playlisten Sofortwiedergabe Foto Wiedergabe ...

Страница 6: ...r 1 USB Kabel 1 Fernbedienung 1 Batterie für Fernbedienung 2 AC DC Netzteil 1 Netzkabel 1 Wireless LAN USB Adapter 1 optional DVB T Antenne 1 optional Bedienungsanleitung 1 Quick Start Guide 1 Treiber CD 1 Hinweis Der aktuelle Verpackungsinhalt könnte von dieser Liste abweichen www fantec de ...

Страница 7: ...schirmt sind werden fast alle elektrischen Geräte durch Funkstörungen gestört Unter bestimmten Umständen könnte ihr Player gestört werden Das Design dieses Player richtet sich nach dem FCC CE Standard und unterliegt diesen Regularien 1 Dieser Player erzeugt keine schädlichen Funkstrahlungen 2 Der Player kann durch Funkstrahlung anderer Gerät in seiner Funktion beeinträchtigt werden 1 3 4 Reparatur...

Страница 8: ...n Player spritzen sollte benutzen Sie bitte ein trockenes Tuch um die Spritzer aufzunehmen Elektronische Geräte sind empfindlich Vermeiden Sie Erschütterungen und Stöße besonders wenn das Gerät in Betrieb ist und drücken Sie die Knöpfe nicht mit Gewalt Lassen Sie den Player nicht mit Wasser oder anderen Flüssigkeiten in Kontakt kommen Bauen Sie die Festplatte nicht aus dem Player aus versuchen Sie...

Страница 9: ... großen USB Stecker des Kabels in den USB Port ihres Computers 1 4 2 Verbinden von Massenspeichergeräten wie z B USB Stick MP3 Player und externe Festplatte 1 Stellen Sie sicher dass der Player eingeschaltet ist 2 Stecken Sie den USB Stick oder die externe Festplatte in den USB Port des Players Der Anschluss von USB Geräten ist nur bei Verbindung am TV möglich am PC ist der USB Host deaktiviert ww...

Страница 10: ... ihrer Videoquelle aufnehmen Wenn nötig können Sie den mitgelieferten SCART Adapter mit der Kennzeichnung OUT verwenden 2 A V Ausgang Wiedergabe Funktion 1 Folgen Sie der Abbildung und stecken Sie die 3 farbigen Stecker in die A V Ausgangsbuchse des Players 2 Folgen Sie der Abbildung und stecken Sie die 3 farbigen Stecker in die A V Eingangsbuchse ihres Fernsehers So verbunden können Sie die auf d...

Страница 11: ...b Pr Buchse am Fernseher Audioanschluss während Sie den Y Pb Pr Video Ausgang verwenden Erste Möglichkeit Nutzen Sie den Audioausgang der A V Ausgangsbuchse Zweite Möglichkeit Nutzen Sie den Audioausgang der S PDIF Koaxial oder optischen Buchse So verbunden können Sie die auf dem Player gespeicherten Inhalte auf dem Fernseher wiedergeben www fantec de ...

Страница 12: ...ecken Sie den anderen Stecker des HDMI Kabels in die HDMI Buchse ihres Fernsehers So verbunden können Sie Bild und Ton mit nur einem Kabel in höchster Qualität genießen 1 4 3 5 TV IN Folgen Sie der Abbildung und Verbinden Sie die DVB T Antenne oder ein analog TV Kable mit der TV IN Buchse www fantec de ...

Страница 13: ... nicht im Lieferumfang in Ihr digitales Audiogerät 1 4 5 Stromanschluss 1 Folgen Sie der Abbildung und verbinden Sie das AC Netzteil mit der DC Eingangsbuche des Players 2 Folgen Sie der Abbildung und verbinden Sie das AC Netzteil mit der Steckdose 1 4 6 Netzwerkverbindung Sie benötigen ein CAT5 CAT5e oder CAT6 Kabel nicht im Lieferumfang um das Gehäuse mit dem Netzwerk zu verbinden 1 Verbinden Si...

Страница 14: ...WLAN Verbindung zusätzliches Zubehör notwendig 1 Stellen Sie sicher dass der Player eingeschaltet ist 2 Schließen Sie den WLAN USB Dongle z B WiFi USB Dongle an den USB Host Anschluss Ihres Players an www fantec de ...

Страница 15: ...ngeschlossen haben wird der Player in den Standby Modus wechseln und die rote Standby Leuchte wird an der Frontblende leuchten Drücken Sie dann den POWER STANDBY Knopf an der Frontblende oder der Fernbedienung und warten Sie einige Sekunden bis das System hochgefahren ist was durch die blaue LED an der Frontblende angezeigt wird 2 Ausschalten Wenn das System läuft drücken Sie den POWER STANDBY Kno...

Страница 16: ...Funktionen der Tasten zu erfahren 1 POWER STANDBY 2 INFO 3 MENU 4 MUSIC 5 TV SYSTEM 6 SOURCE 7 HOME 8 Hoch 9 Links 10 Runter 11 Zahlenfeld 12 TIME SHIFT 13 REC 14 PLAY 15 TIMER 16 PAUSE 17 RECLIST 18 FR 19 A B 20 SUBTITLE 21 Rot 22 EPG Grün 23 TTX YELLOW 24 Blau 25 REPEAT 26 AUDIO 27 FF 28 NEXT 29 SLOW 30 PREV 31 STOP 32 GOTO 33 ENTER 34 Rechts 35 RETURN 36 VOL 37 VOL 38 COPY 39 ZOOM 40 SETUP 41 M...

Страница 17: ...en die Kanalnummer und die Zeit angezeigt z Drücken Sie die Taste während der Time Shift Funktion und der Verlaufsbalken wird angezeigt oder ausgeblendet 3 MENU Taste Drücken um das Menü zu öffnen z Drücken im Browser Menü um Dateien umzubenennen oder zu löschen und Musikstücke in die Wiedergabeliste einzufügen z Drücken in My_Shortcuts in Netzwerkbrowser Menü um Verknüpfungen für den Netzwerkzugr...

Страница 18: ...alten während Sie DVB T Analog TV schauen 11 Zahlenfeld Drücken um Titel direkt anzuwählen oder numerische Einstellungen im Setup vorzunehmen 12 TIME SHIFT Taste Während Sie im Video In Modus sind drücken Sie diese Taste um die Time Shift Funktion zu aktivieren Sie können das Fernsehprogramm dann pausieren und an der gleichen Stelle wieder fortsetzen Während Sie das Programm unterbrochen haben wir...

Страница 19: ...6 PAUSE Taste Drücken um die Wiedergabe zu unterbrechen Drücken Sie die Taste erneut um ein Einzelbild weiter zu springen Drücken Sie um die Wiedergabe fortzusetzen 17 RECLIST Taste Drücken Sie diese Taste um die Aufnahmeliste anzuzeigen 18 FAST REWIND Taste Drücken um die Wiedergabe zurückzuspulen Mehrmaliges Drücken ändert die Geschwindigkeit 19 A B Taste Drücken um einen Start und Endpunkt fest...

Страница 20: ...zuspulen Mehrmaliges Drücken ändert die Geschwindigkeit 28 NEXT Taste Drücken um zum nächsten Titel Kapitel TV Kanal zu gelangen 29 SLOW MOTION Taste Drücken um die Zeitlupe zu aktivieren Mehrere Geschwindigkeitseinstellungen sind möglich Drücken Sie um die Wiedergabe normal fortzusetzen 30 PREVIOUS Taste Drücken um zum vorherigen Titel Kapitel TV Kanal zu gelangen 31 STOP Taste Drücken um die Wie...

Страница 21: ...avigieren 36 VOL Button Drücken um die Lautstärke zu verringern 37 VOL Button Drücken um die Lautstärke zu erhöhen 38 COPY Taste Drücken um in das Kopiermenü zu gelangen 39 ZOOM Taste Drücken zum Heran oder Herauszoomen bei Videos und Bildern 40 SETUP Taste Drücken um direkt in das Einstellungsmenü zu gelangen 41 MUTE Taste Drücken um den Ton auszuschalten Nochmaliges Drücken schaltet den Ton wied...

Страница 22: ...dby Modus schalten und wieder aufwecken Die integrierte LED zeigt den Status an Blau Betrieb Rot Standby 2 Festplattenstatus LED Zeigt den Status der Festplatte an 3 Aufnahmestatus LED Zeigt an ob sich das Gerät im Aufnahmemodus befindet 2 Festplattenstatus 3 Aufnahme LED 1 Standby Schalter www fantec de ...

Страница 23: ...angsbuchse 5 Audio Eingangsbuchse Links 6 Video Eingangsbuchse 7 S PDIF Koaxialanschluss 8 Ein Ausschalter 9 TV Eingang 10 Netzteilanschluss 11 RJ45 LAN Anschluss 12 HDMI Buchse 13 S PDIF optischer Ausgang 14 Audio Eingangsbuchse Rechts 15 Audio Ausgangsbuchse Rechts 16 USB PC Buchse 17 USB Host Buchse x 2 www fantec de ...

Страница 24: ...swahl von DVB T In diesem Menü können Sie DVB T Fernsehen anschauen die Sofortaufnahme starten und die Time Shift Funktion nutzen Wählen Sie das DVB T Icon im Hauptmenü um in dieses Menü zu gelangen 3 2 Auswahl von Analog TV In diesem Menü können Sie analoges Fernsehen anschauen die Sofortaufnahme starten und die Time Shift Funktion nutzen Wählen Sie das ANALOG TV Icon im Hauptmenü um in dieses Me...

Страница 25: ...enen Titel wiedergeben Weiterhin haben Sie hier die Möglichkeit die Titel zusammenzufügen zu teilen zu löschen umzubenennen und zu bearbeiten Um in den Wiedergabemodus zu gelangen drücken Sie die Taste oder wählen Sie den Menüpunkt Playback im Hauptmenü 3 5 Auswahl des Browser Wiedergabe von Multimediadateien Sie können alle Multimediadateien die sich auf der Festplatte einem angeschlossenem USB G...

Страница 26: ...iste zu sehen Hoch Runter Drücken um Programme zu wechseln Das Programm kann während einer Aufnahme nicht geändert werden PREV NEXT Zahlenfeld Zur Eingabe der Programmnummer Drücken Sie ENTER zum Bestätigen GOTO Drücken um zwischen den beiden zuletzt gesehenen Programm hin und her zu wechseln REC Drücken um die Sofortaufnahme zu starten TIME SHIFT Drücken um die Time Shift Funktion zu aktivieren T...

Страница 27: ...it und ein Programm auswählen erscheint eine Infoleiste mit Informationen zum grade gewählten Programm Es werden 4 Felder mit Informationen angezeigt Im Bild oben wird ein Bespiel angezeigt 11 Alterseinstufung N A Sprache SS Untertitel verfügbar TT Teletext verfügbar SD Auflösung des Bildes SD Standard Definition HD High Definition Wenn das Feld umrandet erscheint ist die Funktion verfügbar www fa...

Страница 28: ...rücken Sie und um das Datum zu ändern Drücken Sie und um die Sendung zu wechseln Drücken Sie um einen Aufnahmetermin für die Sendung anzulegen oder zu löschen 4 1 4 Teletext Falls der TV Sender einen Teletext ausstrahlt können Sie diesen mit der Taste aufrufen Mit Hilfe des Zahlenfeldes und der Pfeiltasten können Sie die verschiedenen Seiten des Teletextes aufrufen www fantec de ...

Страница 29: ... Hauptmenü Die folgenden Funktionen auf der Fernbedienung stehen ihnen während der Fernsehwiedergabe über Analog TV zur Verfügung Name Funktion UP DOWN Drücken um Programme zu wechseln Das Programm kann während einer Aufnahme nicht geändert werden PREV NEXT Zahlenfeld Zur Eingabe der Programmnummer Drücken Sie ENTER zum Bestätigen REC Drücken um die Sofortaufnahme zu starten TIME SHIFT Drücken um ...

Страница 30: ...n von aufgenommenen Titeln Um in das Menü zu gelangen wählen Sie das Playback Icon im Hauptmenü Drücken Sie Hoch Runter um zwischen DVB T und Analog TV A V IN auszuwählen Danach können Sie die Programme die Sie über DVB T oder Analog TV aufgenommen haben ansehen und bearbeiten 5 1 Das Titellistenmenü www fantec de ...

Страница 31: ...nden Festplattenspeicher und die verbleibende Aufnahmezeit für jede Aufnahmequalität 4 Vorschau Hier wird ein Vorschaufenster angezeigt 5 2 Wiedergabe von Titeln Um einen aufgenommen Titel wiederzugeben machen Sie bitte folgendes 1 Drücken Sie und auf der Fernbedienung um den Reiter Abspielen auszuwählen 2 Drücken Sie und um den Titel auszuwählen den Sie abspielen wollen 3 Drücken Sie um die Aufna...

Страница 32: ...en Sie Eine Eingabemaske mit Bildschirmtastatur erscheint 4 Benutzen Sie die Navigationstasten um Zahlen und Buchstaben auszuwählen Mit CAPS können Sie zwischen Groß und Kleinschreibung wechseln Drücken Sie um einen Buchstaben zu löschen Mit können Sie ein Leerzeichen einfügen Drücken Sie um das angewählte Zeichen einzufügen 5 Wenn Sie mit ihrer Eingabe zufrieden sind wählen Sie OK an und drücken ...

Страница 33: ... ihrer Aufnahmezeit Titelname Sortiert die Titel alphabetisch nach ihrem Titelnamen Neue Titel Sortiert die Titel nach dem Datum der Aufnahme Die neuesten Titel werden zuerst angezeigt 5 6 Titel Bearbeitungsmenü Drücken Sie und um den Titel Edit Reiter auszuwählen Drücken Sie und das Menü erscheint Zurück Auswählen um in das Hauptmenü zurückzukehren www fantec de ...

Страница 34: ... die gewünschte Stelle erreicht haben drücken Sie oder um Bestätigen auszuwählen und drücken Sie AB löschen Einen bestimmten Abschnitt aus dem Film entfernen schneiden Wählen Sie A Einstellen und drücken Sie um den Startpunkt für den zu löschenden Abschnitt auszuwählen Wählen Sie B Einstellen und drücken Sie um das Ende des Abschnittes festzulegen Wählen Sie Bestätigen und drücken Sie um den Absch...

Страница 35: ...ie Titel zusammenzufassen Kapitelmarkierung einfügen Fügt eine Kapitelmarkierung zu dem ausgewählten Titel hinzu Eine Kapitelmarkierung ist ein Markierungspunkt innerhalb eines Titels Sie können zwischen den Markierungspunkten mit oder springen Wenn Sie diesen Menüpunkt auswählen erscheint ein Bearbeitungsmenü Wenn Sie den Punkt im Film erreicht haben den Sie markieren wollen drücken Sie zum Bestä...

Страница 36: ...Drücken Sie zum löschen Auf Media Partition kopieren nur FAT32 Wählen Sie in der Titelliste durch Drücken von oder aus welchen Titel Sie von der Aufnahme Partition UDF auf die Media Partition FAT32 kopieren wollen 5 7 Extras Drücken Sie und um den Extras Reiter auszuwählen Drücken Sie und das Menü erscheint Zurück Auswählen um in das Hauptmenü zurückzukehren Alle Titel löschen Auswählen um alle Ti...

Страница 37: ...ü zu gelangen drücken Sie 6 1 Einen neuen Termin anlegen Drücken Sie und um Bearbeiten auszuwählen Wählen Sie einen neuen Termin anlegen und drücken Sie Das Menü für die Termineinstellungen öffnet sich Benutzen Sie und um zwischen den Optionsfeldern zu navigieren und drücken Sie und um die einzelnen Einstellungen zu verändern Quelle Wählen Sie die Quelle der Aufzeichnung aus Startzeit Stellen Sie ...

Страница 38: ...Bearbeiten Reiter aus Wählen Sie den Aufzeichnungstermin den Sie bearbeiten möchten und drücken Sie Das Menü zum Bearbeiten des Aufzeichnungstermins erscheint Bearbeiten Sie den Aufzeichnungstermin so wie in Kapitel 6 1 Einen neuen Aufzeichnungstermin anlegen beschrieben 6 3 Löschen eines Aufzeichnungstermins Drücken Sie und um den Löschen Reiter auszuwählen Wählen Sie den Aufzeichnungstermin aus ...

Страница 39: ...us Alle Aufzeichnungstermine werden angezeigt Wählen Sie einen Termin aus und drücken Sie Wählen Sie Timer über Einstellungen aktivieren oder den ausgewählten Termin kurz anhalten Drücken Sie zum Bestätigen 6 5 Anzeigen des Aufnahmeverlaufes Drücken Sie und und wählen Sie den Verlauf Reiter aus Hier werden alle bisher eingestellten Aufzeichnungen angezeigt www fantec de ...

Страница 40: ... Einstellungen zu ändern Um in das Einstellungsmenü zu gelangen wählen Sie SETUP im Hauptmenü aus oder drücken Sie auf der Fernbedienung 7 1 DVB T Einstellungen Drücken Sie und um den DVB T Reiter auszuwählen DVB T Region Wählen Sie die Region aus in der Sie sich befinden Drücken Sie Hoch Runter um das Land auszuwählen und zum Bestätigen www fantec de ...

Страница 41: ... Sie zum Bestätigen AUTO SCAN Im AUTO SCAN Modus wird der Player automatisch nach DVB T Kanälen suchen MANUAL SCAN Im MANUAL SCAN Modus können Sie den Programmnamen die Bandbreite und Frequenz manuell festlegen Benutzen Sie die Navigationstasten und das Zahlenfeld um die Daten einzutragen Drücken Sie zum Bestätigen www fantec de ...

Страница 42: ...nd drücken Sie zum Bestätigen In diesem Menü können Sie den Namen und die Kanalnummer ändern sowie Kanäle löschen Drücken Sie zum Bestätigen Sie können auch Rot um die Standard Einstellungen zu laden und Blau um die Sortierung auszuwählen 7 2 Analog TV Einstellungen Drücken Sie und um den ATV Reiter auszuwählen www fantec de ...

Страница 43: ...en Kanalsuche Auswählen um die verfügbaren Kanäle zu suchen Drücken Sie Hoch Runter um AUTO SCAN auszuwählen und drücken Sie zum Bestätigen In diesem Menü wird der Player automatisch nach Kanälen suchen Kanaleinstellungen Auswählen um die Einstellungen von vorhandenen Kanälen zu ändern Drücken Sie Hoch Runter um ATV zu wählen www fantec de ...

Страница 44: ...llungen Drücken Sie und und wählen Sie den Video Reiter aus Seitenverhältnis Auswählen um das Seitenverhältnis einzustellen Drücken Sie und um Pan Scan 4 3 Letter Box 4 3 oder 16 9 einzustellen Drücken Sie zum Bestätigen Pan Scan 4 3 Das Breitbildfernsehen wird über die gesamte Höhe des Bildschirms angezeigt Da nicht das komplette Bild auf den Fernseher passt werden die Seitenränder ausgeblendet W...

Страница 45: ...ie einen 4 3 Fernseher angeschlossen haben 16 9 Das komplette Breitbild wird angezeigt Wählen Sie dieses Format wenn Sie einen 16 9 Fernseher angeschlossen haben Helligkeit Auswählen um die Helligkeit zu ändern Drücken Sie und um die Helligkeit einzustellen Sie bekommen eine Vorschau auf dem Fernseher angezeigt Drücken Sie zum Bestätigen Kontrast Auswählen um den Kontrast zu ändern Drücken Sie und...

Страница 46: ...ndern Drücken Sie zum Bestätigen 7 4 Audio Einstellungen Drücken Sie und und wählen Sie den Audio Reiter aus Nachtmodus Auswählen um den Nachtmodus zu wählen Drücken Sie und um zwischen Ein Aus und Komfort zu wählen Drücken Sie zum Bestätigen Digital Output Auswählen um den Modus für den digitalen Ausgang S PDIF einzustellen www fantec de ...

Страница 47: ...tellungen für die Aufnahmequalität zu ändern Drücken Sie und um die Aufnahmequalität einzustellen die Sie benötigen Die höchste Qualität ist HQ welche aber auch den meisten Speicherplatz benötigt Die Aufnahmequalität wird von oben nach unten immer geringer Allerdings wird durch eine geringere Aufnahmequalität auch weniger Speicherplatz auf der Festplatte www fantec de ...

Страница 48: ...e Aufnahmen zu spulen Drücken Sie zum Bestätigen Zeitversetzt Auswählen um permanentes zeitversetztes Fernsehen ein oder auszuschalten Drücken Sie und um Ein oder Aus zu wählen Drücken Sie zum Bestätigen Wenn Sie Ein gewählt haben wird die zeitversetzte Aufnahme automatisch gestartet wenn Sie sich im TV Modus befinden Aufzeichnungsort Auswählen um den Aufzeichnungsort festzulegen Drücken Sie und u...

Страница 49: ...s das Gerät auf den Rechner zugreifen kann 4 Aktivieren Sie den Gast Account ihres Betriebssystems Geben Sie die an ihrem PC die Ordner frei auf die Sie zugreifen wollen Stellen Sie sicher dass Zugriffsrechte für die Benutzerkonten Jeder oder Gast vorhanden sind LAN Setup Auswählen um die LAN Einstellungen zu verändern Drücken Sie und um DHCP IP AUTO oder FIX IP MANUAL auszuwählen Drücken Sie zum ...

Страница 50: ...istrator Benutzen Sie das Navigations und Zahlenfeld um die IP Adresse einzugeben Drücken Sie zum Bestätigen WLAN Setup 1 Stellen Sie sicher dass der WLAN USB Adapter optional erhältlich mit dem USB HOST Port verbunden ist 2 Stellen Sie sicher dass ein WLAN Router oder ein Access Point in ihrem Netzwerk vorhanden ist oder ihr Rechner mit einer WLAN Karte ausgestattet ist 3 Stellen Sie sicher dass ...

Страница 51: ...astrukture AP Modus und Peer to Peer Ad Hoc Modus Drücken Sie um abzubrechen und um die nächsten Schritte aufzurufen Drücken Sie und um eine Option auszuwählen und zum Bestätigen Infrastructure AP Der Infrastruktur Modus wird benutzt wenn Sie das Gerät in eine bestehende WLAN Infrastruktur mit einem WLAN Router oder einem Access Point einfügen wollen 1 Suche SSID Wählen Sie Automatisch um nach ein...

Страница 52: ...WPA WiFi Protected Access verwendet wird Hier benötigen Sie einen Netzwerkschlüssel um sich mit diesem verbinden zu können Wird keine Verschlüsselung verwendet wird keine angezeigt 2 Bestätigen des SSID Name 3 WLAN Sicherheitseinstellungen Wählen Sie System öffnen wenn das Netzwerk unverschlüsselt ist Andernfalls wählen Sie Shared Key WEP oder WPA Key Um den Verschlüsselungscode einzugeben www fan...

Страница 53: ...e DHCP IP AUTO um die IP Adresse automatisch beziehen zu lassen oder wählen Sie FIX IP MANUAL um selber eine statische IP Adresse zu vergeben 5 Einstellungen Hier werden die Einstellungen die Sie gemacht haben noch einmal angezeigt www fantec de ...

Страница 54: ...Computer zu Computer Modus bezeichnet wird wird benutzt um 2 WLAN Clients mit einander zu verbinden ohne das ein WLAN Router oder Access Point eingesetzt werden muss 1 Ad Hoc Setup Wählen Sie Manuell aus um die Standarteinstellungen zu verändern Dann wählen Sie die SSID Sicherheitseinstellungen und die Host IP für ihre AD Hoc Verbindung Hinweis Der Player und ihr PC müssen beide den Ad Hoc Modus g...

Страница 55: ...u bestätigen Wenn ihre Einstellungen den Test bestanden haben werden die Netzwerkinformationen angezeigt NAS Mode Wählen um den NAS Modus ein oder auszuschalten Drücken Sie und um zwischen der Festplatte und einem USB Gerät zu wählen Drücken Sie zum Bestätigen www fantec de ...

Страница 56: ...prache zu ändern Drücken Sie und um die Sprachen zu wählen Drücken Sie zur Bestätigung Textkodierung Auswählen um die Textkodierung einzustellen Drücken Sie und um aus den verschiedenen Kodierungen zu wählen Drücken Sie zum Bestätigen Uhrzeit Auswählen um die Zeiteinstellungen des Systems zu ändern www fantec de ...

Страница 57: ...m in das Feld zu gelangen welches Sie ändern wollen Mit den Tasten und können Sie den Wert ändern Drücken Sie zum Bestätigen Kindersicherung Auswählen um die Einstellungen für die Kindersicherung zu ändern Lock System Drücken Sie und um die Kindersicherung ein oder auszuschalten Drücken Sie zum Bestätigen www fantec de ...

Страница 58: ...t mittels des Zahlenfeldes ein Drücken Sie zum Bestätigen Region Drücken Sie und um die Region auszuwählen Drücken Sie zum Bestätigen Passwort Benutzen Sie das Zahlenfeld um das alte und neue Passwort einzugeben Drücken Sie zum Bestätigen TV Rating Wählen Sie mit und die Altersbeschränkung aus www fantec de ...

Страница 59: ...en Drücken Sie und wählen Sie Festplatte formatieren Drücken Sie zum Bestätigen Drücken Sie und um OK auszuwählen Drücken Sie zum Bestätigen Drücken Sie und um die Größe des Puffers für die Time Shift Funktion einzustellen Drücken Sie und um weiter auszuwählen Bestätigen Sie mit www fantec de ...

Страница 60: ...r FAT32 und NTFS Partition einzustellen Drücken Sie und um weiter auszuwählen und bestätigen Sie mit Drücken Sie und um Formatieren auswählen und bestätigen Sie mit Die Formatierung startet nun Dies kann einige Minuten dauern Wenn die Formatierung abgeschlossen ist drücken Sie und Sie gelangen in das Hauptmenü zurück Standardwerte laden Zurücksetzen des Gerätes auf die Werkseinstellungen www fante...

Страница 61: ...ngen zurückgesetzt 7 8 Info Drücken Sie und um den Reiter Info auszuwählen Slide Show Zeit Auswählen um die Intervallzeit für die Slide Show auszuwählen Drücken Sie und um die Intervallzeit festzulegen Drücken Sie zum Bestätigen Übergangseffekt Wählen Sie den Übergangseffekt für die Slide Show www fantec de ...

Страница 62: ...e und um zwischen aus Ordner und alle zu wählen Drücken Sie zum Bestätigen HDD Information Auswählen um Partitionsinformationen zu erhalten Die Kapazitäten und Auslastung der Aufnahme Time Shift und Medienpartitionen werden hier angezeigt Informationen Auswählen um Systeminformationen zu erhalten Firmware Bios Version und die MAC Adresse werden angezeigt www fantec de ...

Страница 63: ... Hauptmenü Drücken Sie und um das Speichermedium zu wählen welches die Mediendateien enthält die Sie suchen Zur Verfügung stehen HDD USB NETZ Zum Bestätigen drücken Sie 8 1 Alles durchsuchen Drücken Sie und um den Reiter Alle auszuwählen Alle vorhandenen Verzeichnisse und alle unterstützen Mediendateien werden angezeigt Drücken Sie und um das Verzeichnis oder die Datei zu wählen die Sie öffnen wol...

Страница 64: ...r Fotos auszuwählen Alle Verzeichnisse und unterstützten Bilder werden angezeigt Drücken Sie und um das Bild zu markieren das Sie anzeigen wollen Bestätigen Sie mit Das Foto wird im Vollbildmodus angezeigt Hinweis 1 Wenn das Bild im Vollbildmodus angezeigt wird startet automatisch eine Slide Show 2 Während Sie einen Musiktitel wiedergeben können Sie gleichzeitig ihre Bilder ansehen Während Sie ein...

Страница 65: ... können mit Hilfe von Streaming Multimedia Dateien aus dem Netzwerk Ethernet oder WLAN wiedergeben Bevor Sie weiter lesen stellen Sie bitte sicher dass Sie Kapitel 7 6 Netzwerkeinstellungen gelesen und das Netzwerk richtig konfiguriert haben Wenn Sie Netz im Browsermenü auswählen haben Sie 2 Möglichkeiten um eine Datei zu finden Zum einen können Sie sich die Arbeitsgruppen im Netzwerk anzeigen las...

Страница 66: ...ie Bandbreite ihres Netzwerkes zu gering ist kann es bei der Wiedergabe zu Störungen kommen 2 Abhängig von den Netzwerkeinstellungen kann gelegentlich nicht auf die Arbeitsgruppe zugegriffen werden oder Sie wird nicht in der Liste angezeigt In diesem Fall nutzen Sie My_Shortcuts um die Netzwerkfreigaben zu durchsuchen 8 5 2 Suchen über My_Shortcuts Sie können die IP Adresse ihres Rechners angeben ...

Страница 67: ...Shortcuts eingetragen Wählen Sie Benutzername und das Eingabefenster erscheint Benutzen Sie die Navigationstasten um Zahlen und Buchstaben auszuwählen Mit CAPS können Sie zwischen Groß und Kleinschreibung wechseln Drücken Sie um einen Buchstaben zu löschen Mit können Sie ein Leerzeichen einfügen Drücken Sie um das angewählte Zeichen einzufügen www fantec de ...

Страница 68: ...igations und Zahlenfeld Tasten um die IP Adresse einzugeben Sie können auch Detail wählen um denVerbindungsnamen die Domain und Host Name einzustellen Danach wählen Sie OK und drücken zum Bestätigen Wählen Sie den Shortcut aus den Sie erstellt haben und drücken Sie zum Bestätigen Danach wählen Sie die Datei aus die Sie abspielen möchten www fantec de ...

Страница 69: ...mzubenennen oder zu löschen Drücken Sie und um Löschen Umbenennen oder Zurück zu Wählen Bestätigen Sie mit 8 6 1 Umbenennen von Dateien Benutzen Sie die Navigationstasten um Zahlen und Buchstaben auszuwählen Mit CAPS können Sie zwischen Groß und Kleinschreibung wechseln Drücken Sie um einen Buchstaben zu löschen Mit können Sie ein Leerzeichen einfügen Drücken Sie um das angewählte Zeichen einzufüg...

Страница 70: ...Playlist Dieser Player unterstützt eine Playlist Funktion so dass Sie ihre Lieblingsmusikstücke einfach jederzeit öffnen können 8 7 1 Dateien zur Playlist hinzufügen Wählen Sie den Titel aus den Sie zur Playlist hinzufügen wollen drücken Sie die Taste Rot und die Datei wird markiert Drücken Sie die Taste Grün und die Titel werden zu ihrer Playlist hinzugefügt Wie auf der Abbildung s u gezeigt könn...

Страница 71: ...ermenü auszuwählen Drücken Sie zum Bestätigen Die Playlist öffnet sich Wenn Sie einen Titel löschen wollen wählen Sie den Titel aus und drücken Sie die Taste Rot und die Datei wird markiert Drücken Sie die Taste Grün und die Titel werden aus ihrer Playlist entfernt www fantec de ...

Страница 72: ...zu öffnen Dieses ermöglicht ihnen Dateien zwischen den Festplatten USB Geräten und dem Netzwerk zu kopieren Schritt 1 Wählen Sie das Quell und Zielgerät aus Drücken Sie und um ein Gerät auszuwählen Drücken Sie zum Abbrechen und um zum nächsten Schritt zu gelangen www fantec de ...

Страница 73: ... Sie um Dateien auszuwählen zum Abbrechen und um zum nächsten Schritt zu gelangen Schritt 3 Wählen Sie den Ordner aus in den Sie die gewählten Dateien kopieren wollen Drücken Sie und um den Ordner anzuwählen Drücken Sie zum Abbrechen und für den nächsten Schritt www fantec de ...

Страница 74: ...ngen von Daten sehr komfortabel von ihrem PC auf den Player und vom Player auf ihren PC zu kopieren Aktivieren Sie die NAS Funtkion in den Einstellungen siehe Kapitel 7 6 Netzwerkeinstellungen Wenn Sie die Netzwerkverbindung richtig eingerichtet haben geben Sie NAS oder IP Addresse unter Ausführen drücken Sie Ausführen im Startmenü oder in die Adressleiste des Internet Explorers ein Beispiel Wenn ...

Страница 75: ...rmware ist das Betriebssystem OS welches auf dem Player installiert ist Firmware Updates können neue Funktionen Verbesserungen und Fehlerkorrekturen enthalten Um zu ermitteln welche Firmwareversion auf dem Player installiert ist 1 Wählen Sie Info im Setup Menü 2 Die Firmware Version wird unter SW Version angezeigt 3 Vergleichen Sie die Nummer mit der neuesten Version Laden Sie die neueste Version ...

Страница 76: ...hse Warten Sie mindestens 3 Sekunden und lassen Sie dann den Standby Schalter wieder los Die Installation der Firmware wird nach 30 Sekunden gestartet Die LEDs an der Frontblende werden aufleuchten und während der Installation blinken Wenn das Gerät mit einem Fernseher verbunden ist wird der Installationsstatus angezeigt Bitte warten Sie etwa 2 Minuten Die Installation wird dann abgeschlossen sein...

Страница 77: ... Audio Codecs z MP2 MP3 OGG Vorbis WMA Standard DRM Pro Advanced Profile werden nicht unterstützt PCM Unterstützte Untertitel Formate z SRT SMI SSA IDX SUB SUB Unterstütze Speichermedien zur Aufnahme z Eingebaute Festplatte z USB Festplatte Video Aufnahmemodi Auswahl Mode 80 GB HDD 120 GB HDD 160 GB HDD HQ 16Std 24Std 33Std SP 32Std 48Std 66Std LP 48Std 72Std 99Std EP 64Std 96Std 132Std SLP 96Std ...

Страница 78: ...N USB Adapter ANALOG TV SYSTEM Frequenz Band 44 25MHz 863 25MHz VHF I III UHF Video PAL B G D K I SECAM L und L Audio Stereo Mono Analog TV Tuner 75 Ohm VHF UHF TV Analog Antenne oder Kabel DIGITAL TERRESTRIAL TV SYSTEM Frequenz Band 44 25MHz 863 25MHz VHF I III UHF COFDM 2K FFT or 8K FFT COFDM Demodulator Fully DVB T compliant ETS 300 744 Code Rate 1 2 2 3 3 4 5 6 and 7 8 Guard Interval 1 4 1 8 1...

Страница 79: ...ft keine eigene Stromversorgung haben Frage 2 Wenn ich den Player entfernen will erhalte ich die Meldung Probleme beim Auswerfen von USB Massenspeicher Das Gerät Standartdatenträger kann zurzeit nicht deaktiviert werden Wiederholen Sie den Vorgang später Was soll ich tun Antwort Schließen Sie alle Programme die auf die Festplatte zugreifen könnten einschließlich des Windows Explorers Falls dies ni...

Страница 80: ... Modi Der Player unterstützt nicht alle Modi Sie müssen das Bildformat wie folgt ändern 1 Benutzen Sie z B Photoshop um das Bild zu öffnen 2 Wählen Sie die Datei aus und wählen Sie speichern unter Wählen Sie JPEG als Format tragen Sie den Dateinamen ein und drücken Sie speichern 3 Ein neues Fenster erscheint Wählen Sie Baseline Standard oder Baseline optimized 4 Drücken Sie OK Frage 7 Wenn ich den...

Страница 81: ... bitte die Systemeinstellungen auf die Werkseinstellungen zurück Kapitel 7 7 Systemeinstellungen Frage 12 Ich kann keine SSID empfangen Es wird immer Can t get any SSID angezeigt Antwort Wenn der WLAN USB Adapter am Player angeschlossen wird dauert es einige Zeit bis dieser initialisiert ist Bitte warten Sie 1 2 Minuten und versuchen Sie es dann noch einmal Frage 13 Ich habe alles korrekt Eingeric...

Страница 82: ... Copyright Gesetz dürfen die aufgenommen Daten nur für die persönliche Nutzung verwendet werden Trademarks Microsoft und Windows sind eingetragene Warenzeichen der Microsoft Corporation Alle anderen Warenzeichen sind rechtmäßiges Eigentum ihrer Urheber 12 4 Garantie Unsere Garantie deckt nicht ab Durch natürliche Einflüsse entstandener Schaden wie z B Feuer oder statische Entladung Schäden durch u...

Страница 83: ...82 159 www fantec de ...

Страница 84: ...83 159 Multimedia DVB T Recorder Player FANTEC MM HDRTV User s Manual www fantec de ...

Страница 85: ... 106 4 1 Watching DVB T TV programs 106 4 2 Watching Analog TV programs 108 5 The Title List Menu for Recorded Videos 109 5 1 Title List Menu 109 5 2 Playing Back Titles 110 5 3 Deleting Titles 110 5 4 Renaming Titles 110 5 5 Sorting Files 111 5 6 Title Edit Menu 112 5 7 Tools 115 5 8 Saving Your Recorded Titles 115 6 Timer Record Menu 116 6 1 Create a New Schedule 116 6 2 Editing Schedule 117 6 3...

Страница 86: ...hotos 142 8 4 Browsing Movies 143 8 5 Browsing via Network 143 8 6 Renaming Deleting Files 146 8 7 Managing the Playlist 147 9 File Copy Menu 149 10 NAS Function 151 11 Upgrading the Firmware 152 12 Appendixes 154 12 1 Specifications 154 12 2 Frequently Asked Questions 156 12 3 Copyrights and Trademarks 158 12 4 Warranty 159 www fantec de ...

Страница 87: ...enjoy chasing playback of live TV programs Movie Playback supports VOB DVD IFO DVD MPG MPEG 2 1 AVI MPEG 4 ASP XviD DAT VCD and MPEG 2 TS files resolution up to 1080i Music Playback supports MP3 OGG and WMA files supports one button playlist music playback Photo Playback supports digital camera JPEG and BMP files Data Storage works as a portable hard disk using USB 2 0 port USB HOST supports two U...

Страница 88: ...mote Control 1 Remote Control Battery 2 AC DC adaptor 1 AC DC adaptor Power Cord 1 Wireless LAN USB Adapter 1 optional DVB T Antenna 1 optional 2 Way RF Splitter 1 User Manual printed 1 Quick Start Guide 1 Driver CD 1 Note The actual contents in the package might be different from the packing list in this manual www fantec de ...

Страница 89: ...he design of this player has followed the FCC CE standard and has followed the following rules 1 This player may not cause harmful interference 2 This player could accept some interference received including interference that may cause undesired operation 1 3 4 Repair If the player has a problem you should take it to an appointed repair center and let the specialists do the repair never repair the...

Страница 90: ...Electronic products are vulnerable when using please avoid shaking or hitting the player and do not press the buttons too hard Do not let the player come into contact with water or other liquid Do not disassemble the player repair the player or change the design of the player any damage done will not be included in the repair policy Do not press the buttons of the player too hard Avoid hitting the...

Страница 91: ...of the USB cable to this player s USB DEVICE port 3 Plug in the rectangular connector of the USB cable to computer 1 4 2 USB Mass Storage Device like USB stick MP3 USB HDD etc Connection 1 Make sure the player is powered on 2 Plug in the USB stick or USB HDD etc to one of the USB host ports of this player www fantec de ...

Страница 92: ... A V OUT jack of the TV IPTV Set Top Box STB In this way you can record TV programs from the TV IPTV Set Top Box 1 4 3 2 A V OUT 1 Follow the picture and plug in the 3 color connector to the player s A V OUT jack 2 Follow the picture and plug in the 3 color connector to the TV s A V IN jack In this way you can enjoy the content in the player on TV or other display devices www fantec de ...

Страница 93: ...dio output from the A V OUT jack Second method use the audio output from the S PDIF Coaxial or Optical jack In this way you can also enjoy videos music and photos in the player on TV 1 4 3 4 HDMI OUT 1 Follow the picture and plug one connector on your HDMI cable to the player s HDMI jack 2 Follow the picture and plug the other connector on your HDMI cable to the TV s HDMI jack In this way you can ...

Страница 94: ...n the RCA connector on your coaxial cable to the player s S PDIF Coaxial jack Or if you use optical fiber please plug in the Toslink connector on your optical fiber to the player s S PDIF Optical jack not supplied 2 Follow the picture and plug in the other connector on your coaxial cable or optical fiber to the digital audio device not included in delivery www fantec de ...

Страница 95: ...he AC adaptor to the power outlet 1 4 6 Ethernet connection To connect to a LAN Local Area Network you require a cat5 cat5e or cat6 network cable 1 Connect one of the crystal plugs on the cable to the player s RJ45 LAN socket 2 Connect the other crystal plug on the cable to a RJ45 LAN port on your router switch or hub devices www fantec de ...

Страница 96: ...95 159 1 4 7 WLAN connection 1 Make sure the player is powered on 2 Plug the Wireless LAN USB Adapter i e Wi Fi USB Dongle to the USB HOST port of the player www fantec de ...

Страница 97: ... 5 3 Power on off language control 1 Power on After connecting the power supply cord and turning on the POWER switch the player will soon enter the main interface and the POWER indicator on the front panel will turn blue 2 Power off When the system is running press the POWER STANDBY button on the front panel or remote control the player will enter standby mode 3 Language control The system languag...

Страница 98: ...ion 1 POWER STANDBY 2 INFO 3 MENU 4 MUSIC 5 TV SYSTEM 6 SOURCE 7 HOME 8 UP 9 LEFT 10 DOWN 11 Numeric buttons 12 TIME SHIFT 13 REC 14 PLAY 15 TIMER 16 PAUSE 17 RECLIST 18 FR 19 A B 20 SUBTITLE 21 RED 22 EPG GREEN 23 TTX YELLOW 24 BLUE 25 REPEAT 26 AUDIO 27 FF 28 NEXT 29 SLOW 30 PREV 31 STOP 32 GOTO 33 ENTER 34 RIGHT 35 RETURN 36 VOL 37 VOL 38 COPY 39 ZOOM 40 SETUP 41 MUTE www fantec de ...

Страница 99: ...rent channel number and time z Press during time shifting to turn the time shifting bar on off 3 MENU button Press to activate tools menus z Press in the browser menu to rename and delete files z Press in My_Shortcuts in NET of the browser menu to add shortcuts for network access 4 MUSIC button Press to start playing music in the playlist 5 TV SYSTEM button Press to switch between NTSC PAL 480P 57...

Страница 100: ...rom the point you left it While paused the program is recorded to the internal HDD as long as the space is available Press to activate the time shift function and wait for the play arrow to appear on the screen Press the PAUSE button and the program will be paused Press the PLAY button to resume viewing the program Time shift mode remains active until you press the STOP button or the TIME SHIFT bu...

Страница 101: ...he playlist 22 Green EPG GREEN button z Press to enter the Electronic Program Guide which displays an on screen list of programs for the coming week when watching Digital Terrestrial TV z Press to add the selected files to the playlist 23 Yellow TTX YELLOW button Press to open teletext OSD if it is available in the broadcasted stream of Digital Terrestrial TV 24 Blue BLUE button Reserved button No...

Страница 102: ...last two viewed channels while watching DVB T TV 33 ENTER button Press to select options in menus 34 RIGHT button Press to move the highlight right while navigating menus 35 RETURN button Press to return to the previous screen while navigating menus 36 VOL button Press to decrease the volume 37 VOL button Press to increase the volume 38 COPY button Press to enter the file copy menu 39 ZOOM button ...

Страница 103: ... 1 POWER STANDBY button Press to enter standby mode or wake up 2 HDD Status LED Indicator flashes when the HDD is working 3 Recording LED Indicator turns on when recording starts 1 Standby button 2 HDD Status LED 3 Recording LED www fantec de ...

Страница 104: ...l 4 Video OUT jack 5 Audio IN jack Left Channel 6 Video IN jack 7 S PDIF Coaxial jack 8 POWER switch 9 TV RF IN socket 10 DC IN jack 11 RJ45 LAN socket 12 HDMI jack 13 S PDIF Optical jack 14 Audio IN jack Right Channel 15 Audio OUT jack Right Channel 16 USB DEVICE port 17 USB HOST port x 2 www fantec de ...

Страница 105: ...ntrol 3 1 Selecting DVB T TV In this menu you can watch and record Digital Terrestrial TV programs or have the time shift function Select the DVB T icon on the main interface to enter this menu 3 2 Selecting Analog TV In this menu you can watch and record Analog TV programs or have the time shift function Select the Analog TV icon on the main interface to enter this menu www fantec de ...

Страница 106: ...programs you can also merge split delete or edit all the recorded titles Select the Playback icon on the main interface to access the title list menu 3 5 Selecting Browser Playback Multimedia Files You can browse all the multimedia Videos Music Photos files on the internal HDD USB or Network and playback them on TV Press the browser button on the remote control or select the Browser icon on the ma...

Страница 107: ...de PREV NEXT Numeric buttons Press to input channel numbers Press the ENTER button to confirm GOTO Press to switch between the last two viewed channels REC Press to start recording the current TV program TIME SHIFT Press to activate the time shift function TIMER Press to edit scheduled recordings EPG Press to activate the EPG menu if available TTX Press to activate the teletext menu if available S...

Страница 108: ...SD Standard Definition HD High Definition When the string looks concave the option will be available 4 1 3 Electronic Programming Guide Press the EPG button when watching DVB T TV programs the Electronic Programming Guide will be displayed Press the PREV NEXT button to change channels Press the LEFT RIGHT button to change date Press the UP DOWN button to change program Press the TIMER button to ad...

Страница 109: ...hing Analog TV programs To enter the Analog TV mode select the Analog TV icon on the main interface The following are some functional buttons on the remote control available during watching Analog TV programs Name Function UP DOWN Press to switch channels Channels cannot be switched in the recording mode PREV NEXT Numeric buttons Press to input channel numbers Press the ENTER button to confirm REC...

Страница 110: ... view and edit recorded DVB T or Analog TV programs 5 1 Title List Menu Number Function Description 1 Menu Bar Press the LEFT RIGHT button to scroll through the menu Here you can Play Delete Rename Sort Edit a recorded title 2 Title Lists Here lists all recorded titles Here you can see thumbnail length quality recorded channel recorded date time of a title A sign shows this recorded title has not ...

Страница 111: ...he Title List menu screen 5 3 Deleting Titles To delete a title do the following 1 Press the LEFT RIGHT button on the remote control to select the Delete tab from the menu bar 2 Press the UP DOWN button on the remote control to select the title you wish to delete 3 Press the ENTER button mark the file 4 A confirmation message appears Press the UP DOWN button and select OK 5 Press the ENTER button ...

Страница 112: ...l changes If you want to cancel the renaming during the process press the RETURN button 5 5 Sorting Files Press the LEFT RIGHT button on the remote control to select the Sorting tab from the menu bar Press the ENTER button and the menu appears Return Select to return to the main screen Title Number Select to sort all files according to title numbers Recording Time Select to sort all files accordin...

Страница 113: ...ears Return Select to return to the main screen Set Thumbnail Select to change a thumbnail of the selected video Press the UP DOWN button on the remote control to select Set Thumbnail an editing screen appears You can press the FF FR button to fast forward or fast rewind when searching a proper point When you reach the point at which you wish to insert a thumbnail press the LEFT RIGHT button to se...

Страница 114: ...h you wish to split the track press the ENTER button to confirm Merge Title Select more than two titles and combine them into one title A confirmation message appears Select CONFIRM to merge the files Add Chapter Mark Add a chapter mark to the selected file A chapter mark is a marker inserted into the title You can jump between marked sections by pressing the PREV NEXT button on the remote control...

Страница 115: ... the PREV NEXT button to select the mark you wish to remove and press the ENTER button to delete Copy to FAT32 partition Copy function In the Title List Menu press the UP DOWN button on the remote control to select which title you want to copy from the UDF partition to the FAT32 partition www fantec de ...

Страница 116: ...o delete all titles 5 8 Saving Your Recorded Titles All the recorded titles are stored temporarily in a recording disc partition UDF format which cannot be identified by personal computers If you want to share the recorded titles on your computer please copy the titles from the recording disc to the multimedia disc which is in FAT32 format first See Copy to FAT32 partition in 5 6 Title Edit Menu f...

Страница 117: ...s and press the UP DOWN button to adjust each setting Source Select the video source or TV channels for the recording Start Time Enter the date and time of the recording Length Enter the length of the recording Repeat Select how often you want the schedule to record Choose from Once Everyday Mon Fri Mon Sat or for an individual day of the week Quality Select the recording quality Choose from HQ SL...

Страница 118: ...etting screen appears Modify the schedule as described in 6 1 Creating a New Schedule 6 3 Deleting Schedules Press the LEFT RIGHT button on the remote control to select the Delete tab from the menu bar Select the schedule you want to delete and press the ENTER button A confirmation message appears Select CANCEL Delete the selected schedule or Delete all schedules Press the ENTER button to confirm ...

Страница 119: ...chedule and press the ENTER button Select Enable the timer by VPS Enable the timer by user s setting or Pause the selected schedule Press the ENTER button to confirm 6 5 Viewing Recording History Press the LEFT RIGHT button on the remote control to select the History tab from the menu bar Here you can view a complete history of all recordings that were set www fantec de ...

Страница 120: ...s Press the LEFT RIGHT button on the remote control to select the DVB T tab from the menu bar DVB T Region Select to set the region for Digital Terrestrial TV Press the UP DOWN button to select and the ENTER button to confirm Channel Scan Select to scan for available Digital Terrestrial TV channels Press the UP DOWN button to select from AUTO SCAN and MANUAL SCAN and press the ENTER button to conf...

Страница 121: ...H name Bandwidth and Input Frequency Use the Navigational and Numeric buttons on the remote control to select or input Press the ENTER button to confirm Channel Set Select to edit channel information Press the UP DOWN button to select DVB T and press the ENTER button to confirm In this menu you can edit the Name and sequence for the DVB T TV www fantec de ...

Страница 122: ...rt 7 2 Changing Analog TV settings Press the LEFT RIGHT button on the remote control to select the ATV tab from the menu bar Analog TV Region Select to set the region for Analog TV Press the UP DOWN button to select and the ENTER button to confirm Channel Scan Select to scan for available Analog TV channels Press the UP DOWN button to select from AUTO SCAN and press the ENTER button to confirm www...

Страница 123: ...et Select to edit channel information Press the UP DOWN button to select Analog TV In this menu you can edit the Status Name Fine Tune TV System and sequence for the Analog TV channels Use the navigational buttons to select and modify the settings and press the ENTER button to confirm www fantec de ...

Страница 124: ...r Box 4 3 or 16 9 Press the ENTER button to confirm Pan Scan 4 3 Display a wide picture on the entire screen and cuts off the redundant portions Select when a standard 4 3 TV is connected Letter Box 4 3 Display a wide picture with two black borders on the top and bottom of 4 3 screen Select when a standard 4 3 TV is connected 16 9 Compress the image to convert the whole image Select when a 16 9 TV...

Страница 125: ...ENTER button to confirm Contrast Select to set contrast levels Press the UP DOWN button to adjust contrast The new setting is previewed on screen Press the ENTER button to confirm TV System Select to adjust TV system Press the UP DOWN button to set the TV system depending on your viewing preferences Press the ENTER button to confirm www fantec de ...

Страница 126: ...ss the UP DOWN button to select from Off On and Comfort Press the ENTER button to confirm Digital Output Select to set Digital Output S PDIF mode Press the UP DOWN button to select from RAW and LPCM Press the ENTER button to confirm 7 5 Changing Record Settings Press the LEFT RIGHT button on the remote control to select the Record tab from the menu bar www fantec de ...

Страница 127: ...cording quality sequentially but also require less storage space Press the ENTER button to confirm Auto Chapter Select to add chapter marks automatically at set intervals Press the UP DOWN button to select the interval you require An automatic chapter mark will be added at each interval allowing you browse titles easily after recording Press the ENTER button to confirm Permanent Time shift Select ...

Страница 128: ...N button to select from HDD and USB Press the ENTER button to confirm 7 6 Changing Network Settings Press the LEFT RIGHT button on the remote control to select the Network tab from the menu bar Wired LAN Setup Select to set the Ethernet settings Before using the network functions please check following items 5 Connect the player to network first 6 Please enable NetBIOS of TCP IP on computer 7 Plea...

Страница 129: ...tton to confirm FIX IP MANUAL Using Fixed IP it is required to enter the followings IP Address Subnet Mask and Default Gateway For further assistance to the above settings please contact the network administrator Use Navigational and Numeric buttons to enter IP address Press the ENTER button to confirm Wireless Setup Before configuring the WLAN settings please check the following 4 Make sure the W...

Страница 130: ... first time to connect to a wireless network There appear two connection modes Infrastructure AP mode and Peer to Peer Ad Hoc mode Press the LEFT button to cancel and the RIGHT button for next step Press the UP DOWN button to select items and the ENTER button to confirm Infrastructure AP Infrastructure mode is used to connect computers with wireless network adapters also known as wireless clients ...

Страница 131: ...ty list WEP Wired Equivalent Privacy and WPA Wi Fi Protected Access means the network is encrypted i e an encryption key is needed to access the network NONE means it is an open system network 8 Confirm SSID Name 9 WLAN Security Setting Select Open System if the network is not encrypted Otherwise select Shared Key WEP or WPA Key to enter the encryption key www fantec de ...

Страница 132: ... the IP address automatically Or select FIX IP MANUAL to set the IP address manually 11 Setting List The Setting List displays the network settings just now you configured 12 Test Connection The test will take for a while please be patient to wait www fantec de ...

Страница 133: ...lled Ad Hoc mode or computer to computer mode is used to connect wireless clients directly together without the need for a wireless router or access point 3 Ad Hoc Setup Select Manual if you wish to change the default settings Then set the Wireless SSID Wireless Security and Host IP for the Ad Hoc connection www fantec de ...

Страница 134: ...d be put into the same IP range 4 Save and Startup Select OK to confirm the above settings If the test is ok the network information will be displayed NAS Mode Select to turn the NAS mode on off Press the UP DOWN button to select from Off and On Press the ENTER button to confirm www fantec de ...

Страница 135: ...uage Select to choose the OSD On Screen Display language Press the UP DOWN button to select the language Press the ENTER button to confirm Text Encoding Select to set text encoding Press the UP DOWN button to select from Unicode Chinese GBK BIG5 and etc Press the ENTER button to confirm Time Select to set the system time www fantec de ...

Страница 136: ...Press the LEFT RIGHT button to select each field and the UP DOWN button to adjust each setting Press the ENTER button to confirm Parental Control Select to set the TV parental control options Lock System Press the UP DOWN button to turn on or off the parental system Press the ENTER button to confirm www fantec de ...

Страница 137: ...put and the ENTER button to confirm Region Press the UP DOWN button to select the region Press the ENTER button to confirm Password Press the Numeric buttons to input and change the password Press the ENTER button to confirm TV Rating Press the Navigational buttons to select Press the ENTER button www fantec de ...

Страница 138: ...irm Press the LEFT RIGHT button to select OK Press the ENTER button to confirm Press the UP DOWN button to adjust the capacity of time shift buffer Press the LEFT RIGHT button to select Next and the ENTER button to confirm Press the UP DOWN button to adjust the capacities of recording and multimedia partitions Press the LEFT RIGHT button to select www fantec de ...

Страница 139: ...firm Press the LEFT RIGHT button to select Format Press the ENTER button to confirm And the formatting will start which will take some time please be patient to wait When formatting is completed press the ENTER button to reboot Restore Default Select to restore factory defaults A confirmation message appears Select OK and press the ENTER button to restore all settings to defaults www fantec de ...

Страница 140: ...the menu Slide Show Timing Select to set the interval time for photo slide show Press the UP DOWN button to select Press the ENTER button to confirm Transition Effect Select to set the transition effect for photo slide show Press the UP DOWN button to select Press the ENTER button to confirm www fantec de ...

Страница 141: ...TER button to confirm HDD Information Select to view the HDD capacities The capacities of the recording time shift and multimedia partitions are listed here Press the ENTER button to confirm Information Select to view the system information The version of the firmware BIOS and the MAC Address etc are listed here Press the ENTER button to confirm www fantec de ...

Страница 142: ...ia is stored Choose from USB HDD NET Playlist and press the ENTER button When data on HDD USB device is connected or connect the system to network you can also browse photos listen to music and watch movies 8 1 Browsing All Use the LEFT RIGHT button on the remote control to select the All tab All directories and supported contents will be displayed Press the UP DOWN button to select the directory ...

Страница 143: ... and supported image files in current directory will be displayed Press the UP DOWN button to select the photo you want to view and press the ENTER button The photo will be displayed full screen Note 1 When the photo is displayed in full screen mode the slide show starts automatically 2 While listening to music files you can browse the photos at the same time While browsing a photo you can press t...

Страница 144: ...m in out the image Four zoom levels are available 8 5 Browsing via Network You can stream the multimedia files shared on the local area network Ethernet or WLAN Before you read the following chapter please make sure that you have read 7 6 Changing Network Settings and made the right settings When selecting NET in the Browser menu there are two ways to locate the multimedia files shared on your loc...

Страница 145: ...is normal due to the limit of network speed or signal strength 2 Due to different network conditions sometimes the workgroup might not be accessed or shown in the list And then you need to use My_Shortcuts to browse shared files 8 5 2 Browsing through My_Shortcuts You can also set Specific File Server IP and access it from My_Shortcuts in the menu Press the MENU button and a tools menu appears www...

Страница 146: ...ons to select letters and numbers Select CAPS to toggle between uppercase and lowercase letters Press to delete a letter Press to insert a space Press the ENTER button to input each letter or number Select OK and press the ENTER button to confirm all changes Select Net Password and the entry screen will appear See above Select Specific File Server IP and use Navigational and Numeric buttons to ent...

Страница 147: ...ess the ENTER button to confirm Then select the shared multimedia file that you want to browse 8 6 Renaming Deleting Files When navigating in the browser menu you can press the MENU button to activate a popup menu where you can rename and delete files or folders Press the UP DOWN button to select from Return Rename and Delete And press the ENTER button to confirm www fantec de ...

Страница 148: ... the deleting operation Or select Return to cancel Note Partitions of NTFS file system format on the hard disc drive might be read only 8 7 Managing the Playlist This player supports the playlist function which allows you to add your favorite content to the playlist and enjoy them at any time 8 7 1 Adding files to the playlist Select the favorite file you wish to add press the RED button on the bo...

Страница 149: ...st Press the UP DOWN button to select Play List in the browser menu And press the ENTER button to confirm Then you will enter the playlist If you wish to delete a file from the playlist press the RED button to select and then press the GREEN button to confirm www fantec de ...

Страница 150: ...nu which allows you to copy files between HDD USB devices and Network Step 1 Select the source device and destination device Press the UP DOWN button to select device Press the LEFT button to cancel and the RIGHT button for next step Step 2 Select the source files you want to copy www fantec de ...

Страница 151: ...3 Select the destination folder to store the above files Press the UP DOWN button to select folder Press the LEFT button to cancel and the RIGHT button for next step Step 4 Proceed to copy selected files Press the UP DOWN button to select OK press the ENTER button to confirm And the copy will start www fantec de ...

Страница 152: ...6 Changing Network Settings for more details and then type NAS or IP Address in the Run window click Run in the start menu or the address bar of Internet Explorer on your PC For example if the IP address of the player is 192 168 0 9 please type 192 168 0 9 or NAS and click OK or press the Enter button on the keyboard Then you can view and edit the files stored on the hard disk installed on the pla...

Страница 153: ...rmware upgrade Copy the 5 files for upgrade to the root directory of your USB Pen Drive Step 2 Connect the USB Pen Drive Plug the USB Pen Drive into one of the USB HOST ports of the player Step 3 Hold the POWER STANDBY button Press and hold the POWER STANDBY button on the front panel and do not loosen Step 4 Connect the power cable Plug the power cable into the DC IN jack wait for about 3 seconds ...

Страница 154: ...D indicators will go off and the player will be powered off automatically Then you can press the POWER STANDBY button to turn on the player and enjoy Note Do not turn off the power during installation The USB Pen Drive is not allowed to be unplugged during installation www fantec de ...

Страница 155: ...D AUDIO CODECS SURPORTED z MP2 MP3 OGG Vorbis WMA Standard DRM Pro Advanced Profile not supported PCM SUBTITLE FORMATS SURPORTED z SRT SMI SSA IDX SUB SUB RECORDABLE DEVICES SUPPORTED z Built in HDD z USB HDD VIDEO RECORDING MODE Mode 80 GB HDD 120 GB HDD 160 GB HDD HQ 16hrs 24hrs 33hrs SP 32hrs 48hrs 66hrs LP 48hrs 72hrs 99hrs EP 64hrs 96hrs 132hrs SLP 96hrs 144hrs 198hrs VIDEO RECORDING FORMAT z...

Страница 156: ...s supported by optional WiFi USB adapter ANALOG TV SYSTEM Frequency Range 44 25MHz 863 25MHz VHF I III UHF Video PAL B G D K I SECAM L and L Audio Stereo Mono Analog TV Tuner 75 Ohm VHF UHF TV Analog Antenna or cable DIGITAL TERRESTRIAL TV SYSTEM Frequency Range 44 25MHz 863 25MHz VHF I III UHF COFDM 2K FFT or 8K FFT COFDM demodulator Fully DVB T compliant ETS300 744 Code Rate 1 2 2 3 3 4 5 6 and ...

Страница 157: ...ur computer try to use the USB ports in the rear because the USB ports in the front are often from non powered hubs Question 2 When I try to disconnect the USB device I keep on getting The device Generic volume cannot be stopped right now Try stopping the device again later message what should I do Answer Close any program that might be accessing data on the player including Windows Explorer If it...

Страница 158: ...not be shown in the photo function Answer In the JPEG format there are different modes The player doesn t support all the modes So you have to change your photo format first as follow 1 Use Photoshop to open the photo 2 Choose File then save as from the menu as the picture on the left hand side shows select the picture format as JPEG input the file name and click the save icon 3 After click on the...

Страница 159: ...s installed correctly and no system partitions on the HDD were deleted If hard disc failure occurs please backup your data and reinstall the firmware Question11 Some functions like recording time shift etc do not work What should I do Answer If you find some functions do not work properly on the player please change system settings to the default Refer to 6 6 for changing system settings 12 3 Copy...

Страница 160: ...om unauthorized repair alteration or accident Damage from misuse or neglect A unit that has been modified or incorporated into other products or is used for institutional or other commercial purposes Loss of customer s software firmware information or memory data Improper handling or installation www fantec de ...

Отзывы: