7
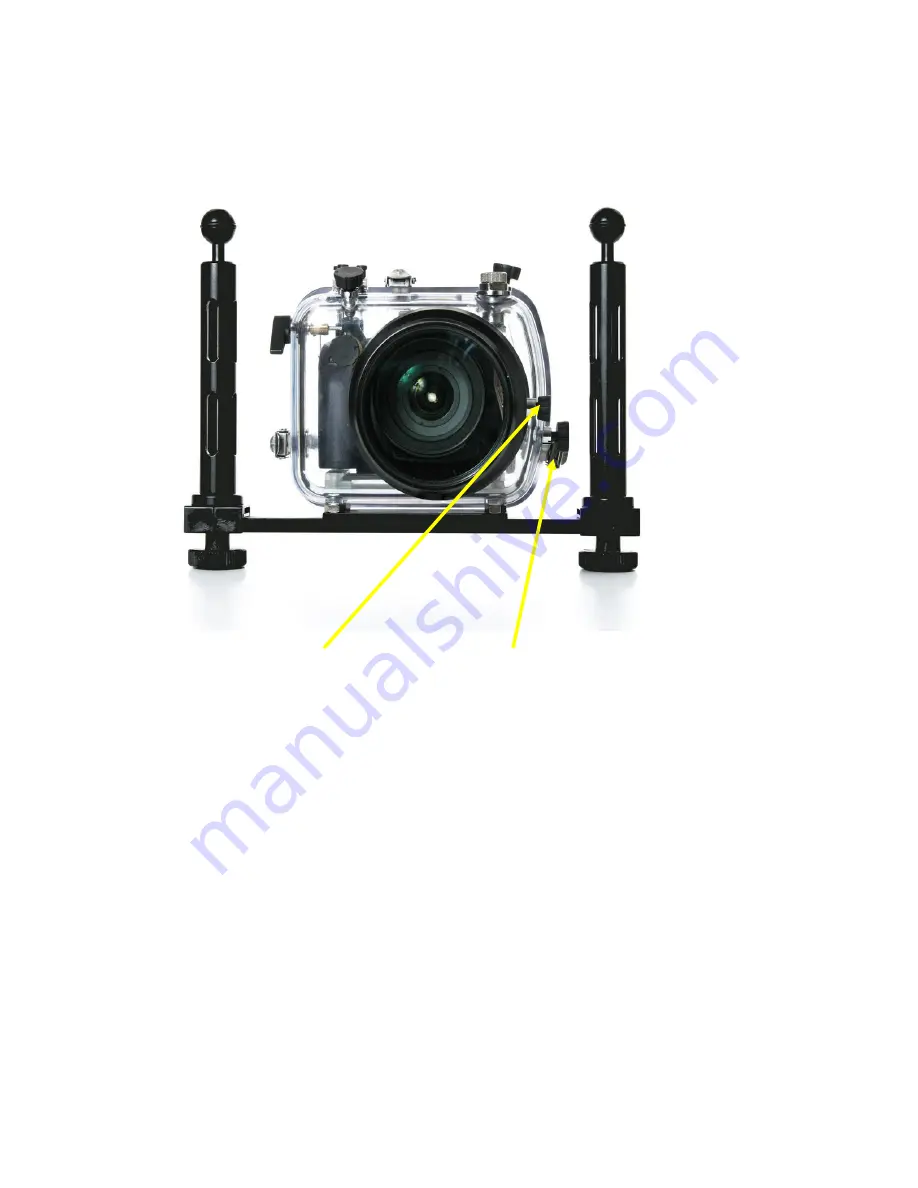
Front View
11. Zoom Port Control 12. Focus Mode Selector
Страница 1: ...Fantasea FD 80 Housing User s Manual ...
Страница 2: ...MODEL 4 A VARIETY OF USES 5 SPECIFICATIONS 5 CONTROLS ORIENTATION 6 CONTROL DETAILS 9 TRAY HANDLE SYSTEM ASSEMBLY 13 PREPARATION OF HOUSING BEFORE THE DIVE 15 USING EXTERNAL STROBES 18 CARE MAINTENANCE 18 BASIC SHOOTING TECHNIQUES 20 CAMERA LENSES AND PORTS 22 FANTASEA FD 80 WARRANTY 22 ...
Страница 3: ... angle fisheye and zoom lenses You will find the housing to be easy and instinctive to use and handle and will have countless dives in which to experiment with the D 80 s advanced imaging capabilities Fantasea Line Photo is pleased to offer our help with any of your photographic needs The purpose of this manual to is to provide you with the basic introduction to your FD 80 which should get you com...
Страница 4: ...ers using gloves Base plate for mounting other tray and arm systems Zoom Control Guide Band that is attached to the camera lens Optical viewfinder eyepiece built into the back cover of the housing to assist the photographer in viewing and focusing A five pin TTL flash sync port to connect with the D 80 s hot shoe Removable camera mounting tray that slides into position with the D 80 attached posit...
Страница 5: ...for many commercial industrial and medical applications because it is impervious to most liquids and sprays Specifications The FD 80 is an injection molded polycarbonate housing The main seal between front and back halves is a Radial O ring The ports are sealed when mounted by 2 O rings one Radial and one Compression type Controls use stainless steel shafts E clips and springs Controls are sealed ...
Страница 6: ... Sync Port 1 Mode Dial 2 Trigger Release Control 3 Latching Buckles 4 Power Switch 5 Exposure Compensation Control 6 Metering Mode 7 Single Continuous Timer Remote Control 8 AF Mode 9 Sub Command Dial 10 Zoom Port Control 11 Focus Mode Selector 12 1 2 3 4 5 6 7 8 9 10 ...
Страница 7: ...7 Front View 11 Zoom Port Control 12 Focus Mode Selector ...
Страница 8: ...k Control 14 Menu 15 Help Protect White Balance 16 Thumbnail ISO sensitivity 17 PlaybackZoom Image Quality Size 18 Main command Dial 19 Four Way Multi Control 4 buttons 20 OK Button 21 Viewfinder 22 AE L AF L Control 23 13 14 15 16 22 11 19 20 21 17 18 23 ...
Страница 9: ...era s main exposure modes Choose Manual Aperture Priority Shutter Priority Program Automatic or any of several Scene Modes Main Shutter Release Control Trigger The camera has a two stage shutter release button The camera sets focus and exposure when the button is pressed halfway Focus and exposure will remain locked while the shutter release button is kept in this position To take the picture pres...
Страница 10: ... independently changes Apertures in M or A exposure mode Or the shutter speed if working the reverse mode Rotating while pushing other control buttons affects the value represented by the control button Zoom Port Control This button activates the zoom lens of the camera Attach the Zoom Control Guide Ring to the lens This is attached using the Velcro strip Insure that the projected nub is directly ...
Страница 11: ...ograph will be marked with a protected icon White Balance To select a value for white balance press the WB button and rotate the main command dial until the desired setting is displayed in the control panel White balance can also be adjusted from the shooting menu Thumbnail ISO sensitivity Thumbnails To display images in contact sheets of four or nine images press the button in full frame playback...
Страница 12: ...ugh Menu options Press Left and Right buttons to make menu settings and confirm settings Use Left and Right buttons in Playback mode to scroll through images recorded on memory card OK Button The OK button authorizes the selections made when the Multi selector buttons are used Pressing OK to authorize confirm your selection Optical Viewfinder Eyepiece Built into the back cover of the housing to as...
Страница 13: ...llel to the three screw holes on the Housing s black attachment plate Please note that the tray should be positioned in a way that the socket on the tray is facing down towards the housing and handles The conical side of the Tray screw holes should be facing up 3 Use a Philips screwdriver in order to screw the three screws you have received with the Housing into the three screw holes on the Tray I...
Страница 14: ...losing the Housing s buckles On the other hand positioning the Handle too far from the Camera Housing might make it difficult to reach the Housing s control buttons while still holding the Handles 3 Insert the Handle screw Item 4 from the bottom of the Tray through the track into the Handle and tighten the screw 4 Do the same for the other Handle on the other side of the Tray You can also find the...
Страница 15: ...or other matter that could compromise the integrity of the seal 5 Clean O ring by soaking in fresh water until all debris is removed 6 Dry O ring with a soft clean cloth Be careful it does not leave any lint on the O ring 7 Lubricate the O ring with the supplied silicone grease Do not over grease the O ring It only requires enough grease to allow it to slip into place and make a seal It should be ...
Страница 16: ...t off back half to open housing Opening the levers To overcome the friction of opening two levers are used to push against the lid with a cam action See picture attached Important Be sure they are inserted all the way flat to the housing before turning to avoid damaging the protrusions on the lid Inspect and clean main O ring Use a clean wet cloth Use only water to clean the O ring sealing surface...
Страница 17: ... position Close all three latches at one time If it is not possible to close all three latches at the same time close the bottom latch first maintaining pressure on the other side Then close the two side latches simultaneously Test all latches carefully to make sure that that are completely locked into place and not just pushed down Try to open them without depressing the Lock Release to make sure...
Страница 18: ... and SB 800 can be used with the D 80 in the iTTL Auto Flash Exposure mode Connect the strobe sync cord to housing s bulkhead sync port On the side of the housing port notice a simple alignment indicator dot The 5 pin cord contains a small channel groove between two of the female pins of the cord You must insert the cord into the port so the groove is aligned with the indicator of the housing This...
Страница 19: ...l its controls operated to visually confirm that it is watertight before descending to depth After a dive o Rinse the housing with a strong stream of fresh water Let it soak for about 20 minutes to allow the water to dissolve any salt residues under the controls or in tight spaces o Operate all the controls while the housing is soaking to help dislodge any salt residue that may be caught under or ...
Страница 20: ...s and full depress movements You will frequently depress the shutter release only half way to activate the exposure meter and auto focus to preview the shooting conditions and make setting changes Once you get the feel for operating the camera control directly you can then try it in the FD 80 using the housing s trigger control in the same manner Use the viewfinder eyepiece o Compose and view expo...
Страница 21: ... speed you would normally set The higher the ISO sensitivity number the more light is captured and the brighter the image Higher ISO sensitivity numbers have more Noise a term that is the digital equivalent of grain in higher speed films Try starting out with a lower ISO sensitivity such as ISO 200 if the lighting conditions permit Get close to you subject when shooting underwater o This will impr...
Страница 22: ...r and is the most common lens first purchased by D 50 owners It does not include a manual zoom control It is meant for use in only one position 60mm Macro Port A very popular port for the workhorse 60mm micro Nikkor lens This lens and port is the ideal combination for capturing the widest variety of fish identification portrait shots in a life size reproduction 105mm Macro Port The micro Nikkor is...