English
- 21 -
The guide can not be displayed if TV input source
is blocked from the
Settings>Channel>Parental
Controls>Inputs Blocked
menu in Live TV mode or
on Home Screen.
Connecting to the Internet
You can access the Internet via your TV, by connecting
it to a broadband system. It is necessary to configure
the network settings in order to enjoy a variety of
streaming content and internet applications. These
settings can be configured from
Settings>Network &
Internet
menu. You can also highlight the Connected/
Not Connected icon on the Home screen and press
OK
to access this menu. For further information refer to
Network & Internet
section under the title of
Settings
.
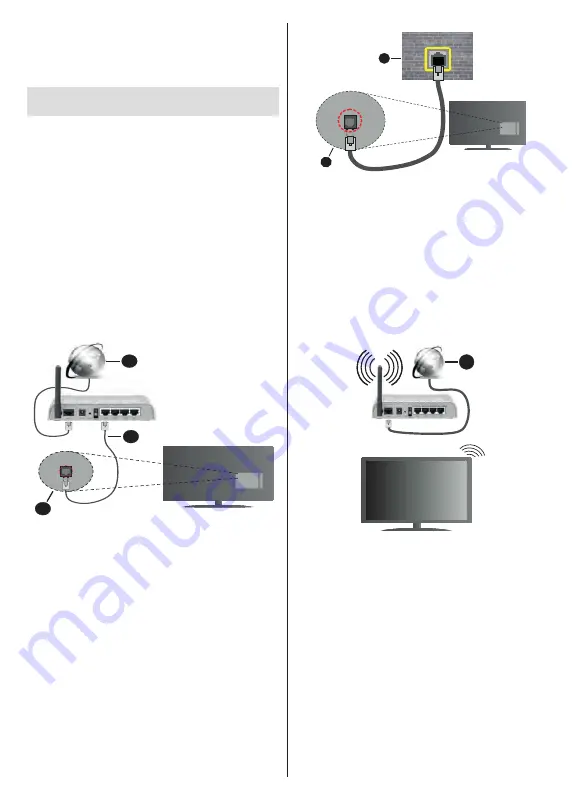
Wired Connection
Connect your TV to your modem/router via an Ethernet
cable. There is a LAN port on the rear side of your TV.
The status of the connection under the
Ethernet
section in the
Network & Internet
menu will change
from
Not connected
to
Connected
.
2
3
1
1.
Broadband ISP connection
2.
LAN (Ethernet) cable
3.
LAN input on the rear side of the TV
You might be able to connect your TV to a network
wall socket depending on your network’s configuration.
In that case, you can connect your TV directly to the
network using an Ethernet cable.
1
2
1.
Network wall socket
2.
LAN input on the rear side of the TV
Wireless Connection
A wireless LAN modem/router is required to connect
the TV to the Internet via wireless LAN.
Highlight
Wi-Fi
option in the
Network & Internet
menu
and press
OK
to enable wireless connection. Available
networks will be listed. Select one and press
OK
to
connect. For more information refer to
Network &
Internet
section under the title of
Settings
.
1
1.
Broadband ISP connection
A network with hidden SSID can not be detected by
other devices. If you want to connect to a network with
hidden SSID, highlight the
Add new network
option
under the
Settings>Network & Internet
menu on
the Home Screen and press
OK
. Add the network by
entering its name manually using the related option.
Some networks may have an authorisation system
that requires a second login as such in a work
environment. In this case, after connecting to the
wireless network you want to connect to, highlight
Notifications
situated on the upper right of the
Home
Screen
and press
OK
. Then highlight the
Sign in to
Wi-Fi network
notification and press
OK
. Enter your
credentials to log in.
A Wireless-N router (IEEE 802.11a/b/g/n/ac) with
simultaneous 2.4 and 5 GHz bands is designed to
Содержание FLA7521UH
Страница 1: ......
Страница 2: ......
Страница 38: ...2 5000 5 cm...
Страница 39: ...3 II i CLASS 1 LASER PRODUCT 1 1 2 2 m...
Страница 42: ...6 ANT LNB 1 2 LNB ANT 1 2...
Страница 44: ...8 220 240 V AC 50 Hz H LED OK OK TV OSD TV TV TV TV Android OK...
Страница 45: ...9 OK TV OK TV...
Страница 49: ...13 OK OK kHz ksym s ID OK DVBS OK DVBS DiSEqC 1 0 DiSEqC 1 1 OK OK SatcoDX DVBS DiSEqC OK SatcoDX OK OK DVBS...
Страница 51: ...15 Google Play TV TV Menu TV TV Exit TV OK OK TV OK TV OK CI CI OK OK PIN MHEG PIN MHEG MHEG PIN...
Страница 54: ...18 OK OK LCN OK LCN OK OK Back OK OK OK OK ID OK Back RF OK LCN LCN LCN OK OK LCN OK...
Страница 55: ...19 LCN OK OK Back OK OK OK OK OK OK OK OK OK OK...
Страница 56: ...20 PIN PIN 1234 PIN PIN OK PIN OK PIN PIN PIN OK PIN PIN PIN Google Google OK OK OK OK...
Страница 60: ...24 OK OK OK Google Assistant Google MAC AC4 AD OK PIN PIN PIN PIN PIN 1234 Android OK OK OK OK OK...
Страница 61: ...25 OK OK OK OK OK OK OK OK TV OK OK OK OK OK TV LCN OK OK OK Menu OK...
Страница 62: ...26 EPG TV TV TV TV OK TV TV TV OK Ethernet LAN Ethernet 2 3 1 1 ISP 2 LAN Ethernet 3 LAN Ethernet...
Страница 64: ...28 USB FAT32 MENU OK OK USB OK OK OK OK...
Страница 65: ...29 OK OK OK OK 90 OK OK OK...
Страница 67: ...31 USB HD USB HDD USB HDD OK TV OK OK Back Return _ _ _ USB USB Exit USB TV OK OK OK USB FAT32 TV OK OK OK OK...
Страница 70: ...34 Android OK OK LED PC...
Страница 80: ......
Страница 81: ......
Страница 82: ......
Страница 83: ......
Страница 84: ......


