background image

Install the DC9V battery into the handheld transmitter. 
Ensure the power is off to the Fan Receiver. While holding down the Fan On/Fan Off 
button, switch the power on to the Fan Receiver and continue to hold down the button for 
5 seconds until the receiver (inside the fan assembly) beeps. This will indicate the 
receiver has learned the frequency that was previously selected on the transmitter. 
 
Note: After the AC power is on, do not press any other button on the transmitter before 
pressing the “OFF” button; doing so will cause the procedure to fail. 
After completing the steps above, you should be able to operate the ceiling fan. If the fan 
is not responding to the transmitter, please turn the power off to the receiver for 60 sec 
and repeat steps 2 and 3 above. 
 
Remove the battery if not used for long periods of time to prevent damage to the hand 
held remote. 
 
For multiple programming multiple fans with individual remote controls ensure each fan 
not being programmed has the power to the Fan Receiver disconnected. 

10 

NOTE

: The Hand Held Remote Control System is 

equipped with a learning frequency function which has 
code combinations to prevent potential interference from 
other remote units. The 
frequency on your Receiver and Transmitter units have 
been preset at the factory. If the remotes need 
programming please following these instructions and 
use a small size tool to change the code switch setting 
for each remote see FIG (3). 


FUNCTIONS OF TRANSMITTER


Содержание ORIGIN CFFCOR4KO

Страница 1: ...it is most important that you read and follow the instructions in this use and care booklet even if you feel you are quite familiar with this type of product Find a safe place and keep this booklet h...

Страница 2: ...xposed to water or moisture is dangerous 9 DO NOT connect the fan motor to a dimmer switch This may give an unsatisfactory performance motor hum and cause damage to the motor and or controller Use ONL...

Страница 3: ...surface to avoid damage DO NOT lay the motor housing on its side the housing may get damaged 2 Before commencing installation check that all parts are included NB You may need to remove all foam packa...

Страница 4: ...ocation you have chosen does not have a suitable support beam capable of supporting 45Kg install a brace 2 x 4 between the ceiling joists as a support medium 5 Secure the hanging bracket to the ceilin...

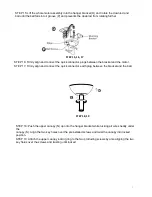
Страница 5: ...ter STEP 4 Feed the main motor wire plug up through the inside of the downrod A then insert the downrod into the motor bush I Cross screws may need to be loosened STEP 5 Gently push the cross pin G th...

Страница 6: ...they are aligned correctly Flip the fan over and install the upper K screws and washers Ensure all 12 blade screws lower and upper are tightened STEP 13 Slide the lower canopy L down over the down ro...

Страница 7: ...EP 17 Firmly align and connect the quick connector earth plug between the bracket and the ball STEP 18 Push the upper canopy N up onto the hanger bracket while tucking all wires neatly under the canop...

Страница 8: ...three screw holes in the light base with the screws on the bottom of the fan twist together and tighten the screws firmly taking sure not to pinch the light plugs and cables INSTALLING THE LIGHT KIT I...

Страница 9: ...ted ball bearing and as such is maintenance free NOISE The manufacturer warranty covers actual faults that may develop but NOT minor complaints e g motor operation noise ALL ELECTRIC MOTORS ARE AUDIBL...

Страница 10: ...the fan is not responding to the transmitter please turn the power off to the receiver for 60 sec and repeat steps 2 and 3 above Remove the battery if not used for long periods of time to prevent dam...

Страница 11: ...not accept in home expenses unless authorisation is granted prior to work commencing and a CA number allocated The in home component of this warranty covers only actual electrical work undertaken on...

Страница 12: ...related issues such as rusting or failure clearly caused by water moisture or wind The Warranty will not cover external appearance or finish of any part of the ceiling fan The Warranty will not cover...

Отзывы: