Fanaway NEXUS Скачать руководство пользователя страница 2

FANAWAY NEXUS    Installation Instructions 


1  | 

P a g e  


THANK YOU FOR PURCHASING 

 
Thank you for purchasing the latest in energy saving ceiling fans. This fan runs on DC (direct current) power 
which gives it the benefit of being super energy efficient whilst still maintaining high volume air-movement 
and silent operation.  
 

Energy saving

 - The DC motor is the latest technology in fan design. Its highly efficient motor saves up to 

65% more energy than ceiling fans with traditional AC motors.   
 

Silent operation

 – This DC fan motor is programmed with a stabilised current which efficiently reduces 

motor noise. 
 

Low operating temperature

 – The DC power is managed effectively which brings down the motor 

operating temperature to less than 50

. This results in a much cooler motor than a standard AC fan and 

increases the longevity of the motor. 
 

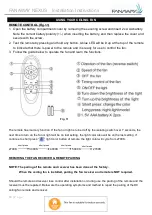
6 speed remote control

 - Regular AC ceiling fans usually come with only 3 speeds, this DC fan comes 

complete with a 6 speed remote, which gives a greater choice of comfort levels. 


SAFETY PRECAUTIONS 

1. 

The appliance is not intended for use by persons (including children) with reduced physical, sensory or 

mental capabilities, or lack of experience and knowledge, unless they have been given supervision or 

instruction concerning the use of the appliance by a person responsible for their safety.   

2. 

Children should be supervised to ensure that they do not play with the appliance. 

3. 

An all-pole disconnection switch must be incorporated into the fixed wiring, in accordance with local wiring 

rules. 

WARNING: 

FOR  SAFE  USE  OF  THIS  FAN  AN  ALL-POLE  DISCONNECTION 

MUST  BE  INCORPORATED  INTO  THE  FIXED  WIRING  IN 

ACCORDANCE WITH THE WIRING RULES. 

As outline in clause 7.12.2 of AS/NZS 60335-1 for meeting the 

minimum electrical safety of this standard.   

Please note warranty will be void if installation is without a means for 

an all-pole disconnection incorporated in the fixed wiring in accordance 

Содержание NEXUS

Страница 1: ...V1 0 AU 07 2022 FANAWAY NEXUS DC CEILING FAN INSTALLATION OPERATION MAINTENANCE WARRANTY INFORMATION CAUTION READ INSTRUCTIONS CAREFULLY FOR SAFE INSTALLATION AND FAN OPERATION...

Страница 2: ...lar AC ceiling fans usually come with only 3 speeds this DC fan comes complete with a 6 speed remote which gives a greater choice of comfort levels SAFETY PRECAUTIONS 1 The appliance is not intended f...

Страница 3: ...be mounted so that the blades are at least 2 1m above the floor 7 This fan is suitable for indoor use only Mounting the fan in a location where it is subject to water or moisture is dangerous and may...

Страница 4: ...n has been damaged during transport Do not operate install any product which appears damaged in any way Return the complete product to the place of purchase for inspection repair or replacement Examin...

Страница 5: ...of carrying a load of at least 23kg with two long screws provided Ensure at least 30mm of the screw is threaded into the support Fig 2 NOTE The bracket screws provided are for use with wooden structu...

Страница 6: ...they are required to reassemble later 2 Loosen the set screws 11 on the down rod coupling housing 8 Fig 4 2 3 Carefully feed the fan wires 1 up through the down rod 6 fig 4 3 4 Assemble the down rod...

Страница 7: ...ver the down rod 6 and install the ball joint 2 and dowel pin 3 back onto the down rod 6 and secure by tightening the set screws 4 Fig 4 5 and Fig 4 6 HANGING THE FAN Lift the fan assembly onto the mo...

Страница 8: ...EIVER TO PAIR TOGETHER NOTE Ensure the motor earth wire is connected to the single earthing terminal block 1 in the diagram below Fig 7 From mains supply to mounting bracket terminal block Fig 7 1 Con...

Страница 9: ...Installation Instructions 8 P a g e Carefully insert the Remote Receiver above the hanger ball in the remainder spacing in the mounting bracket Take care not to damage or loosen any of the wiring Fig...

Страница 10: ...e 2 screws at the bottom of the mouthing bracket 2 Slide the canopy up to the mounting bracket and align the key holes on the canopy with the screws on the mounting bracket Turn the canopy until it lo...

Страница 11: ...n or light is turned off by the isolating switch over 7 seconds the next time to turn on the fan or light will be on last setting the light color also will be on the last setting if continue to short...

Страница 12: ...of a few centimetres is quite acceptable and DOES NOT suggest any problem TO REDUCE THE FAN WOBBLE Please check that all screws which fix the mounting bracket and down rod are secure NOISE When it is...

Страница 13: ...ed Dispose of exhausted batteries immediately and safely so they cannot be retrieved by children Batteries can still be dangerous Contact your local council to safely dispose of the battery Regularly...

Страница 14: ...ng or maintenance using inappropriate cleaning products E Defects caused by normal wear and tear accident negligence alteration or misuse F A product dismantled repaired or serviced by any serviceman...

Страница 15: ...e entitled to a replacement or refund for a major failure and compensation for any other reasonably foreseeable loss or damage You are also entitled to have the goods repaired or replaced if the goods...

Отзывы: