Fanaway NEXUS Скачать руководство пользователя страница 15

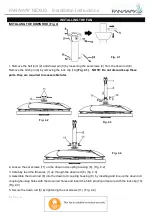
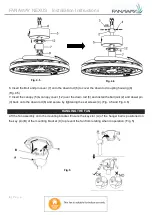
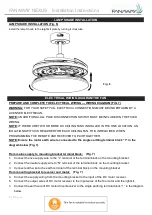
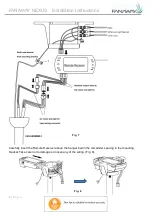
FANAWAY NEXUS    Installation Instructions 


14  | 

P a g e  


PRODUCT TYPE: ...................................................... 

MODEL NUMBER: ..................................................... 

SERIAL NUMBER: ..................................................... 

DATE OF PURCHASE: .............................................. 

INVOICES/SALES DOCKET NO: .............................. 

PURCHASER’S NAME: ............................................. 

PURCHASER’S ADDRESS: ...................................... 

RETAILER’S/DEALER’S NAME: ............................... 

RETAILER’S/DEALER’S ADDRESS: ........................ 

INSTALLED BY: ………………………………………… 

LICENCE NUMBER OF INSTALLER: ………………… 

PHONE NUBER OF INSTALLER: …………………….. 

DESCRIPTION OF FAULT: ……………………………. 


Our goods come with guarantees that cannot be excluded under the Australian Consumer Law. You are entitled to a 

replacement or refund for a major failure and compensation for any other reasonably foreseeable loss or damage. 

You are also entitled to have the goods repaired or replaced if the goods fail to be of acceptable quality and the 

failure does not amount to a major failure. 


CONTACTS: 


Contact Lucci Warranty Service Hotline acting as the service agent for Fanaway on 1800 602 243 between 9AM and 

5PM (E.S.T) Monday to Friday, or go to Website: for more information. 


Distributed by: 

Beacon Lighting 

140 Fulton Drive 

Derrimut, Victoria, 3026 

Australia 

Ph +613 9368 1000 

Email: [email protected] 


Содержание NEXUS

Страница 1: ...V1 0 AU 07 2022 FANAWAY NEXUS DC CEILING FAN INSTALLATION OPERATION MAINTENANCE WARRANTY INFORMATION CAUTION READ INSTRUCTIONS CAREFULLY FOR SAFE INSTALLATION AND FAN OPERATION...

Страница 2: ...lar AC ceiling fans usually come with only 3 speeds this DC fan comes complete with a 6 speed remote which gives a greater choice of comfort levels SAFETY PRECAUTIONS 1 The appliance is not intended f...

Страница 3: ...be mounted so that the blades are at least 2 1m above the floor 7 This fan is suitable for indoor use only Mounting the fan in a location where it is subject to water or moisture is dangerous and may...

Страница 4: ...n has been damaged during transport Do not operate install any product which appears damaged in any way Return the complete product to the place of purchase for inspection repair or replacement Examin...

Страница 5: ...of carrying a load of at least 23kg with two long screws provided Ensure at least 30mm of the screw is threaded into the support Fig 2 NOTE The bracket screws provided are for use with wooden structu...

Страница 6: ...they are required to reassemble later 2 Loosen the set screws 11 on the down rod coupling housing 8 Fig 4 2 3 Carefully feed the fan wires 1 up through the down rod 6 fig 4 3 4 Assemble the down rod...

Страница 7: ...ver the down rod 6 and install the ball joint 2 and dowel pin 3 back onto the down rod 6 and secure by tightening the set screws 4 Fig 4 5 and Fig 4 6 HANGING THE FAN Lift the fan assembly onto the mo...

Страница 8: ...EIVER TO PAIR TOGETHER NOTE Ensure the motor earth wire is connected to the single earthing terminal block 1 in the diagram below Fig 7 From mains supply to mounting bracket terminal block Fig 7 1 Con...

Страница 9: ...Installation Instructions 8 P a g e Carefully insert the Remote Receiver above the hanger ball in the remainder spacing in the mounting bracket Take care not to damage or loosen any of the wiring Fig...

Страница 10: ...e 2 screws at the bottom of the mouthing bracket 2 Slide the canopy up to the mounting bracket and align the key holes on the canopy with the screws on the mounting bracket Turn the canopy until it lo...

Страница 11: ...n or light is turned off by the isolating switch over 7 seconds the next time to turn on the fan or light will be on last setting the light color also will be on the last setting if continue to short...

Страница 12: ...of a few centimetres is quite acceptable and DOES NOT suggest any problem TO REDUCE THE FAN WOBBLE Please check that all screws which fix the mounting bracket and down rod are secure NOISE When it is...

Страница 13: ...ed Dispose of exhausted batteries immediately and safely so they cannot be retrieved by children Batteries can still be dangerous Contact your local council to safely dispose of the battery Regularly...

Страница 14: ...ng or maintenance using inappropriate cleaning products E Defects caused by normal wear and tear accident negligence alteration or misuse F A product dismantled repaired or serviced by any serviceman...

Страница 15: ...e entitled to a replacement or refund for a major failure and compensation for any other reasonably foreseeable loss or damage You are also entitled to have the goods repaired or replaced if the goods...

Отзывы: