background image

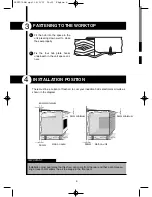
Fit the hob into the space in the
unit pressing down well to close
the seal properly.

Fix the four hob plate hooks
underneath in the unit space cor-
ners.

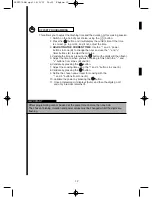
There must be a current of fresh air to cool your induction hob’s electronics circuits as
shown in the diagram.

40mm minimum

50mm

Hob on oven

Hob on unit

50mm

5mm minimum

5mm minimum

6

IMPORTANT

Installation must guarantee that fresh air can come from the rear and that a vent measu-
ring at least 5 mm allows the air to escape in the front part.

3

FASTENING TO THE WORKTOP

4

INSTALLATION POSITION

A

B

C60T376A8.qxd  14/3/07  16:21  Página 6

Содержание IF-800S - 03-07

Страница 1: ...G PT GUIA DE UTILIZAÇÃO P Pl la ac ca a d de e c co oc cc ci ió ón n C Co oo ok ki in ng g H Ho ob b T Ta ab bl le e d de e c cu ui is ss so on n K Ko oc ch hf fe el ld d P Pl la ac ca a d de e c co oz zi in nh ha a ES MANUAL DE UTILIZACIÓN EN GUIDE TO INSTALLATION FR GUIDE D UTILISATION DE BETRIEBSANLEITUNG PT GUIA DE UTILIZAÇÃO ...

Страница 2: ...C60T379A2 qxd 14 3 07 16 10 Página 23 ...

Страница 3: ...MANUAL DE INSTALA C I Ó N Y U S O D E L A P A R A T O C60T357A4 qxd 14 3 07 15 55 Página 1 ...

Страница 4: ...nte de las disposiciones legales y de las exigencias normativas reconocidas en cada país Con la intención de mejorar constantemente nuestros productos nos reservamos el derecho de llevar a cabo modificaciones en sus característi cas técnicas funcionales o estéticas vinculadas a la evolución técnica ADVERTENCIA Colaboramos en la defensa del Medio Ambiente Por esta razón nuestros embalajes Son 100 r...

Страница 5: ...foco 9 Función temporizador 10 Señal sonora 10 Funciones Especiales 11 Mando con funciones básicas 13 Funcionamiento 13 Encendido de un foco 13 Funcionamiento temporizador 13 Señal sonora 13 Función P P punto Función de calentamiento rápido 13 Mando compacto 14 Funcionamiento 14 Encendido de un foco 14 Señal sonora 14 Funcionamiento temporizador 14 3 SEGURIDAD 15 Seguridad en el funcionamiento 16 ...

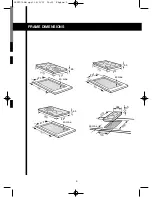
Страница 6: ... ser de al menos 40 mm zona A Pegue la junta de espuma debajo de la placa siguiendo el contorno de las superficies de apoyo con su encimera De este modo conseguirá una buena estanqueidad con la encimera Fije los enganches de la placa al mueble No utilizar materiales no removibles como la silicona 4 A A A B B C B C D D Entrada de aire 580 490 64 40 4 0 4 0 A 560 510 Salida de aire Vidrio vitrocerám...

Страница 7: ...DIMENSIONES DE ENCASTRE 5 65 65 65 288 65 40 máx 60 máx 40 máx 40 máx 510 510 490 510 410 440 4 9 0 490 930 930 770 900 900 270 750 C60T357A4 qxd 14 3 07 15 55 Página 5 ...

Страница 8: ... de su placa de inducción deben enfriarse por una corriente de aire fresco como se indica en el esquema 40mm mínimo 50mm Placa sobre Horno Placa sobre Mueble 50mm 5mm mínimo 5mm mínimo 6 IMPORTANTE La instalación debe garantizar que llegue aire fresco por la parte trasera y que tenga una salida en la parte delantera de al menos 5 mm 3 FIJACIÓN EN LA ENCIMERA 4 LUGAR DE INSTALACIÓN A B C60T357A4 qx...

Страница 9: ...16 2 200w 2 000w 18 2 800w 2 800w 21 3 100w 3 100w 28 3 600w 2 800w TIPO A TIPO B POTENCIA DE CADA FOCO TIPO DE APARATO 1 Los aparatos tipo A llevan mandos con funciones especiales o con funciones basicas Los aparatos tipo B llevan mandos compactos C60T357A4 qxd 14 3 07 15 55 Página 7 ...

Страница 10: ...o con funciones básicas Mando compacto Permite ver sobre la placa la situación de cada foco Permite bloquear los demás sensores para evitar que los niños puedan jugar con los mismos Permite seleccionar el tiempo de cocción del foco elegido entre 0 y 99 minutos Si pulsamos el y el al mismo tiempo el temporizador se pone a 0 Si se mantienen pulsados dichos botones la velocidad de avance de los minut...

Страница 11: ...ecuada manteniendo el dedo encima Al hervir líquidos sobre todo en potencias altas se oirá un zumbido debido al acopla miento de las frecuencias de los focos IMPORTANTE ENCENDIDO DE UN FOCO Siempre que desee podrá activar el sensor de seguridad manteniendo el dedo encima durante tres segundos Si deja algún objeto encima de los sensores la placa emitirá unos pitidos y se apagará La placa se apaga a...

Страница 12: ...ctivar o desactivar cuando la placa está apagada Para desactivar la señal sonora pulse simultaneamente los mandos de potencia y del temporizador en la placa de mandos de la zona de cocción derecha o trasera derecha según modelos hasta que aparezca el símbolo bE Ep tenga pulsado hasta que desaparezcan los dígitos Para activar la señal sonora pulse simultáneamente los mandos de potencia y del tempor...

Страница 13: ...siguientes pasos Modificación de la potencia del acceso directo Estando el foco apagado 1 Mantener pulsado el botón hasta que suena un bip 2 Se visualiza la potencia definida de forma intermitente 3 Modificar la potencia con los botones y de potencia B 4 Volver a pulsar el botón para validar la operación 5 Apagar el foco BOOSTER Las zonas de cocción están dotadas de función BOOSTER Esta función su...

Страница 14: ... la hora en que se quiere que se acabe de cocinar con los botones y de las zonas B y E 6 Validar pulsando el botón 7 Ajustar la duración del cocinado con los botones y de la zona E 8 Validar pulsando el botón 9 Definir la potencia deseada para el cocinado con los botones y de la zona B 10 Validar la potencia pulsando el botón 11 Una vez programado se visualiza Au to y a continuación los dígitos se...

Страница 15: ...rentemente utilice las zonas de cocción situadas en lados diferentes Si se eligen en el mismo lado la utilización de una zona de cocción a máxima potencia provoca una autolimitación de la otra zona de cocción situadad en el mismo lado visible en los indicadores de potencia IMPORTANTE Después de seleccionar la potencia P P punto si no se elige la potencia de trabajo final la potencia del foco se ma...

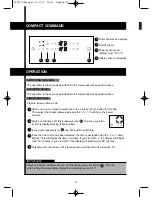
Страница 16: ... en los mandos con funciones especiales SEÑAL SONORA Encender un foco Para encender el foco pulse el botón de dicho foco A continua ción seleccionar la potencia deseada con los botones ó de los sensores de potencia Encender el temporizador Para ello pulsar Se visualiza la zona que se quiere temporizar por medio de estos símbolos Pulsando repetidamente el botón la posición del foco a temporizar va ...

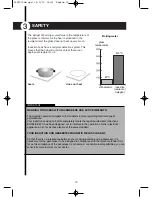
Страница 17: ...erfectamente a las exigencias legales direc tivas 89 336 CEE Ha sido diseñada para no interferir en el funcionamiento de los demás aparatos eléctricos en la medida en que éstos respeten esta misma normativa SU PLACA DE INDUCCIÓN GENERA CAMPOS MAGNÉTICOS EN SU ENTORNO MÁS CERCANO Para que no haya interferencias entre su encimera de cocción y un estimulador cardiaco es necesario que este último haya...

Страница 18: ...metálico colocado sobre las teclas de mando Limpie o retire el objeto y vuelva a poner en marcha la cocción AUTO STOP SYSTEM Si se olvida de apagar un foco su placa está equipada con una función de seguridad AUTO STOP SYSTEM que cortará automáticamente la zona de cocción después de un tiempo ya fijado entre 1 y 10 horas según la potencia empleada En caso de que se active esta seguridad el corte de...

Страница 19: ...s adecuado lo sabrá porque la potencia del indicador parpadeará Únicamente el vidrio el barro el aluminio sin fondo especial el cobre y algunos aceros inoxidables no magnéticos no son aptos para la cocción por inducción 4 RECIPIENTES QUÉ ZONA DE COCCIÓN UTILIZAR EN FUNCIÓN DEL RECIPIENTE Procurar no mover los reci pientes rozando el vidrio de la placa Levántelos para desplazarlos No deje utensilio...

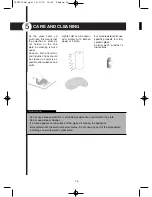
Страница 20: ... laminado o con un paño Para las suciedades más resistentes utilice productos específicos para vidrios vitrocerá micos Utilícelos siguiendo las instrucciones que los acompañan IMPORTANTE No utilice productos abrasivos o polvos de fregar Se puede rayar la placa No utilizar un limpiador de vapor Si apareciera una fisura en la superficie del vidrio desconecte inmediatamente el aparato de la fuente de...

Страница 21: ... L2 antes de efectuar la conexión Separe los 2 cables de fase L1 L2 y Neutro N1 N2 antes de efectuar la conexión Neutro N Fase1 L1 Fase2 L2 Tierra Neutro 1 Neutro 2 N1 N2 Fase1 L1 Fase2 L2 Tierra CONEXIÓN ELÉCTRICA CABLES DE 3 HILOS CABLES DE 5 HILOS 6 400 V 3N trifásica Fusible 16 amperios Neutro N Fase L1 Tierra Marrón Verde Amarillo Azul 220 240 V monofásica Fusible 16 amperios 16A Verde Amaril...

Страница 22: ...a se suministra con cable de alimentación Si el cable de alimentación está dañado debe ser sustituido por el fabricante servicio postventa o personal autorizado con el fin de evitar un peligro Al poner la placa bajo tensión o después de un corte de corriente prolongado aparecerá un código luminoso en el panel de mandos 220 240 V monofásica Fusible 16 y 32 amperios 32A 16A Neutro N Marrón Verde Ama...

Страница 23: ...La conexión de su placa es defectuosa Funcionamiento normal Aparato nuevo El circuito electrónico funciona mal La placa está bloqueada Se ha producido un des bordamiento o un objeto ostruye el panel de man dos Los circuitos electrónicos se han recalentado El recipiente utilizado no es apto para la inducción o tiene un diámetro interior a 12 cm 10 cm en foco de 16 cm Normal con ciertos tipos de rec...

Страница 24: ...var el medio ambiente entregue su aparato usado en un centro oficial de recogida o recuperación de materiales reciclables Antes de deshacerse de su aparato usado inutilícelo cortando el cable de conexión con el enchufe 22 C60T357A4 qxd 14 3 07 15 56 Página 22 ...

Страница 25: ...23 C60T357A4 qxd 14 3 07 15 56 Página 23 ...

Страница 26: ...03 07 C60T357A4 Impreso en papel reciclado C60T357A4 qxd 14 3 07 15 56 Página 24 ...

Страница 27: ...C60T379A2 qxd 14 3 07 16 10 Página 23 ...

Страница 28: ...C60T379A2 qxd 14 3 07 16 10 Página 23 ...

Страница 29: ...APPLIANCE INSTALLA T I O N A N D U S A G E M A N U A L C60T376A8 qxd 14 3 07 16 21 Página 1 ...

Страница 30: ... by a specialist who is aware of the legal procedures and the standard requirements in each country In order to constantly improve our products we reserve the right to make tech nical evolution modifications to their technical functional or aesthetic features WARNING We work to protect the Environment For this reason our packaging Is 100 recyclable Has the smallest possible amount of parts and mat...

Страница 31: ... 9 Switching on a hob 9 Timer function 10 Acoustic signal 10 Special Functions 11 Command with basic functions 13 Operation 13 Switching on a hob 13 Timer function 13 Acoustic signal 13 P function P point Fast heating function 13 Compact command 14 Operation 14 Switching on a hob 14 Acoustic signal 14 Timer function 14 3 SAFETY 15 Safety in operation 16 4 CONTAINERS 17 5 CARE AND CLEANING 18 6 ELE...

Страница 32: ...r panel must be at least 40 mm zone A Glue the foam joint underneath the hob plate following the outline of the support surfaces with your worktop In this way you will get good sealing against the worktop Fix the hob plate s hooks to the unit Do not use material which cannot be removed such as silicon 4 A A A B B C B C D D Air inlet 580 490 64 40 4 0 4 0 A 560 510 Air outlet Vitroceramic glass Pow...

Страница 33: ...FRAME DIMENSIONS 5 65 65 65 288 65 40 máx 60 máx 40 máx 40 máx 510 510 490 510 410 440 4 9 0 490 930 930 770 900 900 270 750 C60T376A8 qxd 14 3 07 16 21 Página 5 ...

Страница 34: ...ool your induction hob s electronics circuits as shown in the diagram 40mm minimum 50mm Hob on oven Hob on unit 50mm 5mm minimum 5mm minimum 6 IMPORTANT Installation must guarantee that fresh air can come from the rear and that a vent measu ring at least 5 mm allows the air to escape in the front part 3 FASTENING TO THE WORKTOP 4 INSTALLATION POSITION A B C60T376A8 qxd 14 3 07 16 21 Página 6 ...

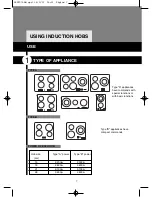
Страница 35: ... 200w 2 000w 18 2 800w 2 800w 21 3 100w 3 100w 28 3 600w 2 800w TYPE A TYPE B POWER OF EACH HOB TYPE OF APPLIANCE 1 Type A appliances have commands with special functions or with basic functions Type B appliances have compact commands C60T376A8 qxd 14 3 07 16 21 Página 7 ...

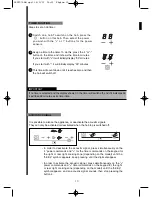
Страница 36: ...unctions Compact command Allows you to see the situation of each hob on the top Allows the other sensors to be blocked to prevent children playing with them Allows you to select the cooking time for the chosen hob between 0 and 99 minutes If we press and at the same time the timer is set to 0 If these buttons are held down the minutes increase at a faster rate Allows you to carry out special funct...

Страница 37: ... your finger down When boiling liquids particularly using high power levels you will hear a buzzing sound due to the hob frequency coupling IMPORTANT SWITCHING ON A HOB Whenever you wish you can activate the safety sensor by holding your finger over it for three seconds If you leave an object on top of the sensors the hob top will beep and switch off The hob top switches off automatically after an...

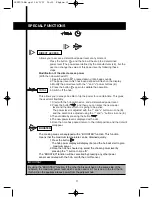
Страница 38: ...he hob top is switched off In order to deactivate the acoustic signal press simultaneously on the power commands and for the timer commands on the keypad for the right or rear right cooking zone depending on the model until the bE Ep symbol appears keep pressing until the digits disappear In order to activate the acoustic signal press simultaneously on the power commands and timer commands on the ...

Страница 39: ...cation of the direct access power With the hob switched off 1 Keep the button pressed down until a beep sounds 2 The power level which has been defined will flash on the display 3 Modify the power level with the and power buttons B 4 Press the button again to validate the operation 5 Switch off the hob BOOSTER The cooking areas are equipped with a BOOSTER function This function means that the maxi...

Страница 40: ...gits will then flash 5 Adjust the time to when you wish cooking to finish with the and buttons from zones B and E 6 Validate by pressing the button 7 Adjust the cooking time using the and buttons in zone E 8 Validate by pressing the button 9 Define the chosen power level for cooking with the and buttons from zone B 10 Validate the power by pressing the button 11 Once programmed it displays Auto an...

Страница 41: ...erably use cooking zones situated on different sides If you choose them on the same side using the cooking zone at maximum power limits the other cooking zone situated on the same side which is visible in the power indicators IMPORTANT After selecting the power P P point if you do not choose the final working power the hob power will be maintained at P Whilst P is displayed P point any action on t...

Страница 42: ... functions ACOUSTIC SIGNAL Switch on a hob In order to switch the hob on press the button for this hob Then select the chosen power level using the or buttons on the power sensors Switch on the timer For this purpose press The zone you wish to time is displayed using these symbols If you press repeatedly on the hob position will rotate Once the hob to time has been selected the time is assigned us...

Страница 43: ...ooking hob plate completely meets the legal requirements directives 89 336 CEE It has been designed not to interfere in the operation of other electrical appliances in so far as they also meet the same standard YOUR INDUCTION HOB GENERATES MAGNETIC FIELDS CLOSE BY So that there is no interference between your cooking worktop and a pacemaker it is necessary for the pacemaker to be designed in compl...

Страница 44: ...n the command keypad Clean or remove the object and start cooking again AUTO STOP SYSTEM If you forget to switch off a hob your hob plate is equipped wi th an AUTO STOP SYSTEM safety funct ion which wi l l automat ical ly cut off the cook ing area after a set t ime between 1 and 10 hours depending on the power being used In the event that this safety function is activated the power cut off in the ...

Страница 45: ...ecipient is not appropriate the power indicator will flash Only glass clay aluminium without a special base copper and some non magnetic stainless steels are not suitable for induction cooking 4 RECIPIENTS WHICH COOKING AREA SHOULD I USE FOR EACH RECIPIENT Try not to move the recipients by pulling them over the glass on the plate Lift them to move them Do not leave utensils on the hob when it is o...

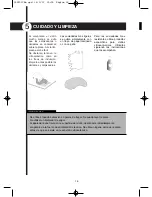
Страница 46: ... simply with kitchen paper or a cloth For more resistant dirt use specific products for vitro ceramic glass Follow each product s instructions IMPORTANT Do not use abrasive products or scrubbing powder You could scratch the plate Do not use a steam cleaner If a crack appears on the surface of the glass disconnect the appliance immediately from the electrical power source Do not use any part of the...

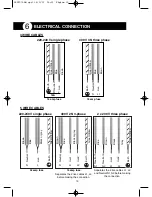
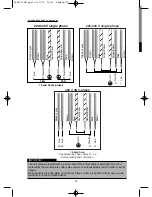
Страница 47: ... L2 before making the connection Separates the 2 live cables L1 L2 and Neutral N1 N2 before making the connection Neutral N Live1 L1 Live2 L2 Earth Neutral 1 Neutral 2 N1 N2 Live1 L1 Live2 L2 Earth ELECTRICAL CONNECTION 3 WIRE CABLES 5 WIRE CABLES 6 400 V 3N three phase 16 amp fuse Neutral N Live L1 Earth Brown Green Yellow Blue 220 240 V single phase 16 amp fuse 16A Green Yellow Blue Neutral N Ea...

Страница 48: ...ob plate is provided with a power cable If the power cable is damaged it must be replaced by the manufacturer after sales service or authorised personnel in order to avoid danger When switching the hob plate on for the first time or after a long time without use a code will light up on the command panel 220 240 V single phase 16 and 32 amp fuses 32A 16A Neutral N Brown Green Yellow Blue Black or g...

Страница 49: ...upply or connection is faulty Connection to your hob plate is faulty Normal operation New appliance The electronics circuit does not work properly The plate is locked There has been an overflow or an object is obstructing the command panel The electronic circuits have overheated The recipient used is not suitable for induction or its diameter is less than 12 cm 10 cm on 16 cm hob Normal with some ...

Страница 50: ...the environment hand in your used appliance to an official collection centre or a recycling centre Before throwing away your used appliance make it unusable by cutting off the connection cable with the plug 22 C60T376A8 qxd 14 3 07 16 21 Página 22 ...

Страница 51: ...23 C60T376A8 qxd 14 3 07 16 21 Página 23 ...

Страница 52: ...03 07 C60T376A8 Printed on recycled paper C60T376A8 qxd 14 3 07 16 21 Página 24 ...

Страница 53: ...C60T379A2 qxd 14 3 07 16 10 Página 23 ...

Страница 54: ...C60T379A2 qxd 14 3 07 16 10 Página 23 ...

Страница 55: ...NOTICE D INSTALLATION E T D U T I L I S A T I O N D E L A P P A R E I L C60T377A6 qxd 14 3 07 16 27 Página 1 ...

Страница 56: ...tre réalisé par un spécialiste au courant des réglementations et des dispositions légales en vigueur dans chaque pays Dans un souci constant d amélioration de nos produits nous nous réser vons le droit de modifier leurs caractéristiques techniques fonctionnelles ou esthétiques conformément à l évolution technique AVERTISSEMENT Nous défendons la préservation de l Environnement Raison pour laquelle ...

Страница 57: ...nction minuterie 10 Avertissement sonore 10 Fonctions Spéciales 11 Bandeau de commandes à fonctions de base 13 Fonctionnement 13 Allumage d un foyer 13 Fonctionnement minuterie 13 Avertissement sonore 13 Fonction P P point Fonction échauffement rapide 13 Bandeau de commandes compact 14 Fonctionnement 14 Allumage d un foyer 14 Avertissement sonore 14 Fonctionnement minuterie 14 3 SÉCURITÉ 15 Sécuri...

Страница 58: ...a plaque et le mur ou paroi latéral ou arrière Collez le joint d étanchéité sous la plaque sur tout le pourtour de la surface d appui du plan pour assurer la parfaite étanchéité du joint Fixez les supports de la plaque au meuble Ne pas utiliser de matériaux non amovibles comme de la silicone 4 A A A B B C B C D D Entrée d air 580 490 64 40 4 0 4 0 A 560 510 Sortie d air Verre vitrocéramique Cordon...

Страница 59: ...DIMENSIONS ENCASTREMENT 5 65 65 65 288 65 40 máx 60 máx 40 máx 40 máx 510 510 490 510 410 440 4 9 0 490 930 930 770 900 900 270 750 C60T377A6 qxd 14 3 07 16 27 Página 5 ...

Страница 60: ...uction doivent être refroidis par un courant d air frais comme indiqué sur le croquis 40mm minimum 50mm Plaque sur Four Plaque sur Meuble 50mm 5mm minimum 5mm minimum 6 IMPORTANT Veillez à ce que l installation permette l entrée d air à l arrière et la sortie d air à l avant en laissant une distance d au moins 5mm entre le meuble et le mur ou paroi 3 FIXATION AU PLAN 4 EMPLACEMENT D INSTALLATION A...

Страница 61: ... 000w 18 2 800w 2 800w 21 3 100w 3 100w 28 3 600w 2 800w TYPE A TYPE B PUISSANCE DE CHAQUE FOYER TYPE D APPAREIL 1 Les appareils de type A sont munis de commandes aux fonctions spéciales ou aux fonctions de base Les appareils de type B sont munis de commandes compactes C60T377A6 qxd 14 3 07 16 27 Página 7 ...

Страница 62: ...ales Commandes à fonctions de base Commandes compactes Permet de voir sur la plaque la situation de chaque foyer Permet de verrouiller les autres touches sensitives pour éviter leur manipulation par les enfants Permet de sélectionner le temps de cuisson sur le foyer sélectionné entre 0 et 99 minutes Pour mettre la minuterie à zéro enfoncer à la fois la touche et Si ces touches restent enfoncées la...

Страница 63: ...e la touche L arrivée à ébullition des liquides surtout à des puissances élevées entraîne un bour donnement lié au couplage des fréquences des foyers IMPORTANT ALLUMAGE D UN FOYER Vous pouvez à tout moment activer la touche de sécurité Il suffit pour ce faire de main tenir enfoncée la touche durant trois secondes Si vous laissez un objet sur les touches la plaque fera entendre quelques bip et s ét...

Страница 64: ...vée ou désactivée que si la table de cuisson est éteinte Pour désactiver l avertissement sonore appuyez simultanément sur les touches de puissance et de la minuterie sur le bandeau de commandes de la zone de cuisson droite ou arrière droite selon les modèles jusqu à l affichage du symbole bE Ep accompagné d un avertissement sonore Lâchez alors les touches Pour activer l avertissement sonore appuye...

Страница 65: ...rt 1 Maintenez enfoncée la touche jusqu à ce qu un bip se fasse entendre 2 La puissance définie commencera à clignoter sur l afficheur 3 Modifiez la puissance à l aide des touches et de puissance B 4 Appuyez à nouveau sur la touche pour valider l opération 5 Éteignez le foyer BOOSTER Les zones de cuisson sont munies de la fonction BOOSTER Cette fonction per met d atteindre rapidement la températur...

Страница 66: ...l heure de fin de cuisson souhaitée à l aide des touches et des zones B et E 6 Validez en appuyant sur la touche 7 Réglez la durée de cuisson à l aide des touches et de la zone E 8 Validez en appuyant sur la touche 9 Définissez la puissance de cuisson souhaitée à l aide des touches et de la zone B 10 Validez la puissance en appuyant sur la touche 11 La programmation une fois achevée l indicateur a...

Страница 67: ...ence pour la cuisson des foyers situés dans des zones différentes étant donné que l utilisation de la puissance maximale sur un foyer autolimite la puissance du foyer contigu situé sur la même zone affichée sur les indicateurs de puissance IMPORTANT Après avoir sélectionne la puissance P P point si vous ne sélectionnez pas la puis sance finale de travail la puissance du foyer restera sur P Durant ...

Страница 68: ... chapitre Bandeau de Commandes à Fonctions Spéciales AVERTISSEMENT SONORE Allumez un foyer Pour ce faire appuyez sur la touche du dit foyer Sélectionnez ensuite la puissance souhaitée à l aide des touches ou de puissance Allumez la minuterie Pour ce faire appuyez sur la touche L indicateur affichera la zone à temporiser à l aide des symboles suivants Appuyez à plusieurs reprises sur la touche jusq...

Страница 69: ...son à induction répond parfaitement aux exigences légales Directives 89 336 CEE et a été conçue de façon à ne pas gêner le fonctionnement des autres appareils électriques à condition que ceux ci soient également conformes à la même réglementation VOTRE TABLE DE CUISSON À INDUCTION GÉNÈRE DES CHAMPS MAGNÉTIQUES DANS SON ENVIRONNEMENT PROCHE Pour éviter toute interférence entre votre table de cuisso...

Страница 70: ...es touches du bandeau de commandes Nettoyez la plaque ou le bandeau de commandes ou retirez l objet et remettez en marche la plaque de cuisson AUTO STOP SYSTEM Si vous oubliez d éteindre un foyer sachez que votre table de cuisson est équipée d une fonction de sécurité AUTO STOP SYSTEM qui met automatiquement hors circuit la zone de cuisson après un temps déterminé entre 1 et 10 heures selon la pui...

Страница 71: ...er Seuls le verre la terre cuite l aluminium sans fond spécial le cuivre et certains aciers inoxydables non magnétiques ne sont pas aptes pour la cuisson à induction 4 RÉCIPIENTS QUELLE ZONE DE CUISSON UTILISER EN FONCTION DU RÉCIPIENT Ne pas déplacer les réci pients en les faisant glisser sur le verre de la plaque Les soulever pour les dépla cer Ne pas laisser d ustensiles sur la plaque en marche...

Страница 72: ...ceau de papier de cuisine Pour les taches plus résistantes utiliser des produits spécifiques pour vitrocéramique Suivre les conseils du fabriquant pour leur application IMPORTANT Ne pas utiliser de produits abrasifs ou de poudre à récurer qui risquent de rayer la plaque Ne pas utiliser de machine à nettoyer à vapeur Si une fissure apparaît sur la surface du verre débrancher immédiatement l apparei...

Страница 73: ...vant de procéder au raccordement Séparez les 2 câbles de phase L1 L2 et neutre avant de procéder au raccordement Neutre N Phase1 L1 Phase2 L2 Terre Neutre 1 Neutre 2 N1 N2 Phase1 L1 Phase2 L2 Terre RACCORDEMENT ÉLECTRIQUE CÂBLES À 3 FILS CÂBLES À 5 FILS 6 400 V Triphasé Fusible 16 Ampères Neutre N Phase L1 Terre Brun Vert Jaune Bleu 220 240 V Monophasé Fusible 16 Ampères 16A Vert Jaune Bleu Neutre...

Страница 74: ...ramique est fournie avec son câble d alimentation Si le câble est endom magé il doit être remplacé par le fabricant le Service Après Vente ou un technicien agréé afin d éviter tout danger Lors de la mise sous tension de la plaque ou après une panne de courant prolongée un code lumineux apparaîtra sur le bandeau de commandes 220 240 V Monophasé Fusible 16 et 32 Ampères 32A 16A Neutre N Brun Vert Ja...

Страница 75: ...ux Mauvais branchement de la plaque C est le fonctionnement normal Appareil neuf Le circuit électronique fonctionne mal La plaque est verrouillée Un débordement hors d un récipient s est produit ou il y a un objet sur le bande au de commandes Les circuits électroniques ont trop chauffé Le récipient utilisé ne con vient pas à la cuisson par induction ou son diamètre est inférieur à 12 cm 10 cm sur ...

Страница 76: ...protection de l environnement portez votre ancien appareil à une déchetterie ou un centre de recyclage Avant de vous débarrasser de votre vieil appareil rendez le inutile en coupant le câble d alimentation avec la prise 22 C60T377A6 qxd 14 3 07 16 27 Página 22 ...

Страница 77: ...23 C60T377A6 qxd 14 3 07 16 27 Página 23 ...

Страница 78: ...03 07 C60T377A6 Imprimé sur du papier recyclé C60T377A6 qxd 14 3 07 16 27 Página 24 ...

Страница 79: ...C60T379A2 qxd 14 3 07 16 10 Página 23 ...

Страница 80: ...C60T379A2 qxd 14 3 07 16 10 Página 23 ...

Страница 81: ...HANDBUCH ZUR INSTALLATIO N U N D Z U R B E D I E N U N G D E S G E R Ä T S C60T378A4 qxd 14 3 07 16 33 Página 1 ...

Страница 82: ...von einem Spezialisten durchgeführt werden der die gesetzlichen Normen und Vorschriften im jeweiligen Land kennt Mit dem Ziel unsere Produkte ständig zu verbessern behalten wir uns das Recht vor Modifikationen an ihren Charakteristiken Funktionen oder der Ästhetik vorzunehmen die mit der technischen Entwicklung verbunden sind HINWEIS Wir nehmen am Schutz der Umwelt teil Aus diesem Grund sind unser...

Страница 83: ...Zeitschaltuhr 10 Akustisches Signal 10 Spezielle Funktionen 11 Steuerung mit den Basisfunktionen 13 Funktionsweise 13 Einschalten von einem Kochfeld 13 Funktionsweise Zeitschaltuhr 13 Akustisches Signal 13 Funktion P Punkt P Funktion Schnellerhitzung 13 Kompakte Steuerung 14 Funktionsweise 14 Einschalten von einem Kochfeld 14 Akustisches Signal 14 Funktionsweise Zeitschaltuhr 14 3 SICHERHEIT 15 Si...

Страница 84: ...agen Zone A Kleben Sie die Schaumdichtung unter die Platte und folgen Sie dabei dem Umriss der Auflage auf ihrer Küchenplatte So erreichen Sie eine gute Dichtheit mit der Küchenplatte Befestigen Sie Halter der Platte an dem Möbelstück Benutzen Sie kein Material dass nicht wieder abnehmbar ist wie Silikon 4 A A A B B C B C D D Eintrittsöffnung für Luft 580 490 64 40 4 0 4 0 A 560 510 Austrittsöffnu...

Страница 85: ...MASSE ZUM EINBAU 5 65 65 65 288 65 40 máx 60 máx 40 máx 40 máx 510 510 490 510 410 440 4 9 0 490 930 930 770 900 900 270 750 C60T378A4 qxd 14 3 07 16 33 Página 5 ...

Страница 86: ...em Schema gezeigt wird Los circuitos electrónicos de su placa de inducción deben enfriarse por una corriente de aire fresco como se indica en el esquema 40mm Minimum 50mm Platte über dem Ofen Platte über dem Ofen 50mm 5mm Minimum 5mm Minimum 6 WICHTIG Die Installation muss gewährleisten dass frische Luft über den hinteren Teil zuströmen kann und im vorderen Teil einen Ausgang von mindestens 5 mm o...

Страница 87: ... 000w 18 2 800w 2 800w 21 3 100w 3 100w 28 3 600w 2 800w TYP A TYP B LEISTUNG DES JEWEILIGEN KOCHFELDS TYP DES GERÄTS 1 Die Geräte vom Typ A verfügen über Steuerungen mit speziellen Funktionen oder mit Basisfunktionen Die Geräte vom Typ B verfügen über kompakte Steuerungen C60T378A4 qxd 14 3 07 16 33 Página 7 ...

Страница 88: ...akte Steuerung Erlaubt es auf der Platte die Situation von jedem Kochfeld zu sehen Erlaubt es die übrigen Sensoren zu blockieren um zu vermeiden dass Kinder mit ihnen spielen können Erlaubt es die jeweilige Kochzeit des ausgewählten Kochfelds zwischen 0 und 99 Minuten zu wählen Wenn Sie und zur gleichen Zeit drücken wird die Zeitschaltuhr auf 0 zurückgesetzt Wenn Sie die Sensoren länger gedrückt h...

Страница 89: ...e den Finger auf ihm halten Wenn Sie Flüssigkeiten kochen vor allem mit hoher Leistung hören Sie einen Summton wegen der Rückkopplung der Frequenzen in den Kochfeldern WICHTIG EINSCHALTEN EINES KOCHFELDS Sie können stets den Sensor zur Sicherheit aktivieren indem Sie den Finger drei Sekunden auf ihn halten Wenn Sie ein Objekt auf den Sensoren stehen haben wird die Platte einige Piepstöne aussenden...

Страница 90: ...nale abschaltet werden Sie können die Deaktivierung oder Reaktivierung aber nur vornehmen wenn die Platte abgeschaltet ist Um das akustische Signal zu deaktivieren drücken Sie gleichzeitig die Knöpfe für die Leistung und für die Zeitschaltuhr an der Platte der Steuerung der Kochzone rechts oder hinten rechts je nach Modell bis das Symbol bE Ep erscheint Halten Sie die Sensoren gedrückt bis die das...

Страница 91: ...n der Leistung für den direkten Zugang Das Kochfeld muss abgeschaltet sein 1 Halten Sie den Knopf gedrückt bis ein Piepston ertönt 2 Die definierte Leistung wird in blinkender Form angezeigt 3 Modifizieren Sie die Leistung mit den Knöpfen und der Leistung B 4 Drücken Sie erneut den Knopf um die Operation zu bestätigen 5 Schalten Sie das Kochfeld ab BOOSTER Die Kochzonen sind mit der Funktion BOOST...

Страница 92: ...ie die Zeit ein zu der Sie wünschen dass der Kochvorgang been det wird Benutzen Sie dafür die Knöpfe und der Zonen B und E 6 Bestätigen Sie durch das Drücken des Knopfs 7 Die Einstellung der Kochzeit wird mit den Knöpfen und in der Zone E durchgeführt 8 Bestätigen Sie durch das Drücken des Knopfs 9 Definieren Sie die gewünschte Leistung für den Kochvorgang mit den Knöpfen und der Zone B 10 Bestäti...

Страница 93: ...Sie am besten stets die Kochstellen auf verschiedenen Seiten Wenn sie die der gleichen Seite benutzten wird die Anwahl für das Kochen mit maximaler Leistung eines Kochfelds die Leistung des anderen Felds automatisch begrenzen dass sich auf der gleichen Seite der Anzeige für die Leistung befindet WICHTIG Nachdem die Leistung P P Punkt ausgewählt wurde aber Sie keine andere Leistung eingeben bleibt ...

Страница 94: ...urde AKUSTISCHES SIGNAL Schalten Sie ein Kochfeld ein Um ein Kochfeld einzuschalten drücken Sie den Knopf des entsprechenden Kochfelds Wählen Sie die gewünschte Leistung mit den Knöpfen oder mit den Sensoren für die Leistung aus Schalten Sie die Zeitschaltuhr ein Drücken Sie dazu den Knopf Die Zone die über eine Zeitspanne gesteuert werden soll wird über diese Symbole angezeigt Wenn Sie wiederholt...

Страница 95: ...e Induktionskochplatten erfüllen vollständig die legalen Anforderungen Direktiven 89 336 CEE Sie wurden so entwickelt dass sie nicht die Funktionsweise anderer elektrischer Geräte beeinflussen wenn diese ebenfalls diese Normen erfüllen IHRE INDUKTIONSPLATTE SCHAFFT IN IHREM DIREKTEN UMFELD MAGNETISCHE FELDER Damit es zu keinen Beeinflussungen zwischen ihrer Kochplatte und dem Herzschrittmacher kom...

Страница 96: ...igen Sie die Tasten oder entfernen Sie das Objekt und beginnen Sie wieder mit dem Kochvorgang AUTO STOPP SYSTEM Falls Sie es vergessen sollten ein Kochfeld abzuschalten ist ihre Kochplatte mit einer Sicherheitsfunktion ausgestattet Das AUTO STOPP SYSTEM wird automatisch die Kochzone nach einer voreingestellten Zeit abschalten zwischen 1 und 10 Stunden je nach eingesetzter Leistung Wenn dieses Syst...

Страница 97: ...s angezeigt die Anzeige für die Leistung wird blinken Nur Glas Ton Aluminium ohne speziellen Boden Kupfer und einige nicht mag netischen Edelstahle sind für das Kochen über Induktion ungeeignet 4 KOCHTÖPFE WELCHE KOCHZONE SOLLTE IN BEZUG AUF DEN KOCHTOPF BENUTZT WERDEN Vermeiden Sie es die Kochtöpfe über die Glasplatte zur ziehen oder auf ihr zu bewegen Heben Sie sie an um sie umzu setzen Lassen S...

Страница 98: ...en Papiertuch oder einem Lappen beseitigt Für die schwereren Verschmutzungen benutzen Sie die Spezialreiniger für Glaskeramik Benutzen Sie diese entsprechend der bei liegenden Anweisungen WICHTIG Benutzen Sie niemals kratzende Reiniger denn Sie können die Platte verkratzen Benutzen Sie keine Dampfreiniger Falls ein Riss in der Oberfläche des Glases auftauchen sollte schalten Sie das Gerät sofort a...

Страница 99: ...n Anschluss durchführen Trennen Sie die beiden Kabel der Phasen L1 L2 und Neutro N1 N2 bevor Sie den Anschluss durchführen Schutzleiter N Phase1 L1 Phase2 L2 Erde Schutzleiter1 Schutzleiter2 N1 N2 Phase1 L1 Phase2 L2 Erde ELEKTRISCHE ANSCHLÜSSE KABEL MIT DREI DRÄHTEN KABEL MIT FÜNF DRÄHTEN 6 400 V 3N dreiphasig Sicherung 16 Ampere Neutro N Fase L1 Tierra Braun Grün Gelb Blau 220 240 V einphasig Si...

Страница 100: ...t einem Kabel zur Stromzuführung geliefert Wenn dieses Kabel beschä digt ist muss es durch den Hersteller dem Technischen Kundendienst oder von autorisier tem Personal ausgetauscht werden damit Gefahren vermieden werden Nach dem Anschließen der Platte oder nach einem längeren Stromausfall erscheint ein Leuchtsignal auf dem Steuerpanel 220 240 V einphasig Sicherung 16 und 32 Ampere 32A 16A Schutzle...

Страница 101: ... Gerät Die elektrischen Schaltkreise funktionieren nicht richtig Es ist etwas übergekocht oder ein Objekt behindert das Panel zur Steuerung Etwas beim Kochen ist überge laufen oder ein Objekt bloc kiert die Steuerung Die elektrischen Schaltkreise haben sich erhitzt Das benutzte Kochutensil ist nicht geeignet für Induktion oder hat einen Durchmesser der kleiner als 12 cm 10 cm auf der Platte mit 16...

Страница 102: ...utzes der Umwelt entsorgen Sie ihr benutztes Gerät in einem offiziellen Zentrum zur Entsorgung und Recycling der Materialien Bevor Sie das Gerät entsorgen machen Sie es durch zerschneiden des Stromkabels unbrauchbar 22 C60T378A4 qxd 14 3 07 16 33 Página 22 ...

Страница 103: ...23 C60T378A4 qxd 14 3 07 16 33 Página 23 ...

Страница 104: ...03 07 C60T378A4 Auf Umweltschutzpapier gedruckt C60T378A4 qxd 14 3 07 16 33 Página 24 ...

Страница 105: ...C60T379A2 qxd 14 3 07 16 10 Página 23 ...

Страница 106: ...C60T379A2 qxd 14 3 07 16 10 Página 23 ...

Страница 107: ...MANUAL DE INSTALAÇÃ O E U T I L I Z A Ç Ã O D O F O R N O C60T379A2 qxd 14 3 07 16 10 Página 1 ...

Страница 108: ...cimento das disposições legais e das exigências normativas reconhe cidas em cada país Com o objectivo de melhorar constantemente os nossos produtos reserva monos o direito de realizar modificações nas suas características técnicas funcionais ou estéticas vinculadas à evolução técnica AVISO Colaboramos na protecção do Meio Ambiente Por esta razão as nossas embalagens São 100 recicláveis Têm a menor...

Страница 109: ...m foco 9 Função temporizador 10 Sinal sonoro 10 Funções Especiais 11 Comando com funções básicas 13 Funcionamento 13 Ligação de um foco 13 Funcionamento temporizador 13 Sinal sonoro 13 Função P P ponto Função de aquecimento rápido 13 Comando compacto 14 Funcionamento 14 Ligação de um foco 14 Sinal sonoro 14 Funcionamento temporizador 14 3 SEGURANÇA 15 Segurança no funcionamento 16 4 RECIPIENTES 17...

Страница 110: ...aseira deve ser de pelo menos 40 mm zona A Coloque a junta de espuma por baixo da placa seguindo o contorno das superfícies de apoio com o seu tampo Deste modo conseguirá uma boa estanquicidade com o tampo Fixe os encaixes da placa ao móvel Não utilizar materiais não removíveis como o silicone 4 A A A B B C B C D D Entrada de ar 580 490 64 40 4 0 4 0 A 560 510 Saída de ar Vidro vitrocerâmico Cabo ...

Страница 111: ...DIMENSIÕES DE ENCASTRE 5 65 65 65 288 65 40 máx 60 máx 40 máx 40 máx 510 510 490 510 410 440 4 9 0 490 930 930 770 900 900 270 750 C60T379A2 qxd 14 3 07 16 10 Página 5 ...

Страница 112: ... sua placa de indução devem arrefecer através de uma corrente de ar fresco tal como indicado no esquema 40mm mínimo 50mm Placa sobre forno Placa sobre móvel 50mm 5mm mínimo 5mm mínimo 6 IMPORTANTE A instalação deve garantir que chega ar fresco pela parte traseira e que tem uma saída na parte dianteira de pelo menos 5 mm 3 FIXAÇÃO NA MESA DE TRABALHO 4 LOCAL DA INSTALAÇÃO A B C60T379A2 qxd 14 3 07 ...

Страница 113: ... 2 200w 2 000w 18 2 800w 2 800w 21 3 100w 3 100w 28 3 600w 2 800w TIPO A TIPO B POTENCIA DE CADA FOCO TIPO DE APARELHO 1 Os aparelhos do tipo A têm comandos com funções especiais ou com funções básicas Os aparelhos do tipo B têm comandos compactos C60T379A2 qxd 14 3 07 16 10 Página 7 ...

Страница 114: ...mando com funções básicas Comando compacto Permite ver na placa a situação de cada foco Permite bloquear os outros sensores para evitar que as crianças pos sam brincar com os mesmos Permite seleccionar o tempo de cozedura do foco seleccionado entre 0 e 99 minutos Se premir e ao mesmo tempo o temporizador é colocado a 0 Se mantiver premidos os referidos botões a velocidade de avanço dos minutos aum...

Страница 115: ...da mantendo o dedo no sensor Ao ferver líquidos sobretudo a potências elevadas irá ouvir um zumbido devido ao acoplamento das frequências dos focos IMPORTANTE LIGAÇÃO DE UM FOCO Sempre que desejar poderá activar o sensor de segurança mantendo o premido durante três segundos Se deixar algum objecto em cima dos sensores a placa emitirá uns apitos e desliga se A placa desliga se automaticamente depoi...

Страница 116: ...ndo a placa estiver desligada Para desactivar o sinal sonoro prima simultaneamente os comandos de potência e do temporizador na placa de comandos da zona de cozedura direita ou traseira direita de acordo com os modelos até que apareça o símbolo bE Ep mantenha o premido até desaparecerem os dígitos Para activar o sinal sonoro prima simultaneamente os comandos de potência e do temporizador na placa ...

Страница 117: ...tes passos Modificação da potência do acesso directo Estando o foco desligado 1 Manter o botão premido até ouvir um som 2 Vai visualizar a potência definida de forma intermitente 3 Modificar a potência com os botões e de potência B 4 Voltar a premir o botão para validar a operação 5 Desligar o foco BOOSTER As zonas de cozedura têm a função BOOSTER Esta função permite alcançar rapidamente a tempera...

Страница 118: ...r 5 Ajustar a hora a que se pretende terminar de cozinhar com os botões e das zonas B e E 6 Validar premindo o botão 7 Ajustar a duração de cozedura com os botões e da zona E 8 Validar premindo o botão 9 Definir a potência desejada para a cozedura com os botões e da zona B 10 Validar a potência premindo o botão 11 Uma vez programado visualiza se Auto e a seguir os dígitos desapare cem e apenas fic...

Страница 119: ...o CONSELHO Preferentemente utilize as zonas de cozedura situadas em lados diferentes Se selec cionar o mesmo lado a utilização de uma zona de cozedura na máxima potência vai provocar uma autolimitação da outra zona de cozedura situada no mesmo lado visível nos indicadores de potência IMPORTANTE Depois de seleccionar a potência P P ponto se não seleccionar a potência de trabalho final a potência do...

Страница 120: ... ao descrito nos comandos com funções especiais SINAL SONORO Ligar um foco Para ligar o foco prima o botão do referido foco A seguir seleccio nar a potência desejada com os botões ou dos sensores de potência Ligar o temporizador Para isso prima Vai visualizar a zona que deseja temporizar através destes símbolos Se premir repetidamente o botão a posição do foco a temporizar vai rodando Uma vez sele...

Страница 121: ...feitamente às exigências legais directivas 89 336 CEE Foi concebida para não interferir no funcionamento de outros aparelhos eléctricos na medida em que estes respeitem esta mesma normativa A SUA PLACA DE INDUÇÃO GERA CAMPOS MAGNÉTICOS NO SEU AMBIENTE MAIS PRÓXIMO Para que não haja interferências na sua placa de cozedura e um estimulador cardíaco é necessário que este último tenha sido concebido e...

Страница 122: ...o colocado sobre as teclas de comando Limpe ou retire o objecto e active novamente a cozedura AUTO STOP SYSTEM Se se esquecer de desligar um foco a sua placa está equipada com uma função de segu rança AUTO STOP SYSTEM que irá desligar automaticamente a zona de cozedura depois de um tempo já seleccionado entre 1 e 10 horas de acordo com a potência utiliza da Caso active esta função de segurança a d...

Страница 123: ...porque a potência do indicador fica a piscar Unicamente o vidro o barro o alumínio sem fundo especial o cobre e alguns aços inoxidá veis não magnéticos não estão aptos para a cozedura por indução 4 RECIPIENTES QUE ZONA DE COZEDURA DEVE UTILIZAR EM FUNÇÃO DO RECIPIENTE Tentar não mover os recipien tes tocando no vidro da placa Levante os para os deslocar Não deixe utensílios na placa quando estiver...

Страница 124: ...laminada ou com um pano Para as sujidades mais resistentes utilize produtos específicos para vidros vitro cerâmicos Utilize os seguin do as instruções que os acompanham IMPORTANTE Não utilize produtos abrasivos ou pós para esfregar Pode riscar a placa Não utilizar um produto de limpeza a vapor Se aparecer uma fissura na superfície do vidro desligue a placa imediatamente da fonte de alimentação elé...

Страница 125: ...bos de fase L1 L2 antes de fazer a ligação Separe os 2 cabos de fase L1 L2 e Neutro N1 N2 antes de fazer a ligação Neutro N Fase1 L1 Fase2 L2 Terra Neutro 1 Neutro 2 N1 N2 Fase1 L1 Fase2 L2 Terra LIGAÇÃO ELÉCTRICA CABO DE 3 FIOS CABO DE 5 FIOS 6 400 V 3N trifásica Fusível 16 amperes Neutro N Fase L1 Terra Marrom Verde Amarelo Azul 220 240 V monofásica Fusível 16 amperes 16A Verde Amarelo Azul Neut...

Страница 126: ...rnecida com cabo de alimentação Se o cabo de alimentação estiver danificado deve ser substituído pelo fabricante pelo serviço de pós venda ou por pessoal autorizado com o fim de evitar danos Ao colocar a placa sob tensão ou depois de um corte de corrente prolongado irá aparecer um código luminoso no painel de comandos 220 240 V monofásica LNFusível 16 e 32 amperes 32A 16A Neutro N Marrom Verde Ama...

Страница 127: ...problemas A ligação da sua placa está com problemas Funcionamento normal Aparelho novo O circuito electrónico funciona mal A placa está bloqueada Ocorreu um derramamento ou um objecto está a obs truir o painel de coman dos Os circuitos electrónicos aqueceram novamente O recipiente utilizado não é adequado para a indução ou tem um diâme tro inferior a12 cm 10 cm no foco de 16 cm Normal com alguns t...

Страница 128: ...eservar o meio ambiente entregue o seu aparelho usado num centro oficial de recolha ou recuperação de materiais recicláveis Antes de se desfazer do seu aparelho usado inutilize o cortando o cabo de ligação com a ficha 22 C60T379A2 qxd 14 3 07 16 10 Página 22 ...

Страница 129: ...23 C60T379A2 qxd 14 3 07 16 10 Página 23 ...

Страница 130: ...03 07 C60T379A2 Impresso em papel reciclado C60T379A2 qxd 14 3 07 16 10 Página 24 C60T386A3 ...

Отзывы: