background image


69 


  Die überschüssige Dichtmasse entfernen. 

  Das Klebeband entfernen. 

  Die Panele für die Bedienfeldhalter und die Bedienelemente wieder anbringen. 
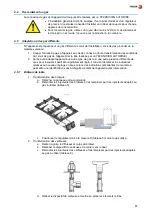
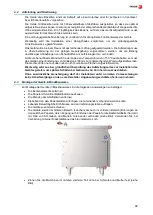
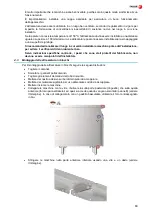
 

4.4  Gasanschluss 

Der Gasanschluss des Gerätes muss von einem AUTORISIERTEN FACHTECHNIKER 

vorgenommen werden. 


  Die Hauptinstallation sollte über einen Durchlaufhahn und einen Druckregler 

verfügen. Werkseitig wird dazu geraten, einen Durchlaufhahn pro 

verbrauchendes Gerät vorzusehen. 

  Für den Gasanschluss ist ein ein Rohr mit einem Mindestdurchmesser von 

12x10 mm mit einer Mutter (¾") am Ende zum Anschluss des Herds zu 

verwenden. 


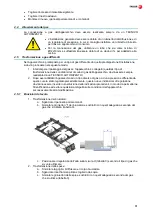
4.5  Umrüstung zur Anpassung an die verschiedenen Gasarten  

Ist die Installation auf eine andere Gasart als das Gerät eingestellt, so ist wie folgt zu verfahren: 

1.  Den Gasdurchlauf zum Gerät unterbrechen falls dieses eingeschaltet ist (nur ein 

AUTORISIERTER FACHTECHNIKER darf Änderungen am Gaskreislauf des Gerätes 

durchführen). 

2.  Nach der Umrüstung des Geräts auf eine andere als die bisher verwendete Gas- oder 

Druckart müssen die Angaben der neuen Einstellung am selben Ort und an der gleichen 

Stellung wie zuvor angebracht werden, so dass der neue Gerätezustand eindeutig 

gekennzeichnet ist und Verwechslungen ausgeschlossen werden. 
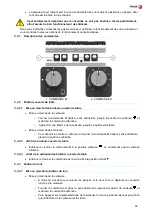
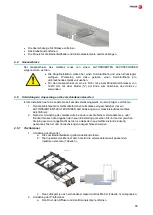
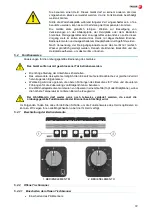
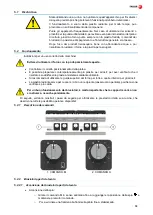
4.5.1  Tischbrenner 

1.  Umrüstung der Brenner: 

a.  Die zum Bedienfeldhalter gehörende Blende lösen. 

b.  Die Injektoren der Brenner durch die für die verwendete Gasart passenden 

Injektoren ersetzen (Tabelle 3). 


c.  Den Luftregler je nach vorhandener Gasart auf das Maß H (Tabelle 3) einregulieren. 

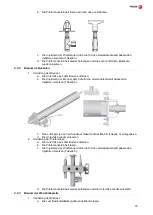
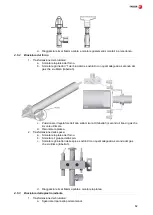
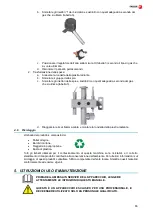
2.  Umrüstung der Pilotbrenner: 

a.  Den Rost, den Diffusor und den Brennerkörper entfernen. 
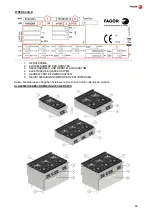
Содержание C-G710

Страница 1: ...TUNGSANLEITUNG IT ISTRUZIONI PER L INSTALLAZIONE L USO E LA MANUTENZIONE TR MONTAJ KULLANIM VE BAKIM TAL MATLARI C G920 C G920 H C G940 C G940 H C G960 C G960 H C G941 C G941 H C G961 C G961 H C G961...

Страница 2: ...ION QUIPOTENTIALIT WARNING HAZARDOUS VOLTAGE PLEASE READ INSTRUCTIONS PROTECTIVE EARTH EQUIPOTENTIAL BONDING VORSICHT GEF HRLICHE SPANNUNG ANLEITUNG GR NDLICH LESEN SCHUTZ ERDE POTENZIALAUSGLEICH PREC...

Страница 3: ...DATEN CARACTERISTIQUES GENERALES CARATTERISTICHE GENERALI 1 Dimensiones generales y acometidas General dimensions and connections Allgemeine Abmessungen und Anschl sse Dimensions g n rales et raccord...

Страница 4: ...4 C G941 C G941 H C G961 C G961 H C G961 OP C G961 OP H...

Страница 5: ...5 C G910 C G911 G Entrada de Gas Gas Inlet 1 V lvula de gas Gas valve 2 Pulsador tren de chispas Piezoelectric ignitor 3 Mando H H control...

Страница 6: ...6 C G720 C G720 H C G740 C G740 H C G760 C G760 H...

Страница 7: ...7 C G741 C G741 H C G761 C G761 H...

Страница 8: ...8 C G710 C G711...

Страница 9: ...9 C G751 C G750 C G730 D...

Страница 10: ...10 C G730 I C G731 D C G731 I...

Страница 11: ...11 C GB761 C GB761 H G Entrada de Gas Gas Inlet 1 V lvula de gas Gas valve 2 Pulsador tren de chispas Piezoelectric ignitor 3 Mando H H control...

Страница 12: ...W 11 kW Qn kW 13 25 18 2 28 7 34 2 41 95 50 2 37 3 Q kW Piloto Pilot burner Veilleuse Zundbrenner Pilota 2 x 0 25 2 x 0 25 4 x 0 25 4 x 0 25 6 x 0 25 6 x 0 25 5 x 0 25 Modelo Model Modelle Mod le Mode...

Страница 13: ...ni esterne L mm 400 400 800 800 800 800 800 W mm 730 730 730 730 730 730 730 H mm 300 300 300 300 850 300 850 Peso neto kg Quemador Burner Brenner Bruleur Bruciatore n 5 25 kW 4 3 3 8 kW 4 2 6 1 1 2 2...

Страница 14: ...25 100 5 3 70 90 20 open Grupo 1 II2H3B P G 20 20 5 25 165 2 2 50 115 40 open G 30 G 31 30 5 25 115 5 2 70 90 25 open BE FR II2E 3 G 20 20 5 25 165 2 2 50 115 40 open G 25 25 4 75 165 2 2 50 115 40 o...

Страница 15: ...II2ELL3B P G 20 20 5 25 165 10 2 50 115 40 open G 25 20 5 25 190 10 2 50 115 40 open G 30 G 31 50 5 25 100 30 3 50 100 25 open DK III1a2H3B P G 20 20 5 25 165 10 2 50 115 35 open G 30 G 31 30 5 25 115...

Страница 16: ...31 30 8 0 135 5 3 50 100 25 open BE FR II2E 3 G 20 20 8 0 210 2 3 05 130 40 open G 25 25 7 5 210 0 3 05 130 40 open G 30 G 31 28 30 37 8 0 135 5 3 50 100 25 open Grupo 2 II2H3 G 20 20 8 0 210 2 3 05 1...

Страница 17: ...ELL3B P G 20 20 8 0 210 10 2 80 130 40 open G 25 20 8 0 235 10 2 80 130 40 open G 30 G 31 50 8 0 120 30 4 20 120 25 open DK III1a2H3B P G 20 20 8 0 210 10 2 80 130 40 open G 30 G 31 30 8 0 135 30 3 50...

Страница 18: ...2x160 28 4 0 1 y abrir 40 G 30 G 31 30 9 25 2x110 28 4 0 1 25 BE FR II2E 3 G 20 20 9 25 2x160 28 4 0 1 y abrir 40 G 25 25 8 25 2x160 28 4 0 1 y abrir 40 G 30 G 31 28 30 37 9 25 2x110 28 4 0 1 25 Grupo...

Страница 19: ...5 30 20 open Grupo 1 II2H3B P G 20 20 8 60 235 28 40 open G 30 G 31 30 8 60 145 28 25 open BE FR II2E 3 G 20 20 8 60 235 28 40 open G 25 25 8 60 235 30 40 open G 30 G 31 28 30 37 8 60 145 28 25 open G...

Страница 20: ...8 60 150 22 25 open DE II2ELL3B P G 20 20 8 60 235 28 40 open G 25 20 8 60 255 28 40 open G 30 G 31 50 8 60 125 28 25 open DK III1a2H3 B P G 20 20 8 60 235 28 40 open G 30 G 31 30 8 60 150 22 40 open...

Страница 21: ...120 10 5 15 120 20 Grupo 1 II2H3B P G 20 20 8 0 215 14 3 65 150 40 G 30 G 31 30 8 0 135 11 4 75 120 25 BE FR II2E 3 G 20 20 8 0 215 14 3 65 150 40 G 25 25 8 0 215 14 3 65 150 40 G 30 G 31 28 30 37 8...

Страница 22: ...P G 20 20 14 0 2x235 27 70 40 open G 30 G 31 50 14 0 2x115 30 40 25 open Grupo 1 II2H3B P G 20 20 14 0 2x235 27 70 40 open G 30 G 31 30 14 0 2x140 27 50 25 open BE FR II2E 3 G 20 20 14 0 2x235 27 70...

Страница 23: ...Grupo 1 II2H3B P G 20 20 11 5 260 20 3 80 150 40 open G 30 G 31 30 11 5 165 30 4 50 120 25 open BE FR II2E 3 G 20 20 11 5 260 20 3 80 150 40 open G 25 25 11 5 260 20 3 31 150 40 open G 30 G 31 28 30...

Страница 24: ...combusti n Consumo di aria necessario per la combustione Nm3 h C G920 26 5 C G920 H 36 4 C G940 57 4 C G940 H 68 4 C G960 83 9 C G960 H 100 4 C G941 74 6 C G941 H 85 6 C G961 101 1 C G961 H 117 6 C G...

Страница 25: ...CHIPRE CY 20 28 30 37 CHEQUIA CZ 20 28 30 37 ALEMANIA DE 20 50 DINAMARCA DK 20 30 ESTONIA EE 20 30 ESPA A ES 20 28 30 37 FINLANDIA FI 20 30 FRANCIA FR 20 25 28 30 37 REINO UNIDO GB 20 28 30 37 GRECIA...

Страница 26: ...MARCA DK 20 30 ESTONIA EE 20 30 ESPA A ES 20 28 30 37 FINLANDIA FI 20 30 FRANCIA FR 20 25 28 30 37 REINO UNIDO GB 20 28 30 37 GRECIA GR 20 28 30 37 CROACIA HR 20 30 HUNGR A HU 25 30 IRLANDA IE 20 28 3...

Страница 27: ...30 37 FINLANDIA FI II2H3B P 20 30 FRANCIA FR II2E 3 20 25 28 30 37 REINO UNIDO GB II2H3 20 28 30 37 GRECIA GR II2H3 20 28 30 37 CROACIA HR II2H3B P 20 30 HUNGR A HU II2HS3B P 25 30 IRLANDA IE II2H3 2...

Страница 28: ...ferimento Gas natural Natural gas Erdgas Gaz natural Gas naturale MJ m G L P L P G Verfl ssigtes Petroleumgas MJ kg G 20 G 25 G 25 1 GZ 35 G 30 G 31 Poder calor fico inferior Lower calorific value Unt...

Страница 29: ...aje 32 4 2 Emplazamiento y nivelaci n 32 4 3 Montaje de equipos en bloques 33 4 4 Conexi n de gas 33 4 5 Transformaci n a distintos gases 34 4 6 Reciclaje 36 5 INSTRUCCIONES DE USO Y MANTENIMIENTO 36...

Страница 30: ...usos previstos por el fabricante Usos inapropiados del mismo pueden causar riesgos a la salud y seguridad de los usuarios y as como al equipo Si su m quina ha sufrido alguna aver a llame al Servicio...

Страница 31: ...REFERENCIA DEL APARATO 3 N DE SERIE FECHA FABRICACI N 4 CARACTER STICAS EL CTRICAS 5 CARACTER STICAS GAS 6 N MERO DE EXPEDIENTE DE CERTIFICACI N Mencione las caracter sticas indicadas al contactar con...

Страница 32: ...peligro potencial El manejo de la m quina debe realizarse con carretilla elevadora o similar para no da ar la estructura de la m quina Transportar la m quina hasta el lugar donde se debe instalar y po...

Страница 33: ...a vez retirados los paneles portamandos v ase imagen En caso de uni n con sart n basculante sese el agujero marcado en azul Atar las m quinas mediante tornillo y tuerca en la parte anterior inferior v...

Страница 34: ...del estado del aparato despu s de la intervenci n 4 5 1 Quemadores de sobremesa 1 Transformaci n de los quemadores a Soltar el panel portamandos b Desmontar los inyectores de los quemadores y sustitui...

Страница 35: ...los adecuado seg n el gas a utilizar tabla 3 d Volver a atar el conjunto piloto y colocar la solera 4 5 3 Quemador de la placa radiante 1 Transformaci n de los quemadores a Soltar el panel portamando...

Страница 36: ...LAS INSTRUCCIONES DE ESTE MANUAL ESTE ES UN APARATO EXCLUSIVAMENTE PARA USO PROFESIONAL Y DEBE SER UTILIZADO POR PERSONAL CUALIFICADO 5 1 Riesgos de utilizaci n Est usted utilizando una cocina no uti...

Страница 37: ...ertos de mesa Encedido de piloto o Girar el mando M en sentido antihorario hasta la posici n piloto y mantener el mando pulsado o A continuaci n acercar una llama al piloto hasta que se estabilice Enc...

Страница 38: ...lvula M a la posici n de 5 3 Consejos tiles Lea atentamente los consejos tiles que a continuaci n se le muestra para poder aprovechar todo el potencial que su cocina dispone 5 3 1 Limpieza inicial Tr...

Страница 39: ...agado de llama Cerrar el grifo de alimentaci n de gas y ventilar el local La llama presenta color amarillo Quemador sucio Contactar con el servicio de asistencia t cnica Piloto de encendido del horno...

Страница 40: ...s componen e impedir potenciales da os para la salud y el medio ambiente El s mbolo de la papelera tachada se encuentra en todos los productos para recordar la obligaci n de recolecci n separada Para...

Страница 41: ...ing 44 4 2 Positioning and levelling 44 4 3 Assembly of equipment in blocks 45 4 4 Gas connection 45 4 5 Conversion to other types of gas FALTAN IMAGENES 46 4 6 Recycling 48 5 INSTRUCTIONS FOR USE AND...

Страница 42: ...opriate use of the same may result in risks to the health and safety of users and damage to the equipment If your machine breaks down please call the Technical Service Centre Do NOT try to repair it y...

Страница 43: ...APPLIANCE REFERENCE 3 SERIAL NUMBER DATE OF MANUFACTURE 4 ELECTRICAL SPECIFICATIONS 5 CHARACTERISTICS OF GAS APPLIANCE 6 CERTIFICATION NUMBER These details should be quoted when the technical service...

Страница 44: ...emove packaging from the machine and check for damage during transportation If any damage is observed immediately notify the supplier and the transport company In the event of doubt do not use the mac...

Страница 45: ...blocks To assemble the equipment in blocks proceed as follows Remove the controls Dismount the control holder panels Remove the chimney trim Place adhesive tape around the edges of the worktop to be...

Страница 46: ...previously set the old instructions should be replaced with the instructions for the new settings to enable unambiguous identification of the state of the appliance after modification 4 5 1 Top burner...

Страница 47: ...unit and replace the base 4 5 3 Hotplate burner 1 Burner conversion a Undo the control holder panel b Remove the burner injectors and replace with the correct model according to the gas to be used ta...

Страница 48: ...period of time may result in overheating of the components Clean the machines thoroughly If you are going to use solvents or inflammable cleaning products to remove any dirt on the worktop hotplate o...

Страница 49: ...rol to the OFF position 5 2 3 Oven burner 5 2 3 1 Switching on the oven burner Pilot ignition o Using the hook for lifting hotplates supplied with the oven move the pilot access cover o Turn control H...

Страница 50: ...is service must be carried out by an OFFICIAL AND OR AUTHORISED TECHNICAL SERVICE The replacement of any functional component that may affect the safety of either the appliance or the user should be p...

Страница 51: ...ermocouple not heated enough Repeat ignition process The oven does not heat up Broken valve Contact your Technical Assistance Service Insufficient gas pressure Contact your Technical Assistance Servic...

Страница 52: ...lage 55 4 2 Mise en place et nivellement 55 4 3 Montage d quipements par blocs 56 4 4 Raccordement au gaz 57 4 5 Adaptation des gaz diff rents FALTAN IMAGENES 57 4 6 Recyclage 59 5 INSTRUCTIONS D UTIL...

Страница 53: ...cant Des utilisations abusives peuvent entra ner des risques pour la sant et la s curit des utilisateurs ainsi que pour l quipement Si votre machine tombe en panne appelez le Service d assistance tech...

Страница 54: ...DE L APPAREIL 3 N DE S RIE DATE FABRICATION 4 CARACT RISTIQUES LECTRIQUES 5 CARACT RISTIQUES GAZ 6 NUM RO DE PROC S VERBAL DE CERTIFICATION Indiquez les caract ristiques indiqu es si vous contactez le...

Страница 55: ...quer aussi bien des dommages mat riels que des l sions 4 1 D ballage D ballez la machine et v rifiez qu elle n ait pas t endommag e durant le transport sinon notifiez le imm diatement votre fournisseu...

Страница 56: ...traires les pi ces qui ont t prot g es par le fabricant ne doivent pas tre manipul es par l installateur 4 3 Montage d quipements par blocs Pour le montage d quipements par blocs suivez les instructio...

Страница 57: ...Apr s avoir adapt l appareil un autre type de gaz ou une autre pression diff rents de ceux pour lesquels il avait t originairement r gl il convient de laisser les indications relatives au nouveau r gl...

Страница 58: ...e c D monter les injecteurs des veilleuses et les remplacer par des injecteurs adapt s au gaz utiliser tableau 3 d Refixer le dispositif de veilleuse et mettre en place le sol 4 5 3 Br leur de la plaq...

Страница 59: ...tilisation Vous tes en train d utiliser une cuisini re n utilisez pas cet appareil des fins diff rentes que celles pr vues car cela peut d t riorer les parties fonctionnelles de ce dernier Le fonction...

Страница 60: ...o Approcher une flamme de la veilleuse jusqu ce qu elle soit stable Mise en marche des br leurs o Pour allumer les br leurs enfoncer et tourner la commande M dans le sens antihoraire jusqu la position...

Страница 61: ...Arr t de la veilleuse du br leur de la plaque foyer radiant Enfoncer et tourner la commande de la vanne M la position d extinction 5 3 Conseils utiles Lisez attentivement les conseils utiles indiqu s...

Страница 62: ...e gaz occasionnelle due au fait que la flamme s est teinte Fermer le robinet d alimentation de gaz et ventiler le local La flamme pr sente une couleur jaune Br leur sale Contacter le service d assista...

Страница 63: ...aux qui les composent et viter d ventuels dommages pour la sant et l environnement Le symbole de la poubelle barr e se trouve sur tous les produits pour rappeler l obligation de collecte s par e Pour...

Страница 64: ...nd Nivellierung 68 4 3 Montage der Ger te in Blockbauweise 68 4 4 Gasanschluss 69 4 5 Umr stung zur Anpassung an die verschiedenen Gasarten HIER FEHLEN ABBILDUNGEN 69 4 6 Recycling 71 5 GEBRAUCHS UND...

Страница 65: ...cherheit der Anwender und des Ger tes selber mit sich bringen Sollte eine St rung an Ihrem Ger t auftreten so setzen Sie sich bitte mit dem zust ndigen Kundendienst in Verbindung Versuchen Sie bitte A...

Страница 66: ...S 3 SERIENNUMMER UND HERSTELLUNGSDATUM 4 ELEKTRISCHE EIGENSCHAFTEN 5 GASRELEVANTE EIGENSCHAFTEN 6 REGISTRIERUNGSNUMMER DER ZERTIFIZIERUNG Halten Sie bitte diesen Angaben bereit wenn Sie sich an den Ku...

Страница 67: ...ng der im jeweiligen Land geltenden Gesetzgebung vorgenommen werden Bei unsachgem er Installation Einstellung Bedienung oder Wartung bzw Handhabung des Ger tes kann es sowohl zu Sach als auch Personen...

Страница 68: ...prechenden Wand aufgestellt werden Die Ger te d rfen nur auf oder neben nicht brennbaren Fl chen aufgestellt werden Werkseitig wird zu einer gr ndlichen berpr fung des Aufstellungsortes vor Installati...

Страница 69: ...eingestellt so ist wie folgt zu verfahren 1 Den Gasdurchlauf zum Ger t unterbrechen falls dieses eingeschaltet ist nur ein AUTORISIERTER FACHTECHNIKER darf nderungen am Gaskreislauf des Ger tes durch...

Страница 70: ...ch die f r die verwendete Gasart passenden Injektoren ersetzen Tabelle 3 c Den Luftregler je nach vorhandener Gasart auf das Ma H Tabelle 3 einregulieren d Die Unterhitze wieder einsetzen 2 Umr stung...

Страница 71: ...ieder einsetzen 4 6 Recycling Die Verpackung dieses Produkts besteht aus folgenden Elementen Holzpalette Kantenschutzelemente aus Pappe Spannband aus Polypropylen Kunststoffbeutel Alle zur Verpackung...

Страница 72: ...f r die ordnungsgem e Bedienung des Ger tes Das Ger t sollte nur mit geschlossener T r betrieben werden Die richtige Stellung der Unterhitze sicherstellen Das verwendete Heizsystem erm glicht den Ein...

Страница 73: ...einer Flamme an den Pilotbrenner erfolgen Einschalten der Brenner o Zum Einschalten des Brenners muss das Bedienelement M gedr ckt und entgegen dem Uhrzeigersinn in die gew nschte Stellung gedreht we...

Страница 74: ...allen Speiseresten reinigen Hierzu kann ein markt blicher Fettl ser benutzt werden Anschlie end die sauberen Fl chen gr ndlich reinigen Keine scheuernden tzenden oder laugehaltigen Produkte L sungsmi...

Страница 75: ...t Wenden Sie sich bitte an den zust ndigen Kundendienst Ungen gender Gasdruck Wenden Sie sich bitte an den zust ndigen Kundendienst Die offenen Tischbrenner z nden nicht Der Z ndspalt des Brenners ist...

Страница 76: ...osizionamento e livellamento 79 4 3 Montaggio delle attrezzatura in blocchi 80 4 4 Allacciamento del gas 81 4 5 Trasformazione a gas differenti IMMAGINI MANCANTI 81 4 6 Riciclaggio 83 5 ISTRUZIONI DI...

Страница 77: ...Un uso improprio pu determinare rischi per la salute e la sicurezza degli utilizzatori e dell apparecchio In caso di guasti si prega di contattare il Servizio di Assistenza Tecnica NON cercare di ese...

Страница 78: ...ENTO DEL PRODOTTO 3 NUMERO DI SERIE DATA DI COSTRUZIONE 4 CARATTERISTICHE ELETTRICHE 5 CARATTERISTICHE GAS 6 NUMERO DI PRATICA DELLA CERTIFICAZIONE Menzionare le caratteristiche elencate quando viene...

Страница 79: ...ono causare danni materiali e lesioni 4 1 Disimballaggio Disimballare la macchina e controllare che non ha subito nessun danno durante il trasporto altrimenti avvisare immediatamente il proprio fornit...

Страница 80: ...verificarsi di danni durante l uso Salvo indicazioni specifiche contrarie i pezzi che sono stati protetti dal fabbricante non devono essere manipolati dall installatore 4 3 Montaggio delle attrezzatu...

Страница 81: ...izioni del circuito di gas dell apparecchio dovr essere sempre realizzato da un TECNICO AUTORIZZATO 2 Dopo aver adattato l apparecchio ad un tipo diverso di gas o ad una pressione differente da quelle...

Страница 82: ...sizionare il regolatore dell aria sulla misura H tabella 3 secondo il tipo di gas che si vuole utilizzare d Rimontare la platea 2 Trasformazione delle spese a Smontare la platea del forno b Smontare i...

Страница 83: ...ella della piastra radiante 4 6 Riciclaggio L imballo del prodotto composto da Pallet di legno Bordi di cartone Reggetta in polipropilene Busta di plastica Tutti gli imballi utilizzati per il confezio...

Страница 84: ...perta Controllare il corretto posizionamento della platea possibile preparare contemporaneamente pi piastre per arrosti per aver verificato che il risultato soddisfacente grazie al sistema scaldante u...

Страница 85: ...gnimento del bruciatore del forno Girare il comando H sulla posizione spia e rester accesa solo la spia 5 2 3 3 Spegnimento della fiamma pilota del bruciatore del forno Girare il comando della valvola...

Страница 86: ...i cloro o derivati della benzina per la pulizia Non pulire la macchina con getti di acqua a pressione Si raccomanda di pulire periodicamente la piastra radiante la platea le piastre i corpi bruciatori...

Страница 87: ...ontattare il servizio di assistenza tecnica Bruciatori aperti da tavolo non si accendono Scanalatura dell accensione del bruciatore intasata Pulire la scanalatura dell accensione del corpo bruciatore...

Страница 88: ...tirme ve y ksekli in ayarlamas 91 4 3 Blok halindeki cihaz n montaj 92 4 4 Gaz ba lant s 93 4 5 Farkl gazlara d n t rme FALTAN IMAGENES 93 4 6 Geri d n m 95 5 KULLANIM VE BAKIM TAL MATLARI 95 5 1 Kull...

Страница 89: ...ng rd kullan mlar do rultusunda kullan n Cihaz n uygunsuz kullan m kullan c lar n sa l k ve g venli i ve cihaz a s ndan riskler do urabilir E er makinan z ar zaland ysa Teknik Yard m Servisini aray n...

Страница 90: ...SI 1 C HAZIN ADI 2 C HAZIN REFERANSI 3 SER NUMARASI RET M TAR H 4 ELEKTR KSEL ZELL KLER 5 GAZ ZELL KLER 6 SERT F KA NUMARASI Teknik servisle ileti ime ge ti inizde belirtilen zellikleri s yleyiniz C H...

Страница 91: ...j n kar n ve nakliye s ras nda herhangi bir hasar al p almad n kontrol edin hasar alm olmas halinde hemen tedarik iyi ve nakliyeciyi bilgilendirin Emin olmad n z durumlarda hasarlar n kapsam analiz ed...

Страница 92: ...taraf ndan korunan par alar kurulumu yapan ki i taraf ndan manip le edilmemelidir 4 3 Blok halindeki cihaz n montaj Blok halindeki cihazlar n montaj i in u talimatlar izleyiniz D meleri kar n Kumanda...

Страница 93: ...p lmal d r 4 Cihaz daha nceden ayarlananlardan farkl ba ka bir gaz ya da bas n t r ne uyarlad ktan sonra yeni ayar n talimatlar n n cihaz n yap lan m dahaleden sonraki durumunu herhangi bir belirsizli...

Страница 94: ...ilot d melerin d n t r lmesi a F r n n alt k sm n kar n b Pilot d me tak m n kar n c Pilot d melerin enjekt rlerini s k n ve kullan lacak gaza g re uygun enjekt rler koyun tablo 3 d Pilot d me tak m n...

Страница 95: ...TL B R EK LDE OKUYUNUZ BU C HAZ SADECE PROFESYONEL KULLANIM ND R VE KAL F YE B R PERSONEL TARAFINDAN KULLANILMALIDIR 5 1 Kullan m riskleri Bir ocak kullan yorsunuz cihaz n i levsel par alar na zarar v...

Страница 96: ...n ne do ru evirin ve bas l tutun o Sonras nda dengelenmesi ad na pilota bir alev yakla t r n Ocaklar n yak lmas o Ocaklar yakmak i in M d mesine bas n ve istenilen pozisyona kadar saatin aksi y n nde...

Страница 97: ...potansiyelden yararlanabilmek i in a a da g sterilen t m kullan l tavsiyeleri dikkatli bir ekilde okuyun 5 3 1 lk temizlik Oca kurduktan sonra temizlenmesi nerilmektedir lk kullan m s ras nda k t koku...

Страница 98: ...i muslu unu kapat n ve b lgeyi havaland r n K v lc m n rengi sar Ocak kirli Teknik yard m servisi ile ileti ime ge in F r n akma n n pilotu yanm yor Piezoelektrik al m yor F r n manuel ekilde a n Tek...

Страница 99: ...ekilde at lmamas gerekti ini belirtir Kullan lmayan aletler kendisini meydana getiren materyallerin geri kazan lma ve geri d n m y zdesini art rmak ve sa l a ve evreye olan olas zararlar n nlemek ad n...

Отзывы: