background image


ES

99

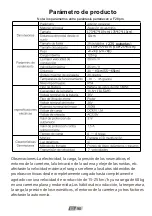
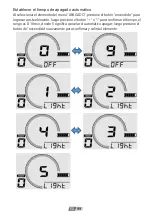
Establecer el tiempo de apagado automático

Al seleccionar el elemento del menú "APAGADO", presione el botón "encendido" para 
ingresar a este elemento, luego presione el botón "+" o "-" para confirmar el tiempo, el 
rango es 0-10 min, donde 0 significa cancelar el automático apagar; luego presione el 
botón de "encendido" nuevamente para confirmar y salir del elemento.

Содержание F26 PRO

Страница 1: ...Smart EV Moped User Manual Model F26 PRO F28 PRO EN DE FR IT ES...

Страница 2: ......

Страница 3: ...eld unten falls Sie dies in Zukunft ben tigen Veuillez noter votre num ro de cadre dans l espace vide ci dessous en cas de besoin futur Si prega di annotare il numero di telaio della bicicletta nello...

Страница 4: ......

Страница 5: ...Model F26 PRO Model F28 PRO...

Страница 6: ...CONTENTS English 1 20 Deutsch 21 40 Fran ais 41 60 Italiano 61 80 Espa ol 81 100...

Страница 7: ...harged first cut off the power supply and then unplug the charger connector When the green light is on the power supply should be cut off in time It is forbidden to connect the charger to the power su...

Страница 8: ...the vehicle should be located in the center of the front fork or frame Always check the tire for scratches cracks or excessive wear The inner tube and the valve should be perpendicular to the wheel h...

Страница 9: ...Tire Rim Brake Disc Front Fork brake Disc Chainwheel Pedal Chain Rear Derailleur Motor Seat Tube Adjustment Quick Release Seat Tube Tail light Saddle Lithium Battery Battery charging hole Battery Loc...

Страница 10: ...rotection rod with an adjustable wrench and remove the front fork protection rod 4 Place the front wheel on the front fork for installation pay attention to the disc brake pad and the disc brake to ma...

Страница 11: ...to ensure that there is no looseness of the handlebar 10 Loosen the headlight fixing screw on the front fork fix the front mudboard fixing hook and the headlight bracket together with the screw on th...

Страница 12: ...the side of the sprocket Note The left pedal is tightened to the left and the right pedal is tightened to the right Pedals Tool Wheel reflector Reflector clip Front wheel quick release Display Pipe Cl...

Страница 13: ...behind the pipe clamps of the display to fix it as shown in the right picture below 4 Loosen the fixing clip of the button unit click it into the handlebar tube and then tighten the fixing screw as sh...

Страница 14: ...display after installation is as shown in the figure above The state of the bicycle after the installation is completed as shown in the figure above Removing the battery Insert the key twist it to the...

Страница 15: ...t light 5 Power assisted mode power assisted riding step on the pedals of the bicycle and automatically start electric power after a certain speed If you don t need assistance you can turn off the pow...

Страница 16: ...s testing from fully charged to completely exhausted with a riding speed of 15 25km h and a load of 60kg on a flat hardened road driving habits temperature load tire pressure road environment and othe...

Страница 17: ...water or use water spray to clean the meter When cleaning please use a soft cloth dampened with water to wipe Do not use any cleaning agents to wipe 4 The USB charging port on the display cannot prov...

Страница 18: ...3 1 2 4 1 3 2 4 5 6 EN 12 Parts description and specifications Parts description DTK3 Buttons...

Страница 19: ...Dimensions Display Dimensions DTK3 Dimensions Reliability Conformities EN 13...

Страница 20: ...en it 3 If you want to install it on a 22 2mm or 25 4mm handlebar please use the attached adapter rubber ring fixing Install the button unit 1 Use one M3 hexagon socket screw 3 to lock the control uni...

Страница 21: ...tion Turn on the power to the riding interface 1 Long press the Power button and the interface is fully lit to enter the riding interface 2 Press or button to change the power speed The default is 0 a...

Страница 22: ...play area EN 16 Trip mileage range 0 0 9999 9 km Total mileage range 0 99999 km Single average speed range 0 0 99 9 km h Single maximum speed 0 0 99 9 km h Single riding time 00 00 99 59 Single calori...

Страница 23: ...Multi function display click the power button to switch Headlight Speed unit default km h Battery display percentage Menu interface In the meter interface long press the and buttons to enter or exit...

Страница 24: ...04 99 in particular 27 5 inches displays 27 5 then press the Power button to confirm And exit the item Set speed unit When selecting the Unit menu item press the Power button to confirm KM H or MPH S...

Страница 25: ...electing the OFF menu item press the power button to enter this item the press or button to confirm the time the range is 0 10 min where 0 means to cancel the automatic shutdown then press the power b...

Страница 26: ...is displayed by default Restoring factory settings can restore the default factory parameters including speed unit wheel diameter speed limit automatic shutdown time and brightness Error code interfa...

Страница 27: ...geladen ist unterbrechen Sie zuerst die Stromversorgung und ziehen Sie dann den Stecker des Ladeger ts ab Wenn das gr ne Licht leuchtet sollte die Stromversorgung rechtzeitig unterbrochen werden Es i...

Страница 28: ...r des Fahrzeugs sollten sich in der Mitte der Vordergabel oder des Rahmens befinden berpr fen Sie den Reifen immer auf Kratzer Risse oder berm igen Verschlei Der Schlauch und das Ventil sollten senkre...

Страница 29: ...ebel Lenkervorbau Vorderlich Kotfl gel vorne Reifen Rand Bremsscheibe Vorderrad Schnellspanner Vorderradgabel Scheibenbremse Kettenabdeckung Kettenblatt Pedal Kette Schaltwerk Motor Sitzrohrverstellun...

Страница 30: ...stellbaren Schraubenschl sselund entfernen Sie die Vorderradgabel Schutzstange 4 Setzen Sie das Vorderrad zur Montage auf die Vorderradgabel achten Sie darauf dass der Scheibenbremsbelag und die Schei...

Страница 31: ...s sich der Lenker nicht lockert 10 L sen Sie die Scheinwerfer Befestigungsschraubean der Vorderradgabel befestigen Sie den Befestigungshaken des vorderen Schmutzblechsund die Scheinwerferhalterung zus...

Страница 32: ...itzel montiert Hinweis Das linke Pedal wird nach links und das rechte Pedal nach rechts angezogen R cklicht Pedale Werkzeug Radreflektor Reflektorclip Ladeger t Ladekabel Wellenschutzkappe Bildschirm...

Страница 33: ...n des Displays fest um es zu befestigen wie im rechten Bild unten gezeigt 4 L sen Sie die Befestigungsklammer der Tasteneinheit klicken Sie sie in das Lenkerrohr und ziehen Sie dann die Befestigungssc...

Страница 34: ...ys nach der Installation ist wie in der Abbildung oben dargestellt Der Zustand des Fahrrads nach Abschluss der Installation wie in der Abbildung oben gezeigt Akku entnehmen Schl ssel einstecken mit de...

Страница 35: ...nterst tzter Modus Kraftunterst tztes Fahren Treten Sie auf die Pedale des Fahrrads und starten Sie nach einer bestimmten Geschwindigkeit automatisch den Strom Wenn Sie keine Hilfe ben tigen k nnen Si...

Страница 36: ...on voll aufgeladen bis v llig ersch pft bei einer Fahrgeschwindigkeit von 15 25 km h und einer Belastung von 60 kg auf einer ebenen geh rteten Stra e Fahrgewohnheiten Temperatur Beladung Reifendruck S...

Страница 37: ...e kein Wasserspray um das Messger t zu reinigen Zur Reinigung verwenden Sie bitte ein weiches mit Wasser angefeuchtetes Tuch zum Abwischen Verwenden Sie zum Abwischen keine Reinigungsmittel 4 Der USB...

Страница 38: ...3 1 2 4 1 3 2 4 5 6 DE 32 Teilebeschreibung und Spezifikationen Teilebeschreibung DTK3 Tasten...

Страница 39: ...Abmessungen Display Abmessungen DTK3 Abmessungen Verl sslichkeit Conformities DE 33...

Страница 40: ...3 Wenn Sie es an einem 22 2 mm oder 25 4 mm Lenker montieren m chten verwenden Sie bitte den beiliegenden Adaptergummiring Installieren Sie die Tasteneinheit 1 Mit einer M3 Innensechskantschraube 3 da...

Страница 41: ...n Sie lange auf die Power Taste und die Schnittstelle ist vollst ndig beleuchtet um die Fahrschnittstelle aufzurufen DE 35 2 Dr cken Sie die Taste oder um die Leistungsgeschwindigkeit zu ndern Der Sta...

Страница 42: ...nfache Durchschnittsgeschwindigkeit Bereich 0 0 99 9 km h Einzelh chstgeschwindigkeit 0 0 99 9 km h Einzelfahrzeit 00 00 99 59 Einzelkalorienverbrauch Bereich 0 9999KCal Echtzeitleistung Bereich 0 999...

Страница 43: ...Umschalten auf den Netzschalter klicken Scheinwerfer Geschwindigkeitseinheit Standard km h Prozentsatz der Batterieanzeige Men oberfl che Dr cken Sie in der Messger teschnittstelle lange auf die Tast...

Страница 44: ...Dr cken Sie dann die Power Taste um zu best tigen und das Element zu verlassen Geschwindigkeitseinheit einstellen Dr cken Sie bei Auswahl des Men punktes Einheit die Taste Power um KM H oder MPH zu be...

Страница 45: ...r cken Sie die Taste Power um diesen Punkt aufzurufen dr cken Sie die Taste oder um die Zeit zu best tigen der Bereich ist 0 10 min wobei 0 bedeutet dass die Automatik abgebrochen wird stilllegen Dr c...

Страница 46: ...ch das Wiederherstellen der Werkseinstellungen k nnen die werkseitigen Standardparameter wiederhergestellt werden einschlie lich Geschwindigkeitseinheit Raddurchmesser Geschwindigkeitsbegrenzung autom...

Страница 47: ...upez d abord l alimentation puis d branchez le connecteur du chargeur Lorsque le voyant vert est allum l alimentation doit tre coup e temps Il est interdit de connecter le chargeur l alimentation pend...

Страница 48: ...e ou du cadre avant V rifiez toujours que le pneu ne pr sente pas de rayures de fissures ou d usure excessive La chambre air et la valve doivent tre perpendiculaires au moyeu de la roue Les pneus endo...

Страница 49: ...umi re de devant Garde boue avant Pneu Jante Disque de frein Blocage rapide de la roue avant Fourche avant Frein disque Couverture de cha ne Pignon P dale Cha ne D railleur arri re Moteur Porte bagage...

Страница 50: ...lette et retirez la tige de protection de la fourche avant 4 Placez la roue avant sur la fourche avant pour l installation faites attention ce que la plaquette de frein disque et le frein disque corre...

Страница 51: ...n y a pas de jeu du guidon 10 Desserrez la vis de fixation du phare sur la fourche avant fixez le crochet de fixation du garde boue avant et le support de phare avec la vis sur la fourche avant puis...

Страница 52: ...le c t du pignon Remarque La p dale gauche est serr e vers la gauche et la p dale droite est serr e vers la droite le feu arri re P dales Outil R flecteur de roue Clip r flecteur Chargeur C ble de ch...

Страница 53: ...age de l cran pour le fixer comme indiqu sur l image de droite ci dessous 4 Desserrez le clip de fixation de l unit de bouton encliquetez le dans le tube du guidon puis serrez la vis de fixation comme...

Страница 54: ...s l installation est comme indiqu dans la figure ci dessus L tat du v lo une fois l installation termin e comme indiqu dans la figure ci dessus Retrait de la batterie Ins rez la cl tournez la vers la...

Страница 55: ...airage avant 5 Mode assist conduite assist e appuyez sur les p dales du v lo et d marrez automatiquement l alimentation lectrique apr s une certaine vitesse Si vous n avez pas besoin d aide vous pouve...

Страница 56: ...de tests continus de pleine charge compl tement puis avec une vitesse de conduite de 15 25 km h et une charge de 60 kg sur une route plate et durcie les habitudes de conduite la temp rature la charge...

Страница 57: ...our nettoyer le compteur Lors du nettoyage veuillez utiliser un chiffon doux humidifi avec de l eau pour essuyer N utilisez aucun produit de nettoyage pour essuyer 4 Le port de chargement USB sur l cr...

Страница 58: ...3 1 2 4 1 3 2 4 5 6 FR 52 Description et sp cifications des pi ces Descriptif des pi ces Boutons DTK3...

Страница 59: ...Dimensions Dimensions d affichage Dimensions DTK3 Fiabilit Conformities FR 53...

Страница 60: ...z l installer sur un guidon de 22 2 mm ou 25 4 mm veuillez utiliser l anneau en caoutchouc de l adaptateur joint Installer l unit de boutons 1 Utilisez une vis six pans creux M3 3 pour verrouiller le...

Страница 61: ...rface de conduite 1 Appuyez longuement sur le bouton Power et l interface est enti rement allum e pour entrer dans l interface de conduite 2 Appuyez sur le bouton ou pour modifier la vitesse d aliment...

Страница 62: ...R 56 Kilom trage parcouru autonomie 0 0 9999 9 km Kilom trage total autonomie de 0 99999 km Vitesse moyenne simple plage 0 0 99 9 km h Vitesse maximale unique 0 0 99 9 km h Temps de conduite unique 00...

Страница 63: ...e multifonction cliquez sur le bouton d alimentation pour basculer Phare Unit de vitesse par d faut km h Pourcentage d affichage de la batterie Interface de menus Dans l interface du compteur appuyez...

Страница 64: ...27 5 pouces affiche 27 5 puis appuyez sur le bouton Power pour confirmer et quitter l l ment D finir l unit de vitesse Lors de la s lection de l l ment de menu Unit appuyez sur le bouton Power pour c...

Страница 65: ...l ment de menu OFF appuyez sur le bouton power pour entrer dans cet l ment appuyez sur le bouton ou pour confirmer l heure la plage est de 0 10 min o 0 signifie annuler l automatique fermer puis appu...

Страница 66: ...ich par d faut La restauration des param tres d usine peut restaurer les param tres d usine par d faut y compris l unit de vitesse le diam tre de la roue la limite de vitesse l heure d arr t automatiq...

Страница 67: ...bbe essere interrotta in tempo vietato collegare il caricabatterie all alimentazione per lungo tempo senza caricarlo Durante il processo di ricarica se l indicatore luminoso anomalo appare un odore pa...

Страница 68: ...on forza e mantenere lubrificato l albero rotante Non consentito guidare oltre il carico massimo il carico massimo 120 kg Dopo l uso l auto non pu essere parcheggiata nell atrio dell edificio nelle sc...

Страница 69: ...apido della ruota anteriore Forcella anteriore Freno a disco Copricatena pignone Pedale catena Deragliatore posteriore Motore Sgancio rapido per la regolazione del tubo sella Portapacchi posterior Tub...

Страница 70: ...egolabile e rimuovere l asta di protezione della forcella anteriore 4 Posizionare la ruota anteriore sulla forcella anteriore per l installazione prestare attenzione alla pastiglia del freno a disco e...

Страница 71: ...llentamento del manubrio 10 Allentare la vite di fissaggio del faro sulla forcella anteriore fissare il gancio di fissaggio del parafango anteriore e la staffa del faro insieme alla vite sulla forcell...

Страница 72: ...nistro serrato a sinistra e il pedale destro serrato a destra posteriore Fanale Pedali Attrezzo Riflettore ruota Clip catarifrangente Caricabatterie Cavo di ricarica Tappo di protezione dell albero Sc...

Страница 73: ...r fissarlo come mostrato nell immagine qui sotto a destra 4 Allentare la clip di fissaggio dell unit pulsante incastrarla nel tubo del manubrio quindi serrare la vite di fissaggio come mostrato nella...

Страница 74: ...allazione quello mostrato nella figura sopra Lo stato della bicicletta dopo il completamento dell installazione come mostrato nella figura sopra Rimozione della batteria inserire la chiave ruotarla ve...

Страница 75: ...eriore 5 Modalit servoassistito guida servoassistita salire sui pedali della bicicletta e avviare automaticamente l alimentazione elettrica dopo una certa velocit Se non hai bisogno di assistenza puoi...

Страница 76: ...da test continui da completamente carico a completamente esaurito con una velocit di marcia di 15 25 km he un carico di 60 kg su una strada piana e temprata abitudini di guida temperatura carico pres...

Страница 77: ...utilizzare spruzzi d acqua per pulire lo strumento Durante la pulizia utilizzare un panno morbido inumidito con acqua per pulire Non utilizzare detergenti per pulire 4 La porta di ricarica USB sul di...

Страница 78: ...3 1 2 4 1 3 2 4 5 6 IT 72 Descrizione e specifiche delle parti Descrizione delle parti Pulsanti DTK3...

Страница 79: ...Dimensioni Dimensioni del display Dimensioni DTK3 Affidabilit Conformities IT 73...

Страница 80: ...era installarlo su un manubrio da 22 2 mm o 25 4 mm utilizzare l anello di gomma dell adattatore in dotazione Installare l unit pulsanti 1 Utilizzare una vite M3 ad esagono incassato 3 per bloccare l...

Страница 81: ...terfaccia di guida 1 Premere a lungo il pulsante Power e l interfaccia completamente illuminata per accedere all interfaccia di guida 2 Premere il pulsante o per modificare la velocit di alimentazione...

Страница 82: ...raggio del viaggio intervallo 0 0 9999 9 km Chilometraggio totale gamma 0 99999 km Velocit media singola intervallo 0 0 99 9 km h Velocit massima singola 0 0 99 9 km h Tempo di guida singolo 00 00 99...

Страница 83: ...isplay multifunzione fare clic sul pulsante di accensione per cambiare Faro Unit di velocit predefinita km h Percentuale di visualizzazione della batteria Interfaccia del menu Nell interfaccia dello s...

Страница 84: ...e 27 5 pollici visualizza 27 5 quindi premere il pulsante Power per confermare ed uscire dalla voce Imposta unit di velocit Quando si seleziona la voce di menu Unit premere il pulsante Accensione per...

Страница 85: ...la voce di menu OFF premere il pulsante power per accedere a questa voce premere il pulsante o per confermare l ora l intervallo 0 10 min dove 0 significa annullare l automatico spegnimento quindi pr...

Страница 86: ...No Il ripristino delle impostazioni di fabbrica pu ripristinare i parametri di fabbrica predefiniti tra cui unit di velocit diametro della ruota limite di velocit tempo di spegnimento automatico e lu...

Страница 87: ...endida la fuente de alimentaci n debe cortarse a tiempo Est prohibido conectar el cargador a la fuente de alimentaci n durante mucho tiempo sin cargar Durante el proceso de carga si la luz indicadora...

Страница 88: ...l de Usuario la empresa se reserva el derecho de modificaci n e interpretaci n final las funciones del modelo espec fico mencionado en este manual de usuario solo son aplicables a ese modelo espec fic...

Страница 89: ...Guardabarros delantero Neum tico Borde Disco del freno Liberaci n r pida de la rueda delantera Tenedor frontal Freno de disco Cubre cadena Rueda de espigas Pedal Cadena Cambio trasero Motor Luz traser...

Страница 90: ...ave ajustable y retire la barra de protecci n de la horquilla delantera 4 Coloque la rueda delantera en la horquilla delantera para la instalaci n preste atenci n a que la pastilla del freno de disco...

Страница 91: ...haya holgura del manillar 10 Afloje el tornillo de fijaci n del faro en la horquilla delantera fije el gancho de fijaci n del salpicadero delantero y el soporte del faro junto con el tornillo de la h...

Страница 92: ...ada Nota El pedal izquierdo se aprieta a la izquierda y el pedal derecho se aprieta a la derecha Luz trasera Pedales Herramienta Reflector de rueda Pinza reflectora Cargador cable cargador Tapa de pro...

Страница 93: ...pantalla para fijarla como se muestra en la imagen de la derecha a continuaci n 4 Afloje el clip de fijaci n de la unidad del bot n haga clic en el tubo del manillar y luego apriete el tornillo de fij...

Страница 94: ...despu s de la instalaci n es como se muestra en la figura anterior El estado de la bicicleta despu s de completar la instalaci n como se muestra en la figura anterior Extracci n de la bater a inserte...

Страница 95: ...5 Modo asistido por energ a conducci n asistida por energ a pise los pedales de la bicicleta y encienda autom ticamente la energ a el ctrica despu s de una cierta velocidad Si no necesita ayuda puede...

Страница 96: ...as desde completamente cargado hasta completamente agotado con una velocidad de conducci n de 15 25 km hy una carga de 60 kg en una carretera plana y endurecida Los h bitos de conducci n la temperatur...

Страница 97: ...en aerosol para limpiar el medidor Al limpiar utilice un pa o suave humedecido con agua para limpiar No use ning n agente de limpieza para limpiar 4 El puerto de carga USB de la pantalla no puede prop...

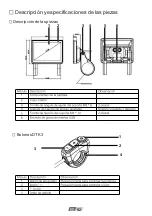
Страница 98: ...3 1 2 4 1 3 2 4 5 6 ES 92 Descripci n y especificaciones de las piezas Descripci n de las piezas Botones DTK3...

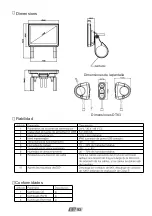
Страница 99: ...Dimensions Dimensiones de la pantalla Dimensiones DTK3 Fiabilidad Conformidades ES 93...

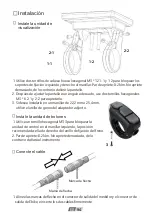
Страница 100: ...retarla 3 Si desea instalarlo en un manillar de 22 2 mm o 25 4 mm utilice el anillo de goma del adaptador adjunto Instale la unidad de botones 1 Utilice un tornillo hexagonal M3 3 para bloquear la uni...

Страница 101: ...onducci n 1 Mantenga presionado el bot n Encendido y la interfaz se iluminar completamente para ingresar a la interfaz de conducci n 2 Presione el bot n o para cambiar la velocidad de alimentaci n El...

Страница 102: ...ES 96 Kilometraje de viaje rango 0 0 9999 9 km Kilometraje total rango 0 99999 km Velocidad media nica rango de 0 0 a 99 9 km h Velocidad m xima nica 0 0 99 9 km h Tiempo de conducci n individual 00 0...

Страница 103: ...lla multifunci n haga clic en el bot n de encendido para cambiar Faro Unidad de velocidad km h por defecto Porcentaje de visualizaci n de la bater a Interfaz de men En la interfaz del medidor mantenga...

Страница 104: ...ulgadas muestra 27 5 luego presione el bot n Encendido para confirmar y salir del elemento Establecer unidad de velocidad Al seleccionar el elemento del men Unidad presione el bot n Encendido para con...

Страница 105: ...el men APAGADO presione el bot n encendido para ingresar a este elemento luego presione el bot n o para confirmar el tiempo el rango es 0 10 min donde 0 significa cancelar el autom tico apagar luego p...

Страница 106: ...ada Restaurar la configuraci n de f brica puede restaurar los par metros predeterminados de f brica incluida la unidad de velocidad el di metro de la rueda el l mite de velocidad el tiempo de apagado...

Страница 107: ......
Страница 108: ...ngzhou Gedesheng V lo lectrique Co Ltd Adresse No 105 rue commerciale village de Guangtang rue Xinya district de Huadu Guangzhou Guangdong Chine INFORMAZIONIDI FABBRICAZIONE Manufacturer Guangzhou Ged...

Отзывы: