


EN
1
0
10
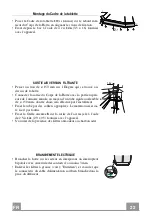
Flue assembly
Lower exhaust flu
e
• Insert the wooden profile
20
(optional)
between the hood body
and the flue.
• Fix the lower section of the flue and the cable raceway to the
hood body from above, using the 6 screws
12g
provided.
Upper exhaust flue
• Slightly widen the two sides of the upper flue and hook them
behind the brackets
7.2.1
, making sure that they are well seat-
ed.
• Secure the sides to the brackets using the 4 screws
12c
sup-
plied.
20
12g
2.2
2.1
12c
Mounting the hood body
At the discretion of the fitter, the wall corner panel can be in-
stalled by screwing it to the back of the hood using the three
12b
screws provided.
• Adjust the two screws
Vr
, on brackets
11a
, to a minimum.
• Hook the hood canopy onto the two brackets
11a.
• Remove the filters, one at a time, after disconnecting the rela-
tive fastening elements.
• From inside the hood canopy, adjust the screws
Vr
to set the
Hood Canopy level.
• Fix the hood to the wall using the two safety holes located at
the bottom inside the canopy of the hood (wall plugs
11
+
screws
12a
).
11a
Vr
Connections
DUCTED VERSION AIR EXHAUST SYSTEM
When installing the ducted version, connect the hood to the
chimney using either a flexible or rigid pipe ø 150 or 120 mm,
the choice of which is left to the installer.
• To install a ø 120 mm air exhaust connection, insert the reduc-
er flange
9
on the hood body outlet.
• Fix the pipe in position using sufficient pipe clamps (not sup-
plied).
• Remove possible charcoal filters.
ø 150
ø 120
9
Содержание WEST ANGOLO BIANCO SC
Страница 8: ...EN 8 8 Dimensions...
Страница 19: ...FR 1 9 19 Encombrement...
Страница 30: ...DE 3 0 30 Platzbedarf...
Страница 41: ...ES 4 1 41 Dimensiones...
Страница 48: ...GR 4 8 48 650 mm 120 mm...
Страница 49: ...GR 4 9 49 0 04 mbar 8...
Страница 50: ...GR 5 0 50...
Страница 52: ...GR 5 2 52...
Страница 55: ...GR 5 5 55 10 4 12n 3 5 x 16 10 12f 1 12n 10 150 150 8 2 12e 2 9 x 9 5 8 12e 150 3 mm...
Страница 56: ...GR 5 6 56 1 1 0 1 0 2 3 L M V L M V 1 2 3...
Страница 57: ...GR 5 7 57 2 4 A B A B...
Страница 59: ...RU 5 9 59 650 I 120...
Страница 60: ...RU 6 0 60 0 04 8...
Страница 61: ...RU 6 1 61...
Страница 63: ...RU 6 3 63...
Страница 65: ...RU 6 5 65 20 6 12g 7 2 1 2 12c 20 12g 2 2 2 1 12c 12b Vr 11a 11 Vr 11 12 11a Vr 150 120 120 9 150 120 9...
Страница 66: ...RU 6 6 66 10 4 12n 3 5 x 16 10 12f 1 12n 10 150 150 8 2 12e 2 9 x 9 5 8 12e 150 3...
Страница 67: ...RU 6 7 67 1 1 0 1 0 2 3 L M V L M V 1 2 3...
Страница 68: ...RU 6 8 68 2 4 A B...
Страница 74: ...PL 7 4 74 Wymiary...
Страница 81: ......
Страница 82: ......
Страница 83: ......
Страница 84: ...991 0432 061_ver5 190426 D000000002611_02...


