


Version 11/00 - Page 7
Light On/Off Button ( L )
On/Off switch for the fluorescent light. Move the switch to
"1" to turn the light ON and to "0" to turn it OFF.
Blower On/Off Button ( M )
On/Off switch for the blower. Move the switch to "1" to turn
the blower ON and to "0" to turn it OFF.
Blower Speed Button ( V )
Variable speed control for blower. Move the switch to the far
left for LOW Speed and to the far right for HIGH speed.
For Best Results
Start the rangehood before cooking and allow the unit to
operate for several minutes after cooking is complete to clear
all smoke and odors from the kitchen.
Cleaning
The metal grease filters should be cleaned frequently in hot
detergent solution or washed in the dishwasher. Clean painted
hoods with hot soapy water. Stainless steel cleaner should
be used on stainless rangehoods. Abrasives and scouring
agents can scratch stainless steel finishes and should not be
used to clean finished surfaces
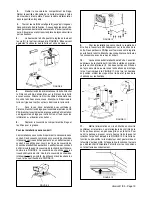
Replacing the Fluorescent Light
To replace the fluorescent light shown in FIGURE 14, remove
the diffuser clips (T) from both ends of the glass diffuser. Care-
fully slide the glass diffuser all the way to the right. Lower
the left end of the glass below the support flange (Z), then
remove the glass by sliding it back to the left. Replace the
diffuser glass by reversing these directions.
USE AND CARE INFORMATION
This rangehood system is designed to remove smoke, cooking
vapors and odors from the cooktop area.
Rangehood Control Panel
The control panel, located on the right-hand side under the
canopy, is designed to disappear from view when not needed.
To open, press upward on the front edge and release. The
panel will drop into sight. To close, push upward on the bot-
tom left corner of the control panel and it will slide up into
the hood. The position and function of each control button is
indicated in FIGURE 13.
FIGURE 13
FIGURE 14
WARRANTY & SERVICE
This rangehood carries a limited warranty against manufac-
turer's defects. To obtain warranty service, contact the dealer
from whom you purchased the rangehood, or the local Faber
distributor. If you cannot identify a local Faber distributor,
contact Faber USA at (508) 358-5353 for the name of a
distributor in your area.
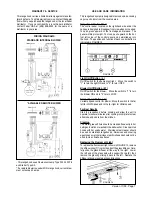
STANDARD INTERNAL BLOWER
WIRING DIAGRAMS
*AVAILABLE REMOTE BLOWER
• This rangehood uses Flourescent Lamp Type F33-15W-T8
and Starter Type S2.
* If a remote blower is used with this rangehood, current draw
must not exceed 4 amps.
Содержание Nova
Страница 12: ...4324289...


