Faber LEVA24SS300-B Скачать руководство пользователя страница 42

42

+B

+B

Schéma de câblage

LEVA24SS300-B   LEVA24WH300-B   LEVA24BK300-B   
LEVA30SS300-B   LEVA30WH300-B   LEVA30BK300-B
LEVA36SS300-B   LEVA36WH300-B   LEVA30BK300-B  

Содержание LEVA24SS300-B

Страница 1: ...B LEVA30SS300 B LEVA30WH300 B LEVA30BK300 B LEVA36SS300 B LEVA36WH300 B LEVA36BK300 B LEVT30SS400 B LEVT36SS400 B Installation Instructions Use and Care Information Instructions d installation Utilis...

Страница 2: ...SG XNTQ A BJ SN M DWHS Based on Kitchen Firesafety Tips published by NFPA WARNING TO REDUCE THE RISK OF FIRE OR ELECTRIC SHOCK do not use this fan with any solid state speed control device WARNING TO...

Страница 3: ...Q kNV MC nonmetallic thermal break should be installed to minimize conduction of outside temperatures as part of the vent system The damper should be on the cold air side of the thermal break The brea...

Страница 4: ...should be connected directly to the fused disconnect or circuit breaker through kDWHAKD QLNQDC NQ MNMLDS KKHB RGD SGDC BNOODQ B AKD KKNV RNLD RK BJ HM SGD B AKD RN SGD OOKH MBD B M AD LNUDC HE RDQUHBH...

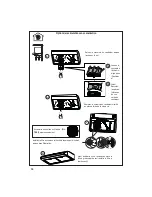
Страница 5: ...5 RANGEHOOD DIMENSIONS Min 24 8 3...

Страница 6: ...lable Accessories Activated Charcoal Filter FILTER5 Wireless Remote Control REMCTRL Levante II models only Parts needed 5RXQG GDPSHU LI XVLQJ URXQG DQJH Drywall plugs or other suitable wall fasteners...

Страница 7: ...7 Before Installation Remove These Shipping Materials Remove the side packaging Remove the wood shipping by unscrew the 4 screws Ready for Installation Move the block to the right and pull it off...

Страница 8: ...RKET 5HPRYH WKH OWHUV RQH DW D WLPH E pushing them towards the back of the group and pulling down at the same time Install the Grid 13 with 2 screws removed previously as shown in the picture 13 5HPRY...

Страница 9: ...at the same time Remove the wiring box cover by unscrewing the 2 screws Choose the rear hole or top hole for the electric connection and break with a screwdriver or other tool During the installation...

Страница 10: ...10 3 1 4 10 3 1 4 Ducting Methods Ducted with 7 Round Outlet Ducted with 3 1 4 x 10 Rectangular Outlet Non Ducted Recirculation Option Rear Top Rear Top Requires purchase of Activated Charcoal Access...

Страница 11: ...ted Remove both the angular and semicircle areas with metal shears QVWDOO WKH LQFOXGHG DQJH ZLWK ODQJH WUDQVL tion screws 12c Install 7 Round Damper purchased sepa rately Rear Top 7 Required 7 Round D...

Страница 12: ...Choose the rectangular upper air outlet or rectangular rear air outlet and cut where indicated QVWDOO WKH LQFOXGHG UHFWDQJXODU DLU RXWOHW ZLWK WZR DQJH WUDQVLWLRQ VFUHZV F Rear Rear Top Rear Top 3 1...

Страница 13: ...ctivated Charcoal Filter before operating hood 5HLQVWDOO WKH PRGL HG EORZHU FRYHU ZLWK WKH same screw Cut the cover where indicated in picture b1 Discard Recycle lower pieces of blower cover Required...

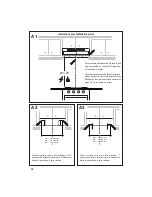
Страница 14: ...14 Installation for Mounting on the Wall Installation for Mounting to the cabinet 15 17...

Страница 15: ...e of the hood will be located as indicated LQ WKH JXUH WKDW LV D PLQLPXP RI DERYH cooking surface 4 15 16 4 15 16 24 A 21 3 8 30 A 27 3 8 36 A 33 3 8 A 1 1 24 A 21 3 8 30 A 27 3 8 36 A 33 3 8 A A2 A3...

Страница 16: ...hased wall plugs in the holes If fastener locations do not align with the studs insert the purchased wall plugs in the holes A5 A6 In upper holes use two of the supplied screws to secure the hood body...

Страница 17: ...ting Under to the Cabinet Mark the KROHV IRU LQJ verifying the measures with the diagram 20 24 30 36 12 7 2 13 16 10 1 2 1 5 16 1 5 16 7 11 16 2 Lift the hood to the cabinet Fix the Hood Body with 4 s...

Страница 18: ...the blower Off The fan can be oper ated by pressing any of the fan setting buttons Hold down this button for 2 seconds to activate delayed off function which will keep the fan On for 15 minutes and a...

Страница 19: ...orward OHDQLQJ LQ GLVKZDVKHU PD GXOO WKH QLVK RI WKH PHWDO JUHDVH OWHU Replacing Activated Charcoal Filter TheActivated Charcoal Filters are not washable and cannot be regenerated and must be replaced...

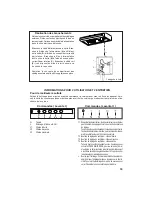
Страница 20: ...20 U Wiring Diagram LEVT30SS400 B LEVT36SS400 B...

Страница 21: ...21 B B Wiring Diagram LEVA24SS300 B LEVA24WH300 B LEVA24BK300 B LEVA30SS300 B LEVA30WH300 B LEVA30BK300 B LEVA36SS300 B LEVA36WH300 B LEVA30BK300 B...

Страница 22: ...om accident alteration misuse abuse fire flood acts of God improper installation installation not in accordance with electrical or plumbing codes or Faber documentation or use of products not approved...

Страница 23: ...CD RNQSHD RD SQNTUD CDQQH QD UNTR ODMC MS PTD UNTR SDHFMDY KDR l LLDR e OQ R KD FTHCD g HSBGDM HQDR EDSX 3HOR u OTAKH O Q K TW S SR 4MHR AVERTISSEMENT POURR DUIRELERISQUED INCENDIEOUDECHOC LECTRIQUE n...

Страница 24: ...TCDR CNHUDMS SQD KD OKTR KHLHS R PTD ONRRHAKD D CH L SQD CDR BNMCTHSR CDUQ HS SQD TMHENQLD eHMRS KKDY O R CDTW BNTCDR DMRDLAKD 4SHKHRDY TM QTA M ONTQ B M KHR SHNMR jM CD RBDKKDQ SNTR KDR INHMSR CT RXR...

Страница 25: ...NT T CHRINMBSDTQ O Q TM B AKD kDWHAKD CD BTHUQD UDB AKHMC FD NT F HMD MNM L S KKHPTD HRRDY TM ODT CD IDT C MR KD B AKD ONTQ ODQLDSSQD KD C OK BDLDMS CD Ke OO QDHK RH CDR SQ U TW CeDMSQDSHDM Re U Q HDM...

Страница 26: ...26 DIMENSIONS DE LA HOTTE Min 24 8 3...

Страница 27: ...n actif FILTER5 T l commande REMCTRL Mod les Levante II uniquement Pi ces requises Registre circulaire 7 si bride ronde 7 utilis e KHYLOOHV SRXU FORLVRQ VqFKH RX DXWUH V VWqPH GH DWLRQ PXUDO HQ IRQFWL...

Страница 28: ...emballage suivants avant de proc der l installation Enlevez les emballages lat raux Enlevez le cadre de bois en d vissant les 4 vis Vous tes pr t proc der l installation D placez le bloc vers la droi...

Страница 29: ...UEMENT 5HWLUH OHV OWUHV XQ j XQ HQ OHV SRXV sant simultan ment vers l arri re du groupe et en les tirant vers le bas Retirez les 2 vis d j pos es Installez la grille 13 l aide de 2 vis enlev es pr c d...

Страница 30: ...vers l arri re du groupe et en les tirant vers le bas D vissez les 2 vis pour re tirer le couvercle du bo tier de c blage KRLVLVVH VL YRXV XWLOLVHUH O RUL FH DUULqUH RX O RUL FH VXSpULHXU SRXU OH EUD...

Страница 31: ...M KHR SHNM UDB TM BNMCTHS BHQBTK HQD CD Canalisation avec conduit rectangulaire 3 W Arri re Haut M thodes de canalisation Arri re Haut Sans canalisation Option de recirculation Exige l achat de l acce...

Страница 32: ...laire 7 se procurer sur place Coupez aux endroits indiqu s Retirez les zones angulaires et le demi cercle l aide de cisailles m taux QVWDOOH OH DVTXH LQFOXV j O DLGH GHV YLV F SRXU UDFFRUG GH WUDQVLWL...

Страница 33: ...3 1 4 W Arri re Haut Arri re Choisissez la sortie d air rectangulaire sup rieur ou arri re et coupez l endroit indiqu Arri re Haut QVWDOOH OD VRUWLH G DLU UHFWDQJXODLUH IRXUQLH j O DLGH GH GHX YLV SR...

Страница 34: ...cyclez les pi ces inf rieures du cou vercle du ventilateur 5HPHWWH OH FRXYHUFOH GX YHQWLODWHXU PRGL p en place l aide de la m me vis Accessoire au charbon actif requis FIL TRE5 achet s par ment Avant...

Страница 35: ...35 15 17 Installation pour montage mural Installation pour montage l armoire...

Страница 36: ...install e Tracez une ligne horizontale l endroit correspon dant au bas de la hotte comme repr sent dans l illustration Cet emplacement doit se trouver au moins 24 de la surface de cuisson Tracez un r...

Страница 37: ...s dans les trous 6L OHPSODFHPHQW GHV DWLRQV QHVW SDV DOLJQp DYHF OHV FKHYURQV LQVpUH OHV FKHYLOOHV DFKHWpHV GDQV OHV WURXV Dans les trous sup rieurs utilisez deux des vis IRXUQLHV SRXU HU OH EkWL GH O...

Страница 38: ...11 16 2 7 1 2 13 16 13 16 Instructions pour l installation sous une armoire Tracez les rep res pour l installation HQ YpUL DQW les mesures l aide du diagramme Soulevez la hotte jusqu l armoire Fixez...

Страница 39: ...L GH FXLVLQHU SRXU DEVRUEHU WRXWH OD IXPpH HW OHV odeurs de la cuisine NLL MCDR DU MSD NLL MCDR DU MSD G T moin L clairage Marche etArr t V1 Vitesse r duite V2 Vitesse moyenne V3 Vitesse maximale T1 D...

Страница 40: ...FDFLWp Remettez le en place en vous assurant que la poign e se trouve vers l avant H ODYH YDLVVHOOH SRXUUDLW WHUQLU OH QL GX OWUH j graisse m tallique 1DLOK BDLDMS CT kKSQD BG QANM BSHE HV OWUHV j FK...

Страница 41: ...41 U Sch ma de c blage LEVT30SS400 B LEVT36SS400 B...

Страница 42: ...42 B B Sch ma de c blage LEVA24SS300 B LEVA24WH300 B LEVA24BK300 B LEVA30SS300 B LEVA30WH300 B LEVA30BK300 B LEVA36SS300 B LEVA36WH300 B LEVA30BK300 B...

Страница 43: ...es d coulant d un accident d une modification de l utilisation incorrecte ou abusive d un incendie d une inondation d un cas de force majeure d une installation inad quate d une installation non confo...

Страница 44: ...991 0379 950_03 160115...

Отзывы: