Faber CRIS36SS300 Скачать руководство пользователя страница 37

37

INSTALE LA CAMPANA

1.Retire la tapa protectora de la campana y colóquela sobre una superficie 

plana. Cubra la superficie para evitar daños accidentales. Retire todas las 

piezas, incluyendo el amortiguador de contraflujo, la rejilla de plástico y el 

paquete de documentación  antes de desechar el cartón. Retirar los filtros 

de grasa y déjelos a un lado.

2.Coloque el amortiguador redondo en la abertura de escape de la campana 

y presione hacia abajo.

FIGURE 5

3.La campana se monta en el armario por medio de dos soportes cargados 

con resortes, uno a cada lado de la campana (FIGURA 6). Levante  la campana 

hasta la abertura de corte en el armario. Tenga cuidado de no dañar el gabinete, l

a campana u otros dispositivos.


RECORTE

PREPARARA EL ARMARIO

1.Desconecte y mueva el rango independiente de la apertura del armario para facilitar 

el acceso al armario superior y a la pared posterior. Coloque una cubierta gruesa y 

protectora sobre las encimeras de cocción, los rangos de ajuste o las encimeras para 

protegerlas de daños o suciedad.

2.Determine y marque claramente con un lápiz la línea central del armario en la pared 

y en la parte inferior del armario, donde se instalará la campana.

3.Si el fondo del armario está empotrado, se deben instalar bloques de madera para 

asegurar una alineación apropiada con el fondo del armario. Los bloques de madera 

deben estar a ras o empotrados de 1/16" a 1/8"  dentro de la parte inferior del armario

como se indica en la FIGURA 4.


FIGURE 4

HAGA LA ABERTURA DE RECORTE (FIGURA 5) DONDE 

SE INSTALARÁ LA CAMPANA.

4.Determine los recortes apropiados para los conductos. Haga todos los cortes 

necesarios en las paredes o armario para los conductos. Instale la red de 

conductos antes de montar la campana.

5.Determine y realice el corte adecuado para el cable de alimentación. 

Utilice una broca de 1 1/4" para hacer este agujero. Pase el cable de suministro 

de energía a través de la pared o el armario. NO encienda la unidad hasta que 

se haya completado la instalación. Use la masilla para sellar alrededor de la 

abertura del cable.


FIGURE 6

4.Los soportes cargados por resorte se ajustan en fábrica para acomodar 

un grosor entre 1 3/16" y 2 1/4". Si el fondo de su armario tiene un grosor 

inferior a 1 3/16", los soportes cargados por resorte se pueden retirar y 

reposicionar desde el ajuste superior hasta el ajuste inferior quitando los 

cuatro tornillos phillips.

5.Apriete la campana al armario girando los tornillos con un destornillador 

phillips.

6.Se incluye una tira de vinilo gris (FIGURA 7) para cubrir la parte inferior 

de cualquier armario expuesto restante. Coloque la tira de vinilo gris en la 

parte inferior trasera de la campana con los tres tornillos provistos. Si es 

necesario, la tira se puede cortar para adaptarse a la profundidad del 

armario.

FIGURE 7

TIRA DE VINILO

25 1/2” - 31 1/2”

10”

25 1/2” - 31 1/2”

13/16”

17 1/2” - 23 1/2”

5 7/8”

TIRAS DE RELLENO DE MADERA

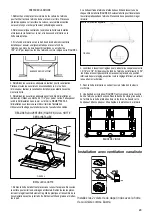
Instalación de ventilación con 

conductos

Instale la aleta del regulador que se incluye con la 

campana extractora como se muestra.

Содержание CRIS36SS300

Страница 1: ...n the bottom This minimum clearance may be higher depending on local building c may be required Overhead cabinets on both sides of this unit must countertop Consult the cooktop or range installation i...

Страница 2: ...RNING TO REDUCE THE RISK OF FIRE OR ELECTRIC SHOCK do not use this fan with any solid state speed control device WARNING TO REDUCE THE RISK OF FIRE ELECTRICAL SHOCK OR INJURY TO PERSONS OBSERVE THE FO...

Страница 3: ...MENTS Determine which venting method is best for your application Ductwork can extend either through the wall or the roof The length of the ductwork and the number of elbows should be kept to a minimu...

Страница 4: ...Check with a qualified electrician if you are in doubt as to whether the rangehood is properly grounded Failure to follow electrical requirements may result in a fire WARNING ELECTRICAL REQUIREMENTS...

Страница 5: ...16 17 1 2 23 1 2 5 7 8 Pre Planning Your Installation Important The recommended height to install this hood off the cooktop is a minimum of 24 and a maximum of 30 for maximum effectiveness Also consu...

Страница 6: ...6 36 RANGEHOOD REAR INFORMATION 30 RANGEHOOD REAR INFORMATION DRAFT 25 MAY 2020 18 52...

Страница 7: ...ise to remove FIGURE 3A Replace all four grease filters Some ductwork must be installed to exhaust the rangehood back into the kitchen either at the top of the cabinet or at the face of the soffit A p...

Страница 8: ...black Filtres charbon Pour les installations non ventil seulement rem placer le charbon de bois filtres au besoin partie FILTER1 R ducteur de CFM Kit Pour r duire cfm 300 cfm ci dessous pour une utili...

Страница 9: ...the wire opening FIGURE 6 3 The spring loaded brackets are factory set to accomo date a thickness between 1 3 16 and 2 1 4 If your cabinet bottom is less than 1 3 16 thick the spring loaded brackets...

Страница 10: ...ssary the front strip can be adjusted by loosening the three phillips screws and sliding the strip up or down Tighten screws when you have the strip properly placed For acustomfrontstrip alocalcabinet...

Страница 11: ...p FIGURE 10 ont strip installed le as accessories ove the three phil E 8 If necessary g the three phillips hten screws when p can make a strip ensions are given 1 15 32 3 4 B USE AND CARE INFORMATION...

Страница 12: ...f operation or more frequently with heavy usage Openthevisorbypullingit RemovetheFilter pushingittowardsthebackoftheunitandatthesame timepullingdownward RemovethesaturatedActivatedCharcoalFilters asin...

Страница 13: ...org VLT org LB WH A GR CN2 WHT WHT BRW BLU 0 1 2 3 SW2 RED 1 2 3 6 5 4 7 8 9 PNK BLU PNK BK BR CN1 RED BRW SIDE INSERT CABLE SW1 BLK 1 2 3 6 5 4 9 8 7 PNK M8 4V BRW ORG M1 WHT BLU BLK GRY 6 3uF Y G WH...

Страница 14: ...ay repair or replace the product or components necessary to restore the product to good working condition Franke Home Solutions Warranty for Franke and Faber Branded Product Effective March 1 2022 In...

Страница 15: ...ents do not include liability for project delays Product replacements are not guaranteed to be exact replacements If the original product is not available at the time of the warranty claim at Franke s...

Страница 16: ...apr sleguide KitchenFiresafetyTips publi parlaNFPAaux tats Unis AVERTISSEMENT POURR DUIRELERISQUED INCENDIEOUDECHOC LECTRIQUE n utilisez jamaisceventilateurenassociationavecundispositifder glagedevite...

Страница 17: ...ezquellem thodedeventilationestmieuxadapt e votreapplication Lesconduitspeuventpasser parlemurouletoit Pour garantir une meilleure efficacit la longueur des conduits et le nombre de coudes doivent tre...

Страница 18: ...hoc lectrique Consultez un lectricien qualifi si vous n tes pas certain de la mise la terre de la hotte Le non respect des exigences de la fiche technique lectrique pourrait entra ner un incendie AVER...

Страница 19: ...installation Important Il est recommand d installer cette hotte une distance d au moins 24 de la surface de cuisson et une distance maximale de 30 pour une efficacit optimale Reportez vous galement a...

Страница 20: ...20 INFORMATIONS ARRI RE HOTTE 36 INFORMATIONS ARRI RE HOTTE 30 DRAFT 25 MAY 2020 18 52...

Страница 21: ...e de vinyle 1 documentation Pour des r sultats satisfaisants la canalisation ne devrait pas tre sup rieure l quivalent de 50 pieds si la canalisation est r alis e avec le conduit circulaire minimum de...

Страница 22: ...black Filtres charbon Pour les installations non ventil seulement rem placer le charbon de bois filtres au besoin partie FILTER1 R ducteur de CFM Kit Pour r duire cfm 300 cfm ci dessous pour une utili...

Страница 23: ...monter la hotte 5 D terminez les ouvertures ad quates pour le c ble d alimentation et r alisez les Utilisez une m che de 1 1 4 pour percer ce trou Faites passer le c ble d alimentation dans le mur ou...

Страница 24: ...ge the front strip remove the three phil lipsscrewslocatedbehindthestrip FIGURE8 Ifnecessary the front strip can be adjusted by loosening the three phillips screws and sliding the strip up or down Tig...

Страница 25: ...f when the visor is closed For Best Results Starttherangehoodseveralminutesbeforecookingtodevelop FIGURE 10 ont strip installed le as accessories ove the three phil E 8 If necessary g the three philli...

Страница 26: ...plus souvent en cas d utilisation intensive Ouvrez le panneau coulissant en le tirant Retirezlefiltre enlepoussantsimultan mentversl arri re de l appareil et en le tirant vers le bas Retirezlesfiltre...

Страница 27: ...org VLT org LB WH A GR CN2 WHT WHT BRW BLU 0 1 2 3 SW2 RED 1 2 3 6 5 4 7 8 9 PNK BLU PNK BK BR CN1 RED BRW SIDE INSERT CABLE SW1 BLK 1 2 3 6 5 4 9 8 7 PNK M8 4V BRW ORG M1 WHT BLU BLK GRY 6 3uF Y G W...

Страница 28: ...ts d taill es dans le pr sent document chacune une garantie et collectivement les garanties Les produits doivent tre correctement install s conform ment aux instructions d installation de Franke dans...

Страница 29: ...Product replacements are not guaranteed to be exact replacements If the original product is not available at the time of the warranty claim at Franke s option the product replacements will be of simi...

Страница 30: ...cia una salida Basado en Consejos para luchas contra los incendios en las cocinas publicado por NFPA ADVERTENCIA PARAREDUCIRELRIESGODEDESCARGASEL CTRICASOINCEN DIOS nouseesteventiladorconning ndisposi...

Страница 31: ...de los requisitos de ventilaci n puede provocar un incendio ADVERTENCIA REQUISITOSDEVENTILACI N Determinequ m tododeventilaci nesmejorparasuaplicaci n Losconductospuedenexten derse a trav s de la par...

Страница 32: ...calificado si tiene dudas acerca de si la campana est correctamente conectada a tierra El incumplimiento de los requisitos el ctricos puede provocar un incendio ADVERTENCIA REQUISITOS EL CTRICOS Sere...

Страница 33: ...revia de su instalaci n Importante La altura recomendada para instalar esta campana arriba de la encimera es de un m nimo de 24 y un m ximo de 30 para una eficacia m xima Tambi n consulte la recomenda...

Страница 34: ...34 CAMPANA 36 INFORMACI N POSTERIOR CAMPANA 30 INFORMACI N POSTERIOR DRAFT 25 MAY 2020 18 52...

Страница 35: ...sa de metal al cuerpo de la campana Retire los 4 tornillos que sujetan la carcasa del ventilador a la carcasa de metal Gire el soplador 90 grados hacia la parte posterior y luego g relo 180 grados Ase...

Страница 36: ...filtros de carb n seg n sea necesario parte FILTER1 FILTER1LL Kit reductor de CFM Para reducir la cfm a menos de 300 cfm para uso en ambientes de aire de reposici n parte CFMRED Amortiguador de aire d...

Страница 37: ...rte inferior del armario como se indica en la FIGURA 4 FIGURE 4 HAGA LA ABERTURA DE RECORTE FIGURA 5 DONDE SE INSTALAR LA CAMPANA 4 Determine los recortes apropiados para los conductos Haga todos los...

Страница 38: ...ont strip installed Optional black and white strips are available as accessories for purchase To change the front strip remove the three phil lipsscrewslocatedbehindthestrip FIGURE8 Ifnecessary the fr...

Страница 39: ...nd shut off when the visor is closed For Best Results Starttherangehoodseveralminutesbeforecookingtodevelop FIGURE 10 ont strip installed le as accessories ove the three phil E 8 If necessary g the th...

Страница 40: ...tensivo Abra la visera tirando de ella Retire el filtro empuj ndolo hacia la parte posterior de la unidad y al mismo tiempo tirando hacia abajo Retire los filtros saturados de carb n activado como se...

Страница 41: ...ED org VLT org LB WH A GR CN2 WHT WHT BRW BLU 0 1 2 3 SW2 RED 1 2 3 6 5 4 7 8 9 PNK BLU PNK BK BR CN1 RED BRW SIDE INSERT CABLE SW1 BLK 1 2 3 6 5 4 9 8 7 PNK M8 4V BRW ORG M1 WHT BLU BLK GRY 6 3uF Y G...

Страница 42: ...o de Franke o Faber de acuerdo con las garant as espec ficas del producto que se detallan en este documento cada una una Garant a y colectivamente las Garant as Los productos deben ser instalados corr...

Страница 43: ...ot guaranteed to be exact replacements If the original product is not available at the time of the warranty claim at Franke s option the product replacements will be of similar size material and value...

Страница 44: ...991 0526 707_11 230510 D000000004196_10...

Отзывы: