


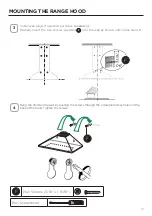


12
Draw a horizontal line where indicated at the bottom edge of the vent hood at the
desired height above the cooking surface.
Place a bracket
E
on the wall as shown about 1/8" from the ceiling or upper limit,
aligning the centers(notch) with the vertical reference line and mark the wall at the
centers of the holes in the bracket.
Place the second bracket
E
on the wall as shown, below the first bracket, at the
height of the upper chimney section
D
supplied and aligning the centers(notch) with
the vertical line.
Mark the wall at the centers of the holes in the bracket and mark the point 1 and 2 for
the Hood Body installation as show (7 1/16" from the horizontal line and 5 1/2" from
the vertical line).
Drill ø 5/16" holes at all the centers points marked (point 1,2,3,4,5,6) as shown.
MOUNTING RANGE HOOD ON WALL
2
x6
x6
7
1/16
”
5
1/2”
´
>
´
5
1/2”
´
´
E
D
E
D
Содержание CLASSICA PLUS CLPL30SSV2
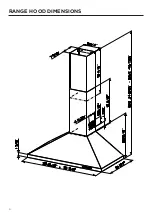
Страница 6: ...6 RANGE HOOD DIMENSIONS...
Страница 7: ...7 MIN 24 OVER ELECTRIC MIN 30 OVER GAS INSTALLATION HEIGHT REQUIREMENTS Min 30 Min 24...
Страница 22: ...22 WIRING DIAGRAM 120V 60Hz...
Страница 29: ...29 DIMENSIONS DE LA HOTTE...
Страница 30: ...30 MIN 24 AU DESSUS DE L LECTRICIT MIN 30 SUR GAZ EXIGENCES EN MATI RE DE HAUTEUR D INSTALLATION Min 30 Min 24...
Страница 45: ...45 SCH MA DE C BLAGE 120 V 60 Hz...
Страница 52: ...52 DIMENSIONES DE LA CAMPANA EXTRACTORA...
Страница 53: ...53 M N 24 SOBRE EL CTRICO M N 30 SOBRE GAS REQUISITOS DE ALTURA PARA LA INSTALACI N M n 30 M n 24...
Страница 68: ...68 DIAGRAMA DE CABLEADO 120V 60Hz...
Страница 71: ...71...
Страница 72: ...991 0687 417_01 220824 D00008874_00...


